by Tashreef Shareef
Tashreef Shareef is a software developer turned tech writer. He discovered his interest in technology after reading a tech magazine accidentally. Now he writes about everything tech from… read more
Updated on February 15, 2022
- Not a PNG file Photoshop error can be problematic, since it will prevent you from working with PNG files.
- To make sure that Photoshop is running error-free, we advise you to keep it always up to date.
- Another way to fix this problem is to resave the image and try to open it again.
- If you’re still getting Adobe Photoshop Not a PNG file error, you should reset your settings to default.

Adobe Photoshop is an industry standard when it comes to image editing and manipulation software for the Windows platform. Photoshop supports all the image formats from jpg to png.
However, some users have reported that they are not unable to work with any images due to a Not a PNG file error. If the user clicks on OK, the image doesn’t load into the Work area.
This is a common error and we have compiled a list of possible fixes to resolve it on a Windows computer.
Why Photoshop won’t open PNG files?
1. Update Photoshop
Photoshop constantly gets updated with new features and better compatibility, so you will need to update it to the latest version in order to take advantage of these new features.
Adobe Photoshop is the most recognized image editor in the world, and to maintain its spot at the top, Adobe is constantly adding new features to it. Here are some examples of the latest features to look forward to if you update Adobe Photoshop to the latest version:
- Support for mobile devices
- Enhanced Content-Aware Fill
- Improved Lens blur with the new GPU-based algorithm
- Faster image processing
2. Check and Change the File Extension
- Navigate to the folder where the problematic image is saved.
- Right-click on the image and select open with Notepad.
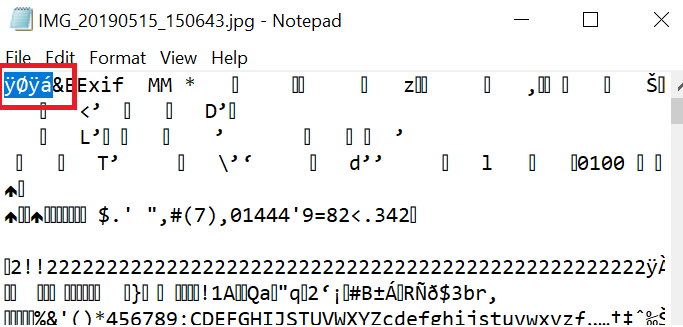
- Check what the first character says. If it says ÿØÿá it means it is a jpg image. If it says ‰PNG it means it is a PNG image.
- Now if it says ÿØÿá it means you need to change the image extension to jpg.
- Open, File Explorer. Make sure the File Name Extensions box is checked.
- Right-click on the image and select Rename. Now change the file extension from png to jpg.
- Now try to open the file in the Photoshop to see if the error is resolved.
This is a simple solution but it can help you to determine the cause of the Not a png file error in Photoshop.
3. Resave the image as PNG
- Navigate to the folder where the PNG image is saved.
- Right-click on the image and open with Paint.
- In the Paint app, click on File > Save As.
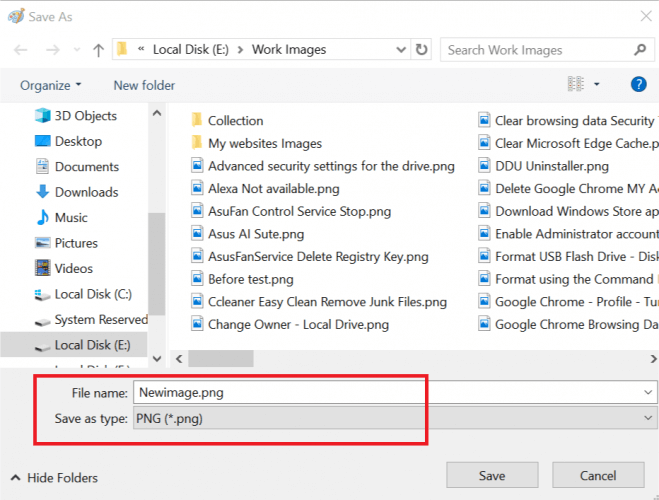
- Save the image as a png file.
- Now try to open the image in Photoshop and check for any improvements.
Although this is a workaround, it will ensure that your file is saved as a PNG and by using it you should circumvent the Not a png file error in Adobe Photoshop.
4. Disable Use of Graphic Processor
- Launch Photoshop.
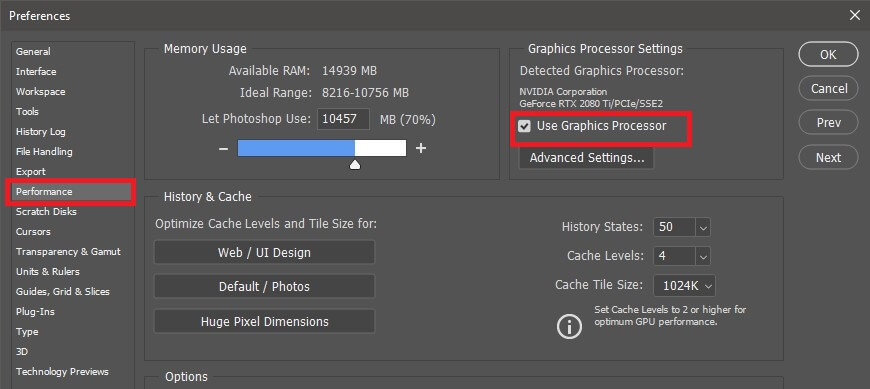
- Go to Edit >Preferences >Performance
- In the Performance tab, uncheck Use Graphics Processor
- Quit and relaunch Photoshop
- Drag and drop the problematic image onto the Workarea and check if the PNG file error is resolved
You may need to use Graphic Processor for other 3D-related tasks, but several users reported that by disabling this feature they fixed the Not a png file Photoshop error.
5. Reset Photoshop Preferences
- Launch Photoshop
- Click on Edit > Preferences
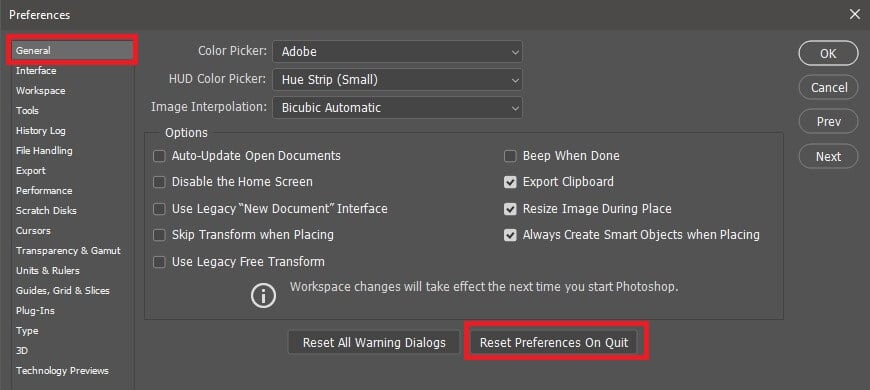
- In the General tab, click on Reset Preferences on Quit
- Quit Photoshop and reboot the computer.
- Launch Photoshop and try to access the image that was giving the error to see if resetting the preferences resolve the error.
Adobe Photoshop Not a png file error will prevent you from working with PNG files, but hopefully, you managed to fix it after reading this guide.
Still experiencing issues?
SPONSORED
If the above suggestions have not solved your problem, your computer may experience more severe Windows troubles. We suggest choosing an all-in-one solution like Fortect to fix problems efficiently. After installation, just click the View&Fix button and then press Start Repair.
![]()
Оглавление:
- Почему Photoshop не открывает файлы PNG?
- 1. Обновление фотошопа
- 2. Проверьте и измените расширение файла
- 3. Сохранить изображение как PNG
- 4. Отключите использование графического процессора
- 5. Сброс настроек Photoshop
Видео: Микромир 🔝 Барбоскины 🔝 Новая серия | 195 | Премьера! 2023
Adobe Photoshop является отраслевым стандартом, когда он поставляется с программным обеспечением для редактирования и обработки изображений для платформы Windows. Photoshop поддерживает все форматы изображений от JPG до PNG. Однако некоторые пользователи сообщают, что они не могут работать с изображениями из-за ошибки в файле PNG. Если пользователь нажимает кнопку «ОК», изображение не загружается в рабочую область.
Это распространенная ошибка, и мы составили список возможных исправлений для ее устранения на компьютере с Windows.
1. Обновление фотошопа
- Запустите Adobe Photoshop.
- Перейдите в « Справка» и выберите « Обновления».
- Проверьте наличие доступных обновлений. Загрузите и установите обновление.
- Перезагрузите систему и проверьте, нет ли улучшений.
Обновление от Creative Cloud
- Нажмите на значок Creative Cloud на панели задач.
- Выберите Проверить наличие обновлений приложения.
- На вкладке Все приложения проверьте, есть ли в Photoshop доступное обновление.

- Нажмите на кнопку Обновить, чтобы обновить Photoshop.
2. Проверьте и измените расширение файла
- Перейдите в папку, в которой сохранено проблемное изображение.
- Щелкните правой кнопкой мыши на изображении и выберите открыть с помощью Блокнота.

- Проверьте, что говорит первый персонаж. Если он говорит ÿØÿá, значит, это изображение в формате jpg. Если он говорит ‰ PNG, это означает, что это изображение PNG.
- Теперь, если он говорит ÿØÿá, это означает, что вам нужно изменить расширение изображения на jpg.
- Открыть, Проводник. Убедитесь, что флажок Расширения имени файла установлен.
- Щелкните правой кнопкой мыши по изображению и выберите « Переименовать». Теперь измените расширение файла с png на jpg.
- Теперь попробуйте открыть файл в фотошопе, чтобы увидеть, устранена ли ошибка.
Мы много писали о проблемах Photoshop в Windows 10. Ознакомьтесь с этими руководствами для получения дополнительной информации.
3. Сохранить изображение как PNG
- Перейдите в папку, в которой сохранено изображение PNG.
- Щелкните правой кнопкой мыши по изображению и откройте с помощью Paint.
- В приложении Paint выберите Файл> Сохранить как.

- Сохраните изображение как файл png.
- Теперь попробуйте открыть изображение в фотошопе и проверить наличие улучшений.
4. Отключите использование графического процессора
- Запустите Photoshop.
- Перейдите в « Правка» > « Настройки».
- Выберите спектакли.
- На вкладке «Исполнения» снимите флажок « Использовать графический процессор » в нижней части экрана.

- Выйдите и перезапустите Photoshop.
- Перетащите проблемное изображение на рабочую область и проверьте, устранена ли ошибка файла PNG.
Возможно, вам придется использовать графический процессор для других задач, связанных с 3D. Поэтому убедитесь, что вы включили эту опцию после редактирования изображения.
5. Сброс настроек Photoshop
- Запустите Photoshop.
- Нажмите на Edit и выберите Preferences.
- В окне настроек нажмите « Сбросить настройки при выходе ».
- Выйдите из Photoshop и перезагрузите компьютер.

- Запустите Photoshop и попробуйте получить доступ к изображению, которое сообщало об ошибке, чтобы увидеть, если сброс настроек устранит ошибку.
![Ошибка Photoshop, а не файл png [техническое исправление]](https://img.compisher.com/img/fix/865/photoshop-error-not-png-file.jpg "Ошибка Photoshop, а не файл png [техническое исправление]")
I found the solution.
Today I got this very same problem. I tried to open a .png file I dowloaded from the internet in my PS to use as a reference. All I got was the «Not a PNG file» box.

I’m using Win10, and the photo viewer shows the image with no problem. However, Photoshop didn’t let me to open it.
davescm had a good hunch on what was going on:
Hi
Open the file with a text editor/hex editor and see what the first characters say. Those first characters show the file type.
For png they will be ‰PNG , for jpeg ÿØÿá
I opened it in notepad, and fairly enough the start of the file read ÿØÿá meaning it was a .jpg file. So the extension was wrong.
I went to the file explorer, and turned on the file name extensions:

Now I can see the incorrect .png in the end
and I just changed it into .jpg instead.

Clicked Yes and tadah! Now it works!
Hopefully this will help someone having the same issue!
Photoshop is one of the most important tools for content creators worldwide and works flawlessly most of the time. However, a lot of people have been getting the Not a PNG file Photoshop error and due to this, they are unable to load certain media into their Photoshop workspace. In this article, we have dedicated ourselves to fixing this issue and have compiled numerous solutions in order to do so.

We have also compiled a list of reasons due to which this error occurs in the first place so make sure to go through the whole article to develop a better understanding of this issue. Also, carefully follow all the solutions in the given order until your issue has been resolved.
What Causes the “Adobe Photoshop Not a PNG File” Error?
After going through some solutions, we concluded that the following are some of the most important triggers due to which this error occurs in the first place.
- Outdated Software: Sometimes, the Photoshop version that you are using might have been outdated due to which you are running into the “Not a PNG File Photoshop” Error. Therefore, we recommend that you follow the first fix below and update your Adobe Photoshop software to the latest available version.
- File Type: It is possible that the “.png” file that you are trying to load into Photoshop has been incorrectly classified as a “.jpg” file by writing a certain portion into its information due to which this error message is being triggered. This can be fixed by making certain amendments to it inside the notepad as indicated in the solution below.
- Photoshop Preferences: The “Not a PNG File Photoshop” Error is sometimes triggered if the Photoshop preferences aren’t deleted when you last closed the software and have been loaded into this new session gain. Therefore, we recommend that you try and delete the Photoshop preferences and then check to see if this issue still occurs.
- Use of Graphics Processor: In certain cases, the Graphics Processor or the GPU installed on your computer might be used by the Adobe Photoshop application to enhance certain features and speed. However, this can sometimes trigger the “Not a PNG File” error and prevent the file from being loaded into the interface.
- Incorrect Compression: It is also possible that the Image compression hasn’t been properly completed on the file due to which Photoshop is facing issues while loading it into its interface. In order to fix this, you can redo the compression onto the image using your browser and then save it from there which should fix the compression issue and successfully load it into your Adobe Photoshop interface.
Now that you have learned about the reasons behind this issue, we can finally move on towards fixing the Not a PNG File error.
Before You Start:
If you’ve encountered this issue on Macbook then before proceeding towards the fixes indexed beneath, try to open the suspect file in “Preview.app” and afterward select “File -> Save” and the correct extension will be applied to the image automatically. If doing this didn’t fix the issue for you then check whether you’re running the latest version of macOS because numerous people reported that an old version of macOS on their respective machines triggered this problem.
Solution 1: Update Photoshop
- In order to update Photoshop, launch the “Creative Cloud App” from the taskbar.
- Then select the “Updates” icon from the left panel and find Photoshop in the “All Apps” tab.
- Click on the “Update” option in the blue box next to the Photoshop icon. The program will get downloaded and updates would be automatically installed for Photoshop.

Updating Photoshop - After updating, launch Photoshop now to see if the photoshop not a png file issue gets resolved.
Solution 2: Change File Type
- Right-click on the image showing the “Not a .png File” error and select “Open With Notepad” from the context menu.
- Navigate to the first character or word in notepad and carefully observe it. If it says ÿØÿá then you need to alter the file extension otherwise, you can skip this method.

Observe Characters - Close notepad, launch the File Explorer and then checkmark the box associated with “File Name Extensions”.
- Now right-click on the faulty image and select “Rename” from the context menu.
- Finally, change the image name and extension from jpg to .png and try opening in Photoshop again to check if the issue is settled now.
Solution 3: Make Alteration In The File Type
- Right-click on the image showing the “Not a .png File” error and select “Open with->Paint” from the context menu.
- Next click on the “File” option at the top left corner of the screen and select the “Save as” button.
- In the “Save as” window, click on the “Save as Type” option from the dropdown menu and then select “.PNG(*.png)”. Afterward, press the Enter key or choose the “Save” option.

Saving Image as PNG - Try opening the edited image in Photoshop and see if the adobe photoshop not a png file problem is resolved now.
Solution 4: Disable Use of Graphic Processor
- Open Photoshop, click on the “Edit” option, and select “Preferences”.

Clicking on Preferences - After that, click on the “General” tab and afterward choose the “Performance” option from the left menu panel and uncheck the box associated with “Use Graphic Processor”.

Uncheck Graphic processor Box - Save the changes made, restart Photoshop, and reload the image in Photoshop again to check whether not a png file photoshop 2018 issue gets resolved.
Solution 5: Reset Photoshop Preferences
- Launch Photoshop, click on the “Edit” option and select “Preferences”.
Clicking on Preferences - Then click on the “General” tab from the left menu panel, select the “Reset Preferences On Quit” button and close Photoshop.

Reset Preferences On Quit - Restart your PC and reload the image in Photoshop now.
Solution 6: Reinstall Photoshop
- Press “Window + R” keys simultaneously from your keyboard to open the Run Prompt. Type the “appwiz.cpl” command in the Run Prompt and hit the Enter key.

Typing “appwiz.cpl” - Locate “Photoshop” from the list of installed programs, then right-click on it and select “Uninstall” from the context menu.

Uninstalling Photoshop - Wait while Window uninstalls the program for you and then proceed to the installation process again.
- Launch the “Creative Cloud” desktop application or web app and sign in to your account. Make sure you enter the correct credentials.
- Next click on the “Search” icon, type “Photoshop” and select the “Download” option next to the Photoshop icon to start the downloading process.
- Once the download is complete, click on the downloaded file and follow the on-screen instructions for a successful installation.
Solution 7: Utilize a Third Party Software
You can use a third-party application to open any sort of image. First of all, download the “Irfanview” application through this link. Then launch the application and open the image in the application. The program will automatically ask you to change the extension to the correct one. Save the edited image and now try opening it in Photoshop once again.
Solution 8: Save Image via Browser
- Open your browser and drag the faulty image to the browser. Wait for a while until the browser opens up the file for you.
- Right-click on the image and select “Save as” from the context menu.
- Click on the dropdown next to “Save Image as” and then select “PNG”.
- Rename your image, press the “Save” button and proceed to Photoshop and try opening this new file there to rectify adobe photoshop not a png file issue.
Solution 9: Rotate and Resave the Image
- Open the faulty image and zoom in by clicking on the magnifying icon at the top.
- Rotate the image by pressing “Ctrl + R” keys simultaneously from the keyboard, then proceed to the next image and close the photo viewer.
- Now reopen the same image and rotate it back to its original orientation.
- Try using this image again in Photoshop and check whether not a png file photoshop error gets resolved.
Solution 10: Save Image in PSD Format
- If you are sure that your image file is not corrupted, then try opening it on another PC.
- Attach a flash drive to your computer and copy the same file into another PC.
- Now open the image file on this computer and save it on the flash drive as a “.psd” file.
- Remove the flash drive from this PC, reattach it to your original computer, copy the file to desktop and reopen it again in Photoshop.
Solution 11: Tweak the App Settings
- Launch the Photoshop application and click on the “File” option at the top left corner of the screen. Then select “Open” from the menu.

Clicking on Open Option - After that, select your image file and click on the dropdown at the bottom right corner of the “Open” window.
- Select “All Files” from the dropdown menu and click on the “Open” button and the image should now open up normally.
Workaround:
Even after following all of the above steps you aren’t able to rectify photoshop not a png file issue then you should download the “Paint.Net” by clicking here and install it by following the on-screen instructions. After the successful installation of the firmware open the image in Paint.Net and click on the “Save As” option to save it as a new file. After saving that image, open photoshop and try to open the new file with Photoshop.
Proper implementation of the aforementioned solutions will take you through the resolution of this error but if the issue still persists you can Contact Us here for further assistance.

Alan is a hardcore tech enthusiast that lives and breathes tech. When he is not indulged in playing the latest video games, he helps users with technical problems that they might run into. Alan is a Computer Science Graduate with a Masters in Data Science.
Вы здесь: Главная / Ошибка фотошопа Не файл PNG [TECHNICIAN FIX]
Adobe Photoshop является отраслевым стандартом, когда он поставляется с программное обеспечение для редактирования и обработки изображений для Windows Платформа, Photoshop поддерживает все форматы изображений от JPG до PNG. Однако некоторые пользователи сообщают, что они не могут работать с изображениями из-за ошибки в файле PNG. Если пользователь нажимает кнопку «ОК», изображение не загружается в рабочую область.
Это распространенная ошибка, и мы составили список возможных исправлений для ее устранения на Windows компьютер.
1. Обновить фотошоп
- Презентация Adobe Photoshop.
- Перейдите на Помощь и Обновления.
- Проверьте наличие доступных обновлений. Загрузите и установите обновление.
- Перезагрузите систему и проверьте, нет ли улучшений.
Обновление от Creative Cloud
- Нажмите на Creative Cloud значок на панели задач.
- Выберите Проверьте наличие обновлений приложения.
- В разделе Все приложения На вкладке проверьте, есть ли в Photoshop обновление.

- Нажмите на Обновление ПО кнопка для обновления Photoshop.
2. Проверьте и измените расширение файла
- Перейдите в папку, в которой сохранено проблемное изображение.
- Нажмите правой кнопкой мыши на изображение и выберите открыть с Блокнот.

- Проверьте, что говорит первый персонаж. Если это говорит Yoya это означает, что это изображение JPG. Если это говорит ‰ PNG это означает, что это PNG изображения.
- Теперь, если это говорит Yoya это означает, что вам нужно изменить расширение изображения на jpg.
- Открыто, Проводник Убедитесь в том, Расширения имени файла флажок установлен.
- Нажмите правой кнопкой мыши на изображение и выберите Переименовать. Теперь измените расширение файла с PNG в JPG.
- Теперь попробуйте открыть файл в фотошопе, чтобы увидеть, устранена ли ошибка.
Мы много писали о проблемах Photoshop на Windows 10, Проверьте эти руководства для получения дополнительной информации.
3. Сохранить изображение как PNG
- Перейдите в папку, в которой сохранено изображение PNG.
- Щелкните правой кнопкой мыши на изображение и откройте с помощью Покрасить.
- В разделе Покраска приложение, нажмите на Файл> Сохранить как.

- Сохраните изображение как PNG .
- Теперь попробуйте открыть изображение в фотошопе и проверить наличие улучшений.
4. Отключить использование графического процессора
- Запустите Photoshop.
- Перейдите на Редактировать >Предпочтения.
- Выберите Представления.
- Снимите флажок на вкладке «Исполнения»Использовать графический процессор»В нижней части экрана.

- Выйдите и перезапустите Photoshop.
- Перетащите проблемное изображение на рабочую область и проверьте, устранена ли ошибка файла PNG.
Вам может понадобиться использовать графический процессор для других задач, связанных с 3D. Поэтому убедитесь, что вы включили эту опцию после редактирования изображения.
5. Сброс настроек Photoshop
- Запустите Photoshop.
- Нажмите на Редактировать и Предпочтения.
- В окне настроек нажмите «Сбросить настройки при выходе».
- Выйдите из Photoshop и перезагрузите компьютер.

- Запустите Photoshop и попробуйте получить доступ к изображению, которое сообщало об ошибке, чтобы увидеть, если сброс настроек устранит ошибку.
Оригинал статьи