When you’re browsing online, encountering an error message that prevents you from accessing a website is incredibly frustrating. One such error is the ‘DNS_PROBE_FINISHED_BAD_CONFIG’ message. It can occur regardless of your browser or Operating System.
If you run into this error when trying to open a site, don’t panic. It simply means that the Domain Name System (DNS) wasn’t able to resolve the IP address properly, which can happen for a variety of reasons.
Fortunately, as with most DNS-related issues, there are some simple solutions you can try to fix this problem.
In this article, we’ll explain what the DNS_PROBE_FINISHED_BAD_CONFIG error code means and some common causes of it. Then we’ll walk you through seven solutions for fixing it in Windows, macOS, Android, and Ubuntu.
Let’s get started!
What Is the DNS_PROBE_FINISHED_BAD_CONFIG Error?
To understand what this error means, it’s helpful to first get a general idea of the important role the DNS plays in helping users access websites. In a nutshell, the DNS directs traffic on the internet and is responsible for translating and connecting nameservers, URLs, and IP addresses with web servers.
All websites have unique IP addresses, such as 218.3.120.12. Rather than requiring you to memorize and enter the IP address any time you want to visit a website, the DNS makes it so you can use a more user-friendly domain name, such as kinsta.com.
When you input the URL into your browser, it begins the process known as DNS name resolution. This is where the DNS essentially looks up the URL/IP address and connects it with a web server. However, if for whatever reason the DNS is not able to successfully complete this process, it can return an error message instead.
DNS_PROBE_FINISHED_BAD_CONFIG is a network connection error that displays when there is a problem with the DNS configuration, which prevents it from connecting to a network. It is not specific to any one browser or system, meaning you could come across it in Google Chrome, Windows, or macOS, on an Android mobile device, etc.
Similar DNS Error Messages
A DNS error message occurs when your DNS or network settings are misconfigured. The DNS_PROB_FINISHED_BAD_CONFIG error is just one of them, and there are other similar messages you may run across.
For example, you might see the DNS_PROBE_FINISHED_NXDOMAIN error:
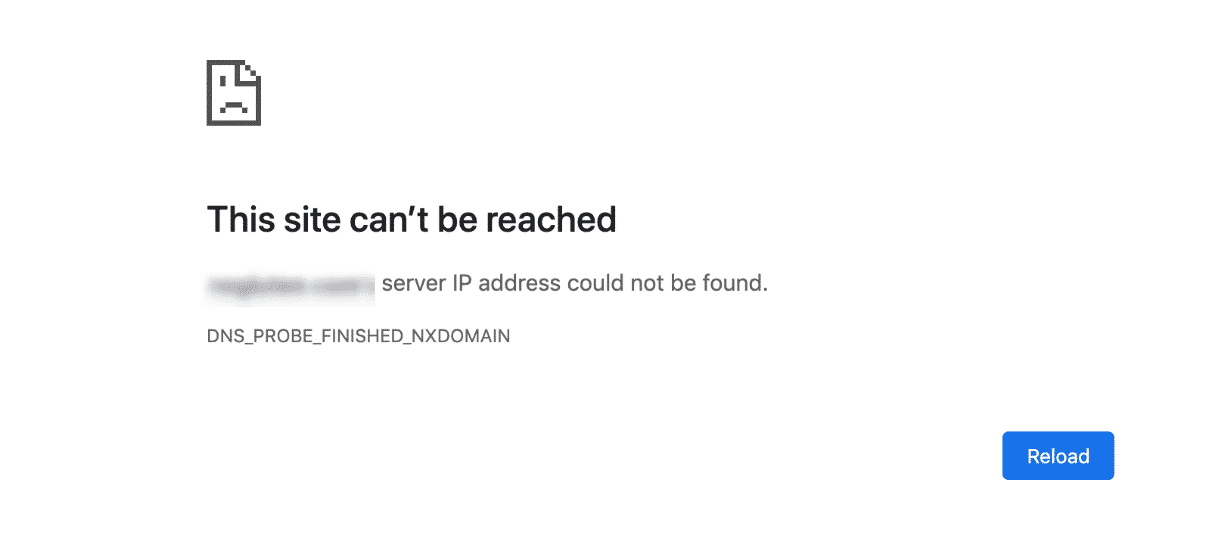
In this error message, “NXDOMAIN” stands for “Non-Existent Domain”. In other words, the domain name that was queried doesn’t exist.
Another similar DNS error is DNS_PROBE_FINISHED_NO_INTERNET:
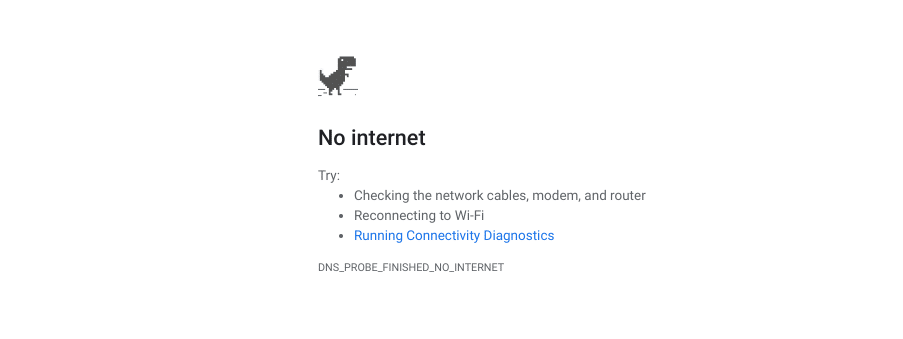
This error message indicates that a problem occurred while establishing an internet connection, or that the connection was lost.
Any of the above DNS errors can vary depending on the browser you’re using. So your message might also include phrases such as:
- This web page is not available.
- This site can’t be reached.
- Safari can’t find the server.
- We’re having trouble finding the site/web page.
- There is no internet connection.
As you can see, although they’re slightly different, all of these errors indicate a DNS or network misconfiguration. Therefore, they share many of the same solutions, as we’ll see shortly.
Common Causes of DNS_PROBE_FINISHED_BAD_CONFIG
While there are a handful of reasons you might be seeing this message, the good news is that you can at least narrow it down to a DNS or network issue. Some of the most common causes of DNS_PROBE_FINISHED_BAD_CONFIG include:
- Network settings that were accidentally changed
- Router settings changed through an unauthorized app
- Browser plugin(s), such as a VPN app, interfering or messing with the IP or DNS address
- Problematic firewall or antivirus software
- Corrupted files on your device
It’s also possible that the underlying issue is much simpler. For example, the error message may stem from a malfunctioning internet cable or a website that’s temporarily down.
How to Fix the DNS_PROBE_FINISHED_BAD_CONFIG Error Code (7 Ways)
Now that you have a better idea of what this error means, it’s time to get to work.
Before attempting any of the following solutions, we recommend first making sure your internet cables, modem, and router are properly connected. It’s also smart to refresh the web page, just to make sure there wasn’t a temporary glitch with the connection.
Once you eliminate those options, you’re ready to dive in. Let’s take a look at seven potential solutions you can use to fix the DNS_PROBE_FINISHED_BAD_CONFIG error.
1. Restart Your Router
Even if your router is securely hooked up, it may need a quick reboot to reset the IP address. Therefore, the first step is to restart your router.
To do so, simply hold down the power. After leaving it off for at least one minute, power it back on. While it’s restarting, you may also want to restart your computer.
Once both devices are back on, connect to your Wi-Fi or LAN network and try accessing the website again. If you’re still seeing DNS_PROBE_FINISHED_BAD_CONFIG, it’s time to move on to the next method.
2. Clear Your Browser Cache
While this likely isn’t what’s causing the DNS error, it doesn’t hurt to eliminate it as an option. You might want to first try accessing the website from a different browser than the one you’re currently using.
If you can do so successfully, the next logical solution is to clear the cache of the problematic browser.
The process for doing so will look slightly different, depending on your OS and browser. For detailed guidance, you can refer to our post on how to clear your browser cache.
3. Flush the DNS Cache and Renew Your IP Address
If there was a change recently made to your DNS, whether maliciously or accidentally, your system could be trying to use the local cache to connect to the network.
When this is the case, it makes sense that you might receive the DNS_PROBE_FINISHED_BAD_CONFIG message.
Therefore, the next solution to try is flushing your DNS cache, as well as releasing and renewing your IP address. If you’re using Windows 7 or Windows 10, you can do this through the Command Prompt app.
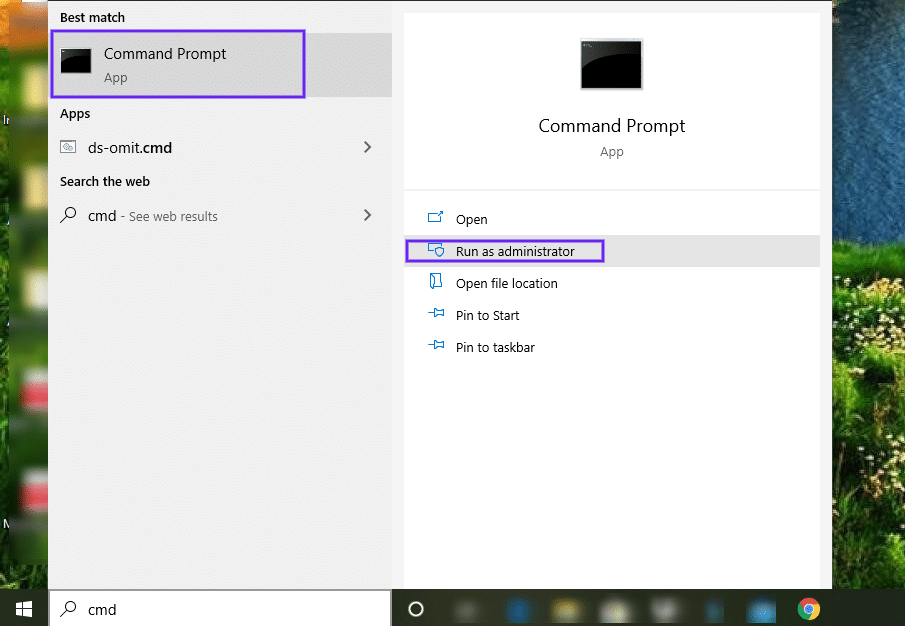
To open Command Prompt, click on the Windows icon/Start button and type “cmd” into the search field. Under Command Prompt, select Run as administrator:
In the Command Prompt window, type in the following commands, hitting the Enter key after each:
ipconfig /flushdns
ipconfig /release
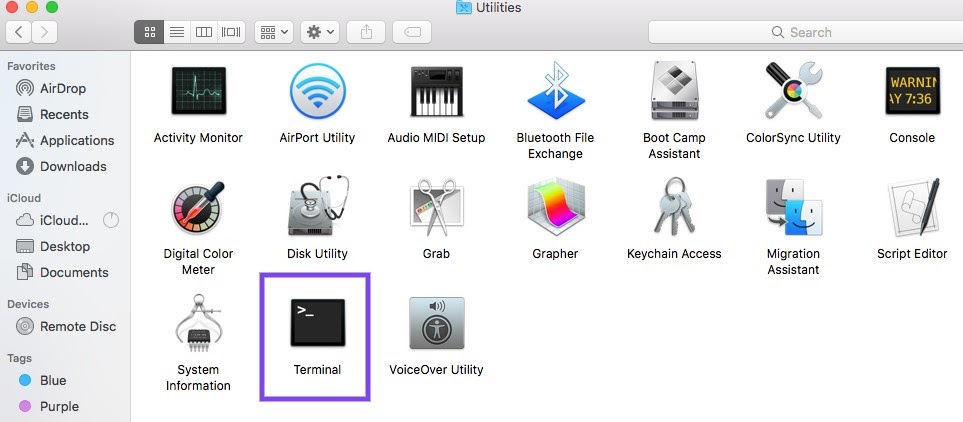
ipconfig /renewOn macOS, you can do this through the Terminal command-line interface. To locate it, click on the Apple icon, followed by Applications > Utilities > Terminal:
In the Terminal interface, the specific command you’ll use varies depending on your macOS version:
-
sudo killall -HUP mDNSResponder(macOS v10.11 or later)
-
sudo discoveryutil mdnsflushcache(Yosemite v10.10 through v10.10.3)
-
sudo killall -HUP mDNSResponder(Mavericks, Mountain Lion and Lion)
-
sudo dscacheutil -flushcache(Snow Leopard)
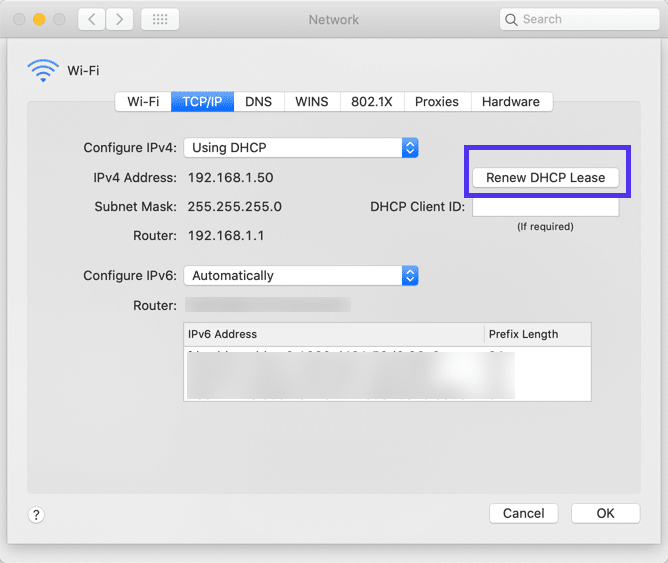
To release and renew the IP address, navigate to the Apple menu icon > System Preferences > Network > Advanced > Renew DHCP:
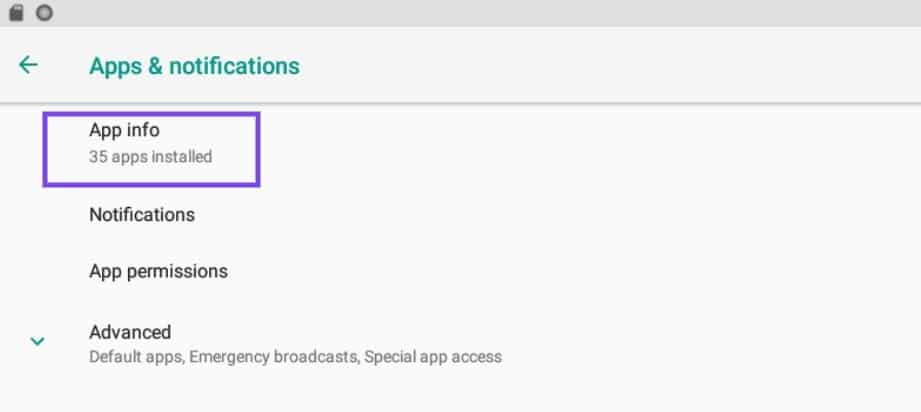
If you’re using an Android device, you can clear your DNS cache by going to Settings > Applications > App info:
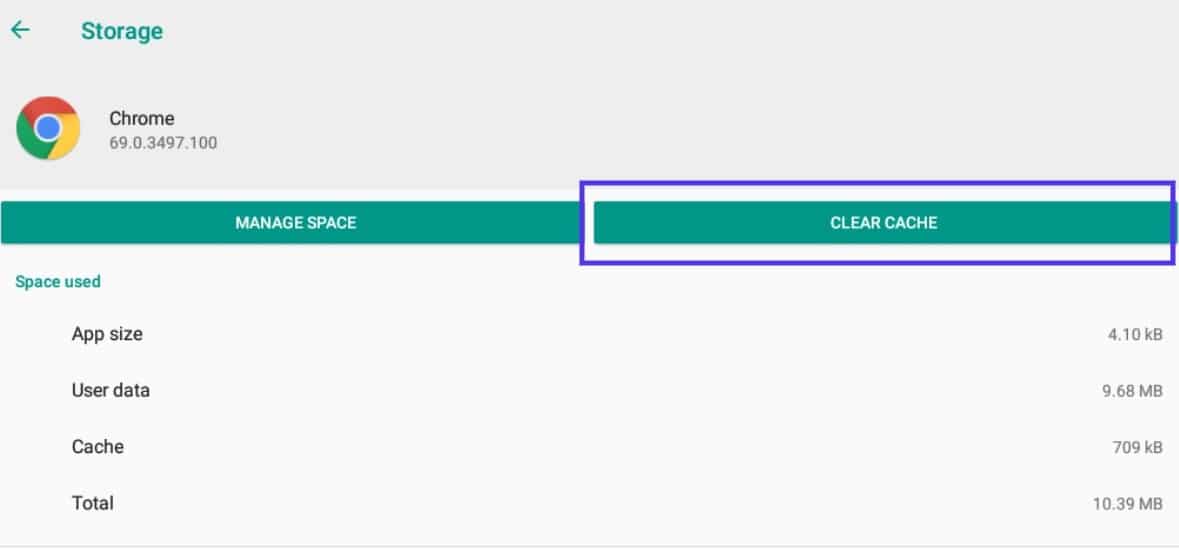
From the list of apps, select Chrome (or whatever browser app you’re using), followed by Storage. On the Storage page, click on the Clear Cache button:
Ubuntu users can launch the command Terminal by pressing CTRL + ALT + T, and then input the following command:
sudo systemd-resolve --flush-cachesFor more detailed guidance, refer to our guide on how to clear your DNS cache.
4. Manually Change the DNS Settings
If you’re still seeing the DNS_PROBE_FINISHED_BAD_CONFIG error message in your browser, the next thing you can try is changing your DNS settings. Your ISP assigns DNS servers by default.
However, you can temporarily switch to a public DNS server such as Google.
To do this in Windows, right-click on the network icon in the bottom right-hand corner of your screen, then select Open Network and Sharing Center.
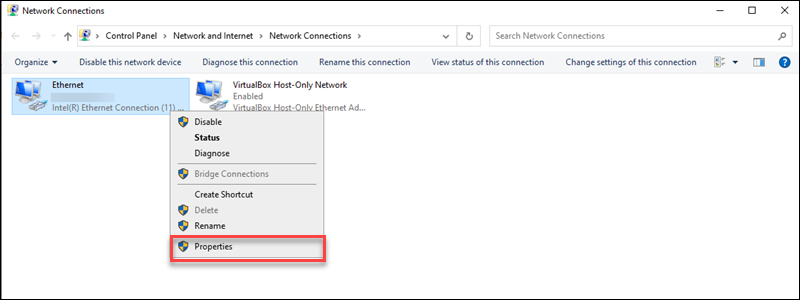
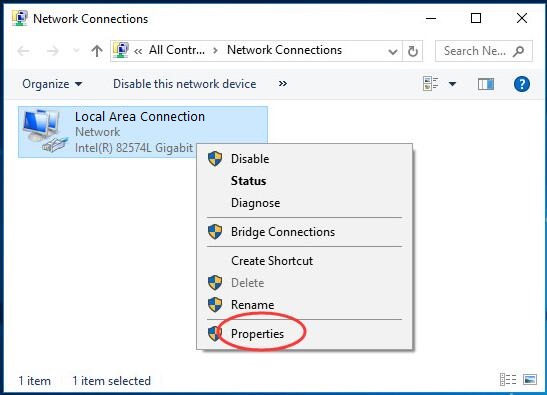
Once the Network window opens, right-click on your network connection and select Properties from the drop-down menu:

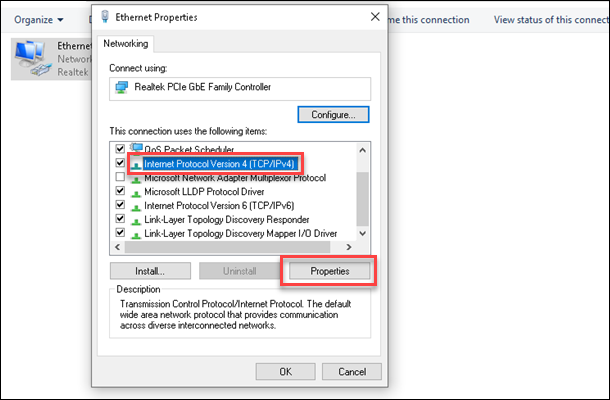
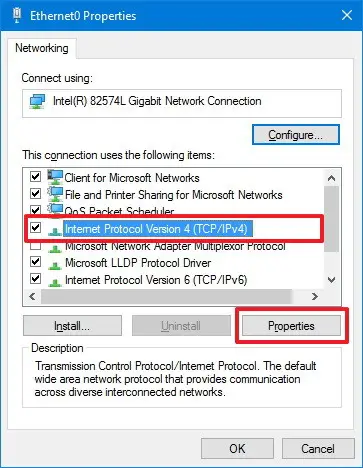
In the panel that opens, under the Networking tab, select “Internet Protocol Version 4 (TCP/IPv4)” followed by the Properties button:
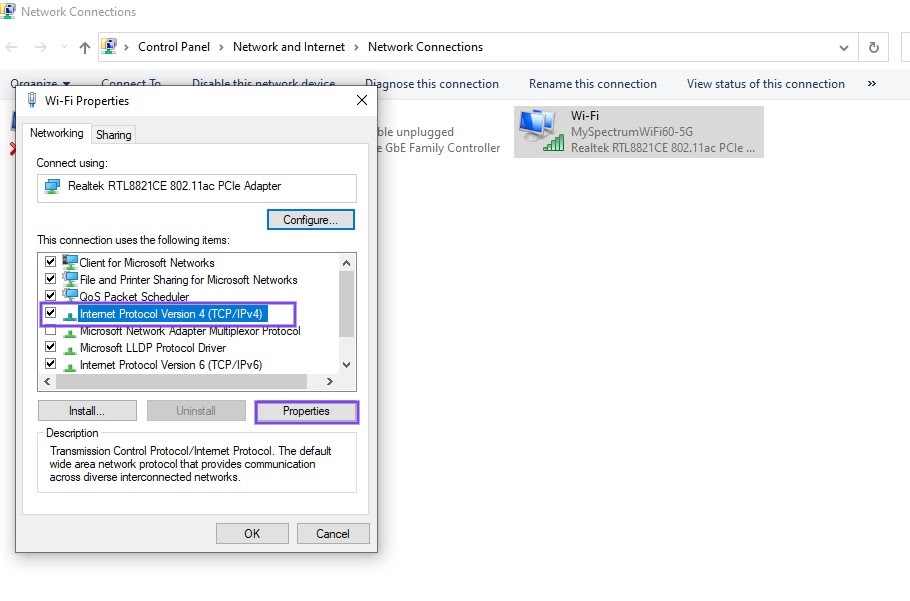
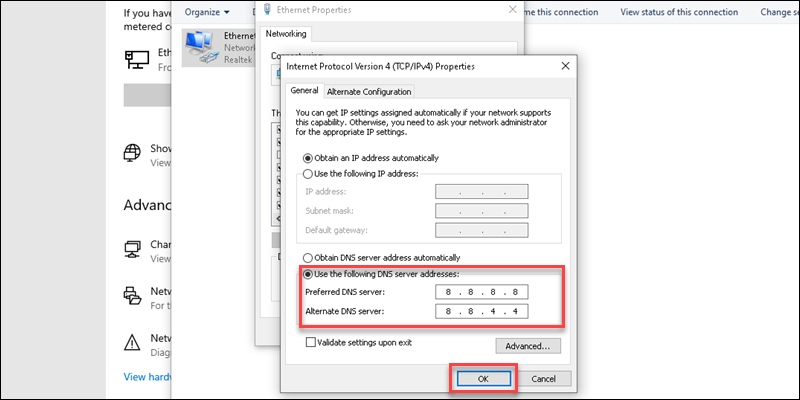
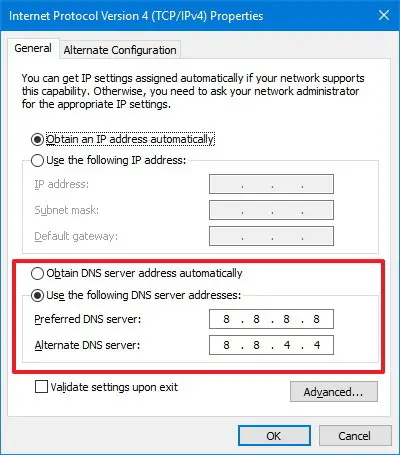
Under “Use the following DNS server addresses”, enter the following:
- Preferred DNS Server: 8.8.8.8
- Alternate DNS Server: 8.8.4.4
When you’re done, click OK. Refresh your browser and try accessing the website again.
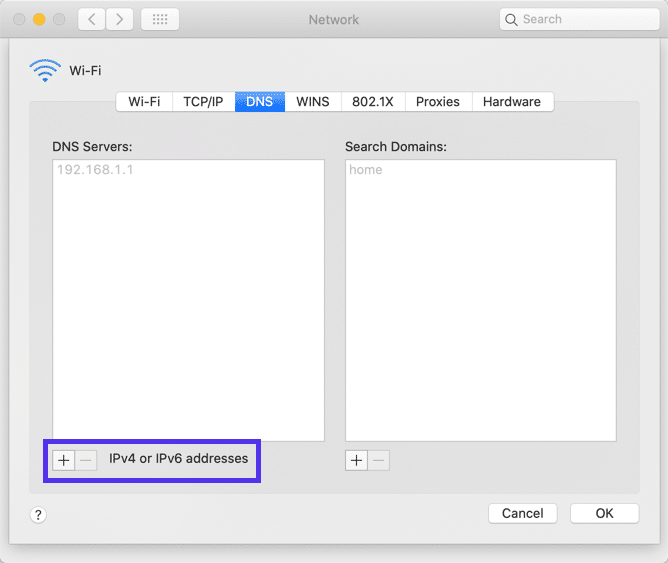
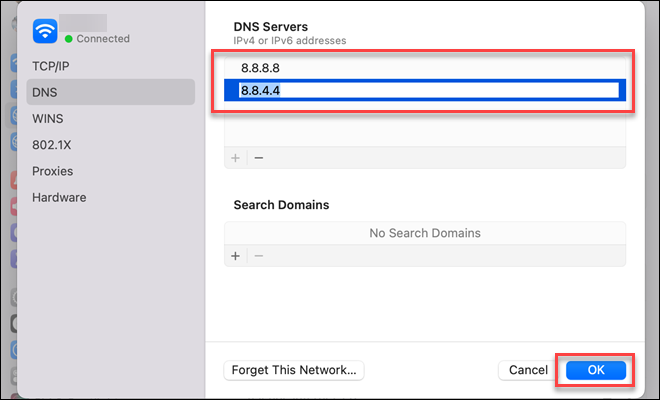
To change your DNS settings for macOS, click on the Apple menu icon, followed by System Preferences > Network. Select your network connection. You can add the new DNS addresses by clicking on the (+) icon:
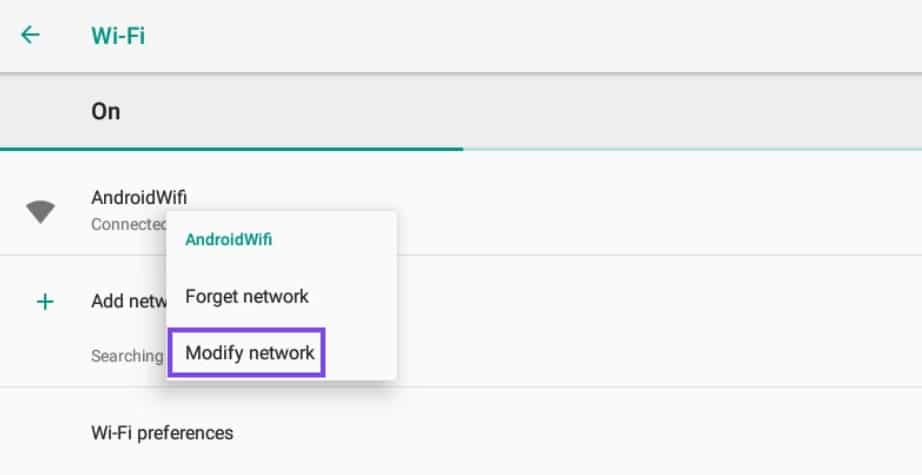
Android users can locate this option by navigating to Settings > WiFi. Press and hold the network, then click on Modify network:
Click on Advanced options, then under IP settings, select Static:
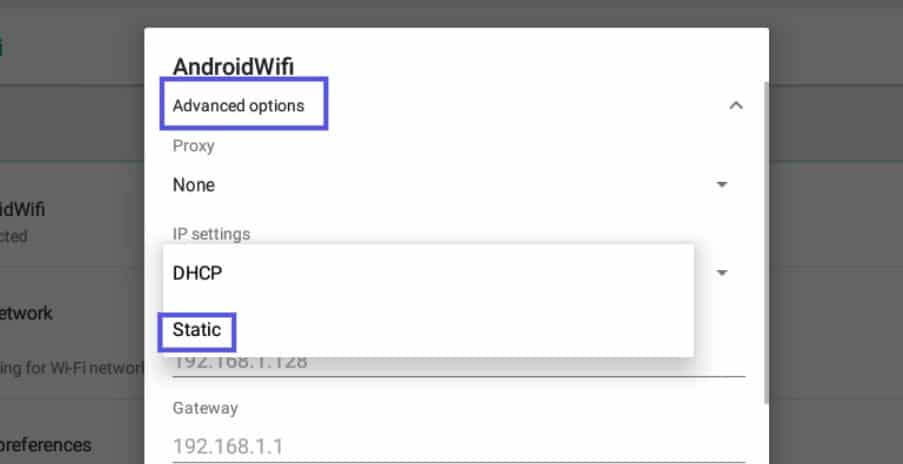
Enter the IP addresses into the respective fields, and save your changes.
If you’re running Ubuntu OS, you can change your DNS settings by clicking on the gear icon next to your network. Under IPv4 tab, there will be a text field to enter new DNS server addresses:

After you enter them, separating each with a comma, click on the Apply button.
5. Trash Temporary Files
Most browsers and systems will save temporary files to your device to use later.
However, if one of those files is corrupted, it may be what’s causing the DNS_PROBE_FINISHED_BAD_CONFIG error. Therefore, another solution we recommend is deleting your temporary files.
To do this in Windows, type “%temp%” into the search field along your desktop toolbar, and then hit Enter:

This will bring you to the “temp” directory on your computer, where you can view a list of temporary files:
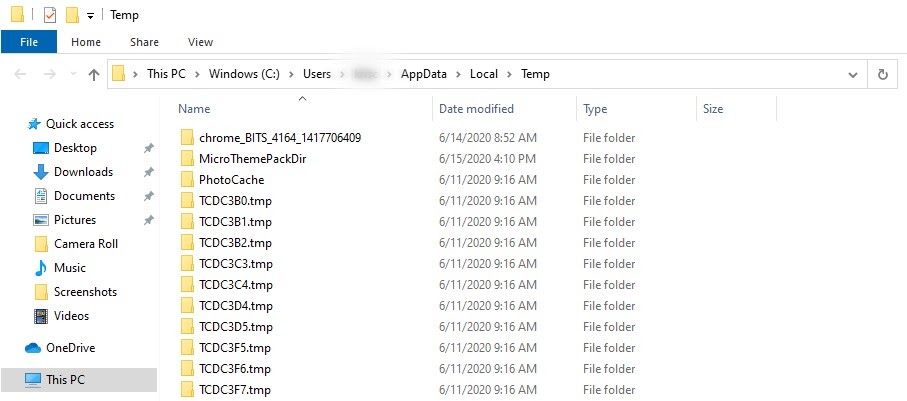
Select all of them and delete them.
On macOS, you can do this by first clicking on Finder and selecting Home (this may be your username instead). Next, hit cmd + shift + . (the period key). This should make your hidden files visible, so you can delete them.
Alternatively, you can try opening Finder and using the Shift + Cmd + G keys. Then, in the text field of the window that opens, enter “~Library/caches”, followed by Enter. This should show you the relevant folders, which you can then delete.
Ubuntu users can skip this step entirely, since the /tmp folder is automatically emptied every time the system is rebooted.
6. Disable Antivirus Software and Firewalls
One of the common issues with antivirus software, firewalls, and VPNs is that they can sometimes conflict with network settings. More specifically, they can interfere with your DNS servers.
Therefore, if you’ve reached this point and the DNS_PROBE_FINISHED_BAD_CONFIG error persists, your next course of action should be to temporarily disable your antivirus software and firewall applications.
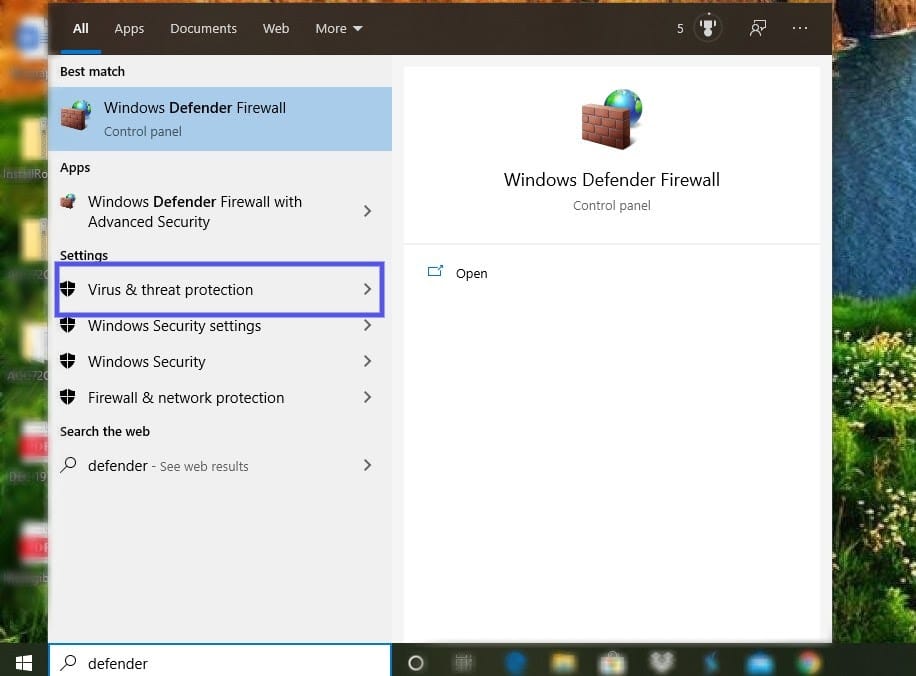
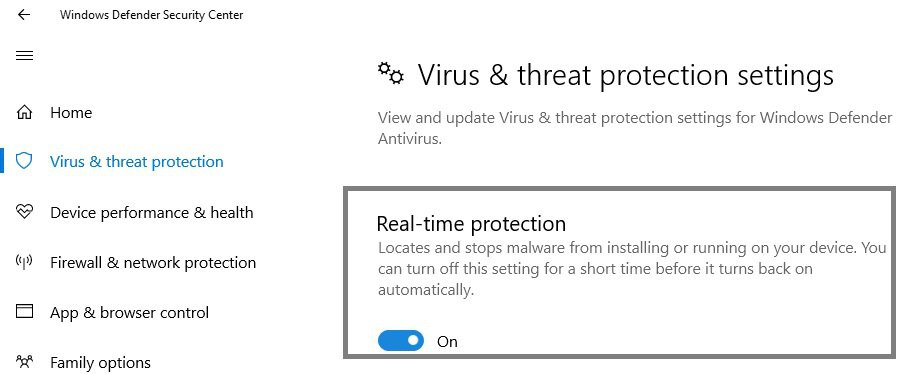
Here’s an example using Windows. Click on the Windows icon, then typing “defender” into the search field. Click on Virus & threat protection:
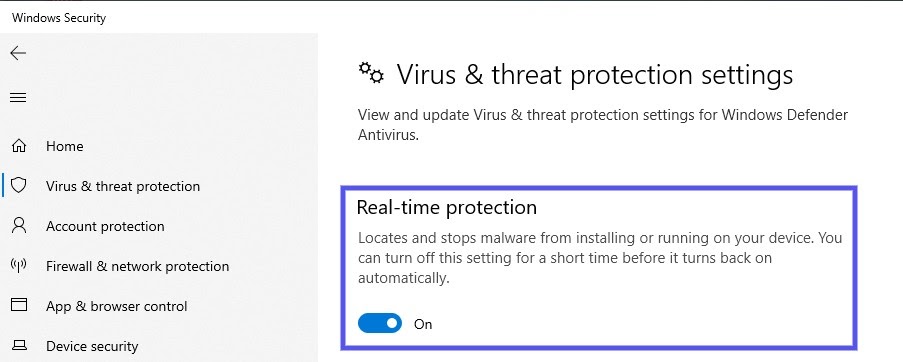
Navigate to Real-time protection, and toggle the switch to Off:
When you’re finished with that, in the left-hand panel, click on Firewall & network protection > Domain network:
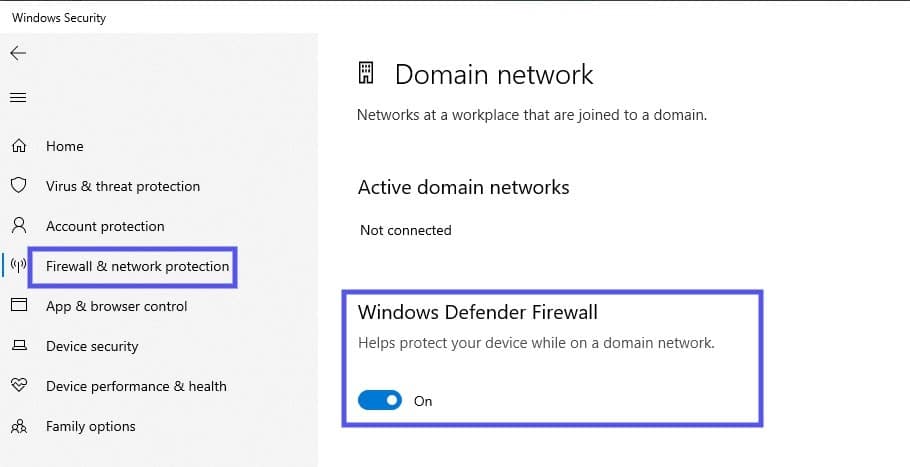
Under Windows Defender Firewall, toggle the switch to disable it. Now try accessing the website again.
Of course, the process for doing this will vary based on what system you’re using, as well as what antivirus and firewall software you have installed. If in doubt, check out the developer documentation for your specific software for more details.
You may also want to disable any WordPress security plugins you’re using, on the off chance that they’re causing an issue while you’re working on your website.
7. Update Your Network Drivers
If you’ve made it to this point on the list, it’s likely because you’re still seeing the DNS_PROBE_FINISHED_BAD_CONFIG error message after trying the above fixes. Fortunately, we have one more solution to try: updating your network drivers.
Outdated or corrupted network drivers can cause a variety of issues, including DNS and network interruptions. Windows Updates typically handle the necessary updates for you. However, you can double-check to see whether you can upgrade to the latest version manually.
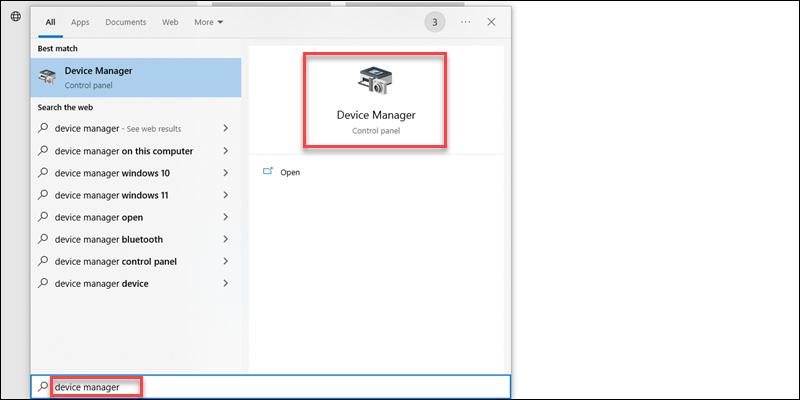
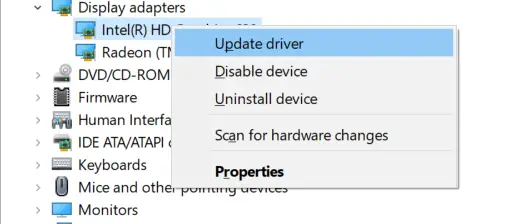
To do so, type “device manager” into the search field of your taskbar, then click on the Device Manager control panel:
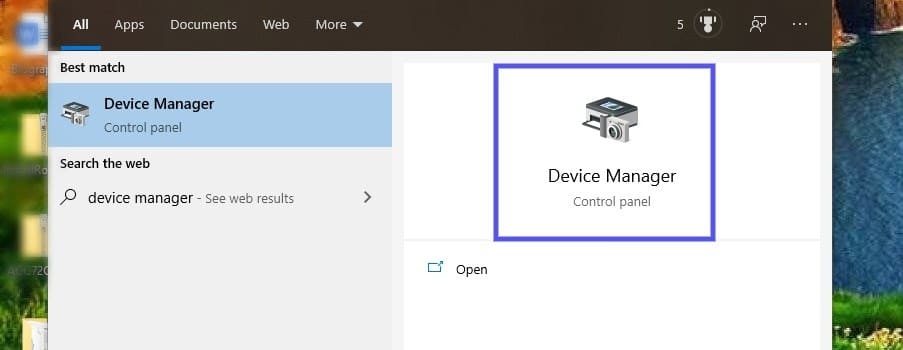
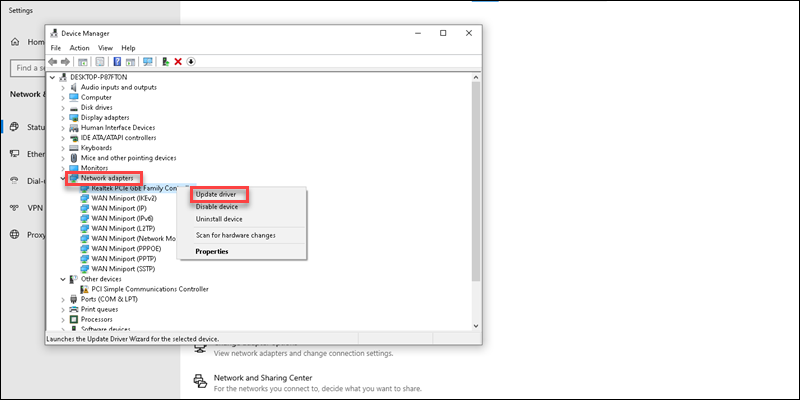
Click on Network adapters, then right-click on the network driver and select Update driver:

Restart your computer, and then try accessing the website again. You should no longer see the DNS_PROBE_FINISHED_BAD_CONFIG message!
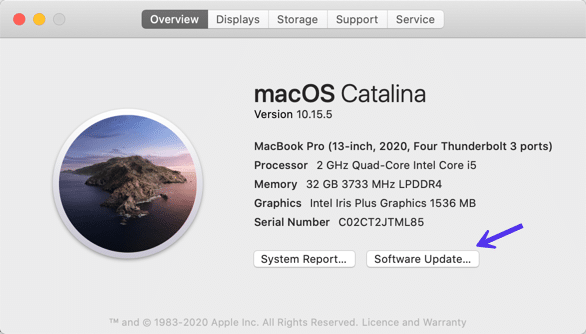
Apple handles system and driver updates as well, so this isn’t something you usually have to worry about on macOS. However, if you want to make sure your system is updated, you can do so by navigating to the Apple menu icon > About this Mac and then clicking on Software Update:
If you’re using Android, you can update your device by going to Settings > About Phone/Tablet/Phone/System > System Updates. The path may look slightly different, depending on the type of device you’re using and your version of Android.
Are you experiencing the DNS_PROBE_FINISHED_BAD_CONFIG error? Well, it means there’s an incorrect DNS configuration preventing access to a web page🚪. Here are 7 ways to fix the issue! ✌️Click to Tweet
Summary
There’s nothing fun about trying to access a website, only to find yourself staring at an error message. While irritating, DNS errors are actually quite common.
Fortunately, they’re also relatively easy to resolve and if you’re dealing with the DNS_PROBE_FINISHED_BAD_CONFIG error, here’s how to fix it:
- Restart your router.
- Clear your browser cache.
- Flush the DNS cache and renew your IP address.
- Manually change the DNS settings.
- Trash temporary files.
- Disable antivirus software and firewalls.
- Update your network drivers.
If you’re a frequent internet user, chances are you’ve encountered the DNS_PROBE_FINISHED_BAD_CONFIG error message. This error can prevent you from accessing websites and can be quite frustrating.
You also might get confused especially if you’re not familiar with DNS (Domain Name System). Which, is a critical component of internet browsing that translates website domain names into IP addresses, allowing you to access the internet.
When you encounter the “DNS_PROBE_FINISHED_BAD_CONFIG” error, there’s no need to worry or panic. This error simply indicates a problem with your DNS configuration, and your DNS is unable to resolve the IP address due to various possible reasons.
But the best part is, like other DNS issues, this DNS_PROBE_FINISHED_BAD_CONFIG error can also be easily fixed with only some simple troubleshooting methods.
In this article, we’ll comprehensively discuss every point related to the “DNS_PROBE_FINISHED_BAD_CONFIG” error, including its meaning, causes, and solutions.
So stay tuned and keep reading this post.
Read Similar DNS errors: 🚩 How To Fix DNS_PROBE_FINISHED_NXDOMAIN Error?
To better understand what actually DNS_PROBE_FINISHED_BAD_CONFIG Error means? It is better you must understand the role of DNS first.
- DNS directs traffic on the internet and connects nameservers, URLs, and IP addresses with web servers.
- Websites have unique IP addresses, which can be difficult to remember for all the sites you want to visit. Fortunately, DNS comes to the rescue by making domain names user-friendly and easy to remember.
- When a user inputs a URL into their browser, the DNS begins the process of DNS name resolution to connect it with a web server.
- If the DNS is unable to complete this process successfully, it can return an error message.
DNS_PROBE_FINISHED_BAD_CONFIG is an error message that appears in web browsers when they are unable to access a website due to a problem with the DNS configuration.
It means that the browser was unable to resolve the IP address of the website you’re trying to access. This can happen due to a misconfiguration in your network settings, your router settings, or due to an issue with your ISP’s DNS server.
Note: The DNS_PROBE_FINISHED_BAD_CONFIG error can occur on various browsers and devices, including Google Chrome, Android, iOS, macOS, and Windows. It is not restricted to a particular platform.
What Are The Causes of DNS_PROBE_FINISHED_BAD_CONFIG Error:
The “DNS_PROBE_FINISHED_BAD_CONFIG” error can occur due to various reasons. Here are some common causes:
- Misconfigured DNS Settings: This is the most common cause of the error. If your DNS settings are not configured correctly, your device won’t be able to connect to the internet. This can happen due to incorrect settings or outdated information.
- Outdated Browser: An outdated browser may not be compatible with the latest DNS settings, leading to the error. Make sure to update your browser regularly to avoid this issue.
- Antivirus or Firewall Interference: Sometimes, antivirus or firewall software can interfere with your DNS settings and cause an error. Disable your antivirus or firewall temporarily and check if the issue persists.
- DNS Server Issues: The server you’re trying to connect to may be down or not responding. You can try changing your DNS server to a different one to see if it resolves the issue.
Read: 🚩 How To Fix “DNS Server Not Responding” Error? (12 Methods)
How to Fix DNS_PROBE_FINISHED_BAD_CONFIG Error?
A DNS-related error can trigger due to a variety of reasons, and it would be difficult for you to figure out the exact cause. Hence, the best thing you can do is to try troubleshooting DNS issues directly which can help you to fix DNS_PROBE_FINISHED_BAD_CONFIG Error.
Here are the steps to troubleshoot and fix the “DNS_PROBE_FINISHED_BAD_CONFIG” error:
- Restart your Internet Device or Router
- Purge your Browser’s DNS cache
- Check DNS Settings
- Change DNS Server
- Reset IP and Flush DNS Cache
- Update Network Drivers
- Delete Temporary files
- Disable Antivirus or Firewall
- Scan your System for any malware
- Check Browser Extensions
1. Restart your Internet device or Router
Although your internet device or router may be working fine, one of the quickest and easiest ways to check and fix the DNS_PROBE_FINISHED_BAD_CONFIG error is by restarting it and renewing the IP address.
To do this, simply turn off your router or internet access device for a few minutes, and then turn it back on. Meanwhile, you can also restart your system. Once both devices are turned on, connect your system or PC to the LAN or Wi-Fi and try to access the website. Check if the error has been resolved or not.
2. Purge your Browser’s DNS cache
Browsers are designed to cache DNS records in order to deliver faster response times. Therefore, over time, these DNS records may get corrupted and can be responsible for triggering the DNS_PROBE_FINISHED_BAD_CONFIG error.
Clearing your browser’s cache can resolve the DNS_PROBE_FINISHED_BAD_CONFIG error caused by corrupted DNS records, as browsers cache DNS records to deliver faster response times. However, before trying this troubleshooting method, try accessing the website on an alternate browser.
If you can access the website on an alternate browser, then you should proceed to clear the DNS cache of the faulty browser.
Note: Since Chrome has a major Browser market share, here
On various operating systems including Windows, macOS, and Linux, if you use Google Chrome as your web browser, you have the option to use the feature chrome://net-internals/#dns to clear the DNS cache within the Chrome browser.
Read: 🚩 How to fix the DNS_PROBE_STARTED Error? [8 Ways]
All you have to do is,
Step 1: Open your Chrome Browser
Step 2: Enter the chrome://net-internals/#dns to the chrome address bar and hit the “Enter” button to open the interface.
Step 3: Now click the Cler Host cache button as shown in the picture.
 3")
Step 4: After that restart Chrome and go to the link chrome://net-internals/#sockets to flush the socket pools.
 4")
You have successfully been able to flush the DNS cache in Chrome. The above method also works on various platforms and devices such as Windows, Linux, macOS, Android, and iPhone or Ipad.
3. Check DNS Settings
To Check your DNS settings and ensure the settings are up to date and accurate. The following steps outline the process of reviewing DNS settings on a Windows system:
Step 1: Open the Command Prompt > Type “ipconfig /all” and hit enter.
 5")
Step 2: Now Locate the ” DNS servers ” entry to make sure your DNS settings are accurate.
Step 3: If the displayed DNS servers are incorrect, recheck your DNS settings in the “Network and Sharing Center”.
 6")
Step 4: Now Type “nslookup WPOven.com” and hit enter button.
 7")
Step 5: Now confirm that the displayed IP addresses are correct.
 8")
If you receive an error message something like “Host not found,” it may indicate an issue with your DNS servers. Consider changing to a different DNS server and try again.
4. Change DNS servers
For Windows 10 and Windows 11 users:
Step 1: If you are Windows 10 or 11 User, you have to open the control panel by simply typing “Control Panel” in the search bar.
Step 2: In the Control Panel select Network & Internet > Network and Sharing Center.
Step 3: From the menu on the left, select Change adapter settings.
Step 4: Right-click on your network and select Properties.
Step 5: In the window that opens, click on Internet Protocol Version 4 (TCP/IPv4) from the list, then select Properties again.
 9")
Step 6: Click on Use the following DNS server addresses.
Step 7: Enter “8.8.8.8” for the Preferred DNS server and “8.8.4.4” for the Alternate DNS server.
 10")
Step 8: Click on the OK button to save your changes.
Step 9: Close all the windows and try re-accessing the website to see if the error is still present.
If the problem persists, you may need to try other solutions. However, changing your DNS address can often resolve internet connection issues.
For MacOS users:
Step 1: First, navigate to the System Preferences on your Mac. You can find this by clicking on the Apple icon in the top-left corner of your screen, then selecting “System Preferences“.
 11")
Step 2: Once you’re in System Preferences, locate the “Network” icon and click on it. From there, select the network connection that you want to modify (e.g., Wi-Fi or Ethernet).
Step 3: In the Network settings, you should see a button labeled “Advanced“. Click on that, and then navigate to the “DNS” tab.
 12")
Step 4: Here’s where you’ll add the DNS server addresses. Click on the “+” button at the bottom-left of the DNS settings window, and then type in the IPv4 address for Cloudflare’s DNS servers: 1.1.1.1. Press enter, then repeat the process to add another address: 1.0.0.1.
Step 5: Finally, click “OK” to save the changes you’ve made. You should now be all set with your new DNS settings!
5. Reset IP and Flush DNS Cache
The DNS cache stores recent DNS lookup results on a computer or device. It improves the speed and efficiency of web browsing and other network-related tasks by avoiding the need to perform new DNS lookups.
The DNS cache is automatically updated over time, but it may get corrupted and need to be manually cleared to resolve issues with DNS lookups.
Refer to our detailed and comprehensive guide on ‘How to Easily Flush DNS Command Cache (Windows, Mac, Linux).‘ Once you have successfully cleared the system DNS cache, attempt to access the website again to determine if the issue has been resolved.
6. Update Network Drivers or Adaptors
Sometimes, an outdated network Adaptor can also be the culprit for triggering the DNS_PROBE_FINISHED_BAD_CONFIG Error. Hence, if you are still facing the error try uninstalling and reinstalling your network drivers through your Device Manager:
Step 1: Press the Windows key + R on your keyboard.
Step 2: Type “devmgmt.msc” into the Run box and hit Enter.
Step 3: In the Device Manager window, click to expand Network adapters.
Step 4: Right-click on your network adapter, and select Uninstall device.
Step 5: Confirm the action and wait for the process to complete.
Step 6: Close the Device Manager window and restart your computer.
Step 7: Once your computer has restarted, open the Device Manager again and select your network adapter.
 13")
Step 8: Click on Action > Scan for hardware changes from the menu bar. This will reinstall your network driver(s).
 14")
Step 9: Now try loading the website again. If the issue persists, you may need to update your drivers manually or seek further assistance.
7. Delete System Temporary Files
Most browsers and operating systems store some temporary data on the device for later use. However, if any of these temporary files get corrupted over time, which can conflict with the DNS information and trigger DNS_PROBE_FINISHED_BAD_CONFIG errors.
Therefore, you can resolve this issue, by simply deleting your system’s temporary files. To do this,
For Windows
Step 1: Type %temp% in your Windows search bar and hit Enter.
 15")
Step 2: This will open the “temp” folder, which contains all the temporary files listed.
 16")
Step 3: Select all, and Delete them.
For macOS
- Open the Finder by clicking on the Finder icon in the dock.
- Press the “Command+Shift+G” keys on your keyboard. This will open a search bar.
- In the search bar, type “/Library/Caches” and then press the Enter key.
- This will take you to the Caches folder. Here, you will see several folders with the names of different applications.
- Select the folders that you want to delete.
- Empty the trash bin by right-clicking on the icon and selecting “Empty Trash”.
For Linux
Ubuntu users do not need to follow these steps because all temporary files are automatically deleted with every reboot.
8. Disable Antivirus or Firewall
Antivirus and firewalls are undoubtedly essential tools for protecting your PC against malware and hacking threats. However, sometimes these security tools are configured too strictly and start interfering with your DNS servers, causing connectivity issues.
Therefore, you can try temporarily disabling them and check whether it fixes the DNS_PROBE_FINISHED_BAD_CONFIG error or not.
For Windows users:
Step 1: First, you need to open your computer’s control panel. To do this, click on the “start” menu on your desktop and type in “control” in the search field.
Step 2: Next, select “System and Security” from the control panel options. This will take you to a new page.
Step 3: On the new page, you’ll see an option for “Windows Defender Firewall.” Click on “Allow an app or feature through Windows Firewall.”
 17")
Step 4: In the next window, you’ll see a list of apps and features that are allowed to communicate through your firewall. To change these settings, click on “Change settings.”
 18")
Step 5: If you don’t see your DNS client on the list, you can add it by clicking on the plus (+) icon.
Step 6: To temporarily disable your firewall, uncheck the box next to “Windows Defender Firewall” and click on “OK” to save your changes.
Step 7: Alternatively, you can adjust your firewall settings by finding the DNS client or any other application you want to configure and checking or unchecking the boxes next to the desired settings.
Step 8: Once you’re done adjusting your settings, click on “OK” to save your changes.
Note: It’s important to only disable your firewall temporarily if you need to troubleshoot a connectivity issue. Leaving your computer without a firewall can expose it to potential security threats.
For macOS
- Click on the Apple search bar and type “Firewall”.
- A firewall interface will open where you have to select the “Firewall” tab.
- If the firewall is turned on, you’ll see a message that says “Firewall is on.” Toggle to Turn it Off.
 19")
9. Scan your System for any Malware
Cached DNS records can be infected with by malware, viruses, and other threats. If you suspect that your device has been compromised by malicious software or files, it’s recommended that you must run a complete malware scan of your System.
Attackers often target DNS in order to redirect users to fake websites. To protect your infrastructure from cyber attacks, it’s important to follow DNS security best practices.
Read: 🚩 DNS Poisoning aka DNS Spoofing: Meaning, Prevention, and Fix.
10. Check the Browser’s Extensions
A faulty Browser Extension can create connectivity issues. Try disabling all extensions to see if they are the case. In the Chrome menu, click on Advanced Tools — Extensions. To disable them just uncheck the toggle on each of them. Make sure you disable all the extensions, it is very important to identify the reason.
Then, try to access the website again. If the error does not appear anymore, all you have to do is to find the extension causing the error. Turn on the installed extensions one by one and check the availability of the problem site after each one.
How to Prevent DNS_PROBE_FINISHED_BAD_CONFIG Error?
Preventing the “DNS_PROBE_FINISHED_BAD_CONFIG” error can save you from the frustration of not being able to access the internet. Here are some tips to prevent the error:
- Maintain a Stable Internet Connection: Ensure your internet connection is stable and reliable. Unstable connections can cause DNS-related issues.
- Check DNS Settings Regularly: Check your DNS settings regularly to ensure they are up-to-date and correct.
- Update Software: Keep your software updated to ensure compatibility with the latest DNS settings.
- Secure Your System: Protect your system from malware and viruses that can interfere with your DNS settings.
Conclusion
If you have encountered the DNS_PROBE_FINISHED_BAD_CONFIG error, it can be frustrating for anyone. However, there are several ways to fix it.
In this article, we have explored the causes of the error and provided various basic and advanced troubleshooting steps to resolve it, along with some preventive tips to avoid it in the future.
To summarize, the basic fixes include.
- Restart your Internet Device or Router
- Purge your Browser’s DNS cache
- Check DNS Settings
- Change DNS Server
- Reset IP and Flush DNS Cache
- Update Network Drivers
- Delete Temporary files
- Disable Antivirus or Firewall
- Scan your System for any malware
- Check Browser Extensions
If you have any queries or would like to add any valuable points to it, please do let us know in the comment section below.
Frequently Asked Questions
How do I fix error code dns_probe_finished_bad_config?
How to DNS_PROBE_FINISHED_BAD_CONFIG Error? (10 ways)
1. Restart your Internet Device or Router
2. Purge your Browser’s DNS cache
3. Check DNS Settings
4. Change DNS Server
5. Reset IP and Flush DNS Cache
6. Update Network Drivers
7. Delete Temporary files
8. Disable Antivirus or Firewall
9. Scan your System for any malware
10. Check Browser Extensions
How do I fix DNS probe problems?
1. Reset your Router
2. Flush the DNS cache of your browser, as well as your system.
3. Update your Network Drivers
4. Change DNS server
5. Check DNS settings
Introduction
A web browser displays the DNS_PROBE_FINISHED_BAD_CONFIG error if it cannot connect to a web server. The error shows a vague indication of DNS configuration issues. Understanding what causes the error is the first step to resolving it.
This article explains how to fix the DNS_PROBE_FINISHED_BAD_CONFIG error.
Prerequisites
- A stable connection to the internet.
- Command line/terminal access.
- Access to a user account with administrator/sudo privileges.
What is the DNS_PROBE_FINISHED_BAD_CONFIG Error?
The DNS_PROBE_FINISHED_BAD_CONFIG error appears when a browser cannot connect to a website due to a DNS misconfiguration.
A DNS configuration error means the browser can’t resolve the domain name into an IP address. The problem can occur in any browser and operating system.
What Causes the DNS_PROBE_FINISHED_BAD_CONFIG Error?
The DNS_PROBE_FINISHED_BAD_CONFIG error happens for several reasons. The source of the error is one of the following:
- User configuration — A misconfigured DNS on a user’s device.
- Network — Network connectivity issues or network misconfigurations.
- Web server — A website’s DNS misconfiguration.
There are several reasons the DNS error appears, and it is difficult to pinpoint the source of the issue. The best approach is to troubleshoot DNS issues to fix a DNS_PROBE_FINISHED_BAD_CONFIG error.
Below are several different methods to approach resolving the DNS error.
1. Restart Router
A fast way to check and resolve connectivity issues is through a router reset. Turn the router off for a minute and turn it back on again.
Wait for the router to reboot and connect fully. Once connected to the internet, check if the problem persists on the website.
2. Clear Browser DNS Cache
Browsers cache DNS records to enable faster response times. If the cache corrupts over time, it may cause the DNS_PROBE_FINISHED_BAD_CONFIG error. Clear the browser’s DNS cache to attempt resolving the error.
The steps to clear the DNS browser cache differ based on the browser. Follow the steps below for the specific browser you’re using.
Chrome
To clear DNS cache in Chrome:
1. Open a new tab in Chrome.
2. Enter the following address into the address bar:
chrome://net-internals/#dnsThe page shows a DNS lookup section and a button for the Host Resolver Cache.
3. Click the Clear Host Cache button.
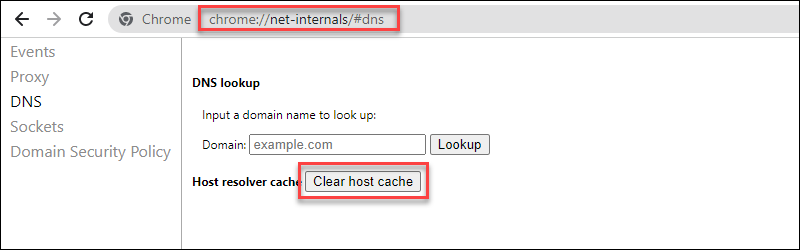
4. To apply the changes, restart the browser and check if the problem is gone.
Firefox
To clear DNS cache in Firefox, do the following:
1. Open a new tab in Firefox.
2. Go to the following page:
about:networking#dnsThe page shows DNS networking options.
3. Click the Clear DNS Cache button near the bottom of the page.
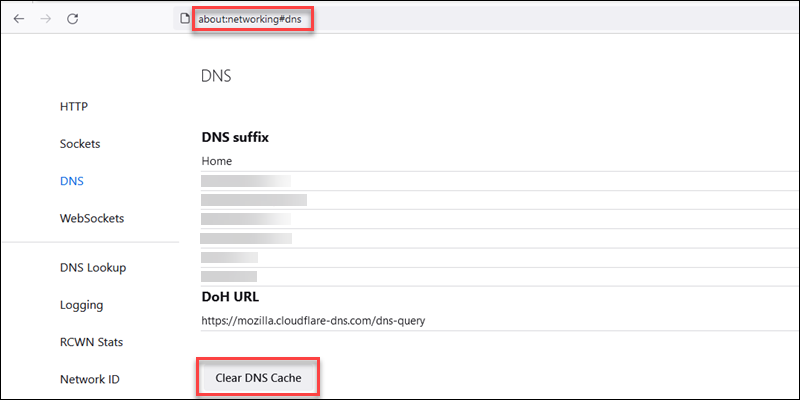
4. Restart the browser and check if the problem persists.
Safari
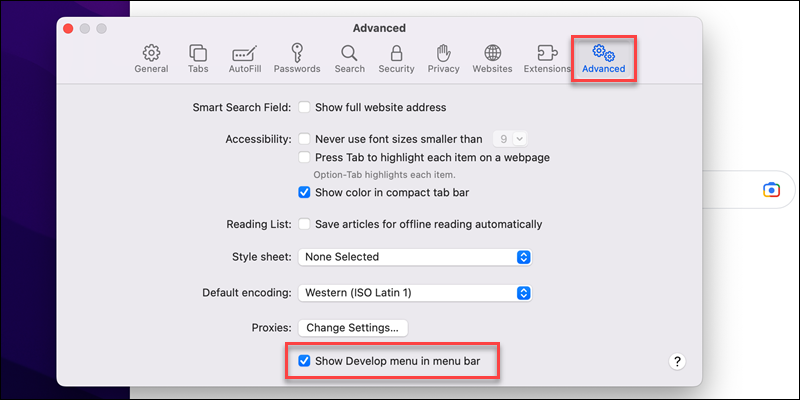
If using Safari, enable the Develop menu to clear DNS cache. Follow the steps below:
1. Open the Safari menu and choose Settings.

2. Select the Advanced tab and check Show Develop menu in menu bar. The new option appears in the menu bar.
3. Open the Develop menu and choose Empty Caches from the list to clear the browser’s cache.
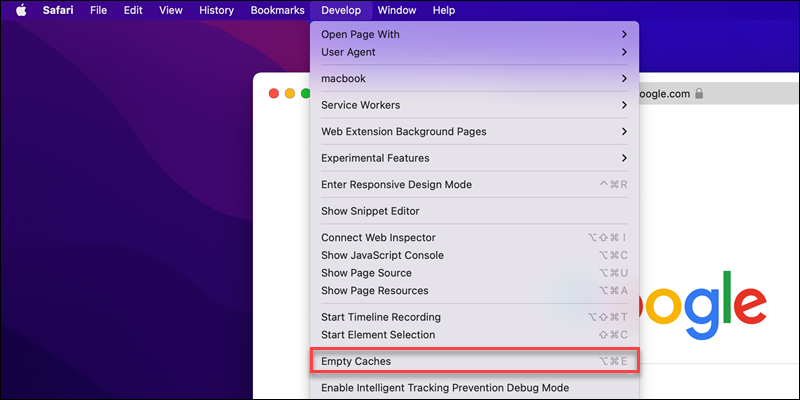
4. Restart the browser to apply the changes and see if the problem persists.
3. Flush System DNS Cache
DNS cache stores DNS lookup information. If the cache is corrupted, the best course of action is to clear the cache. The next time the computer sends a request, the lookup information automatically updates.
Follow our guide to flush DNS cache in macOS, Windows, or Linux. The commands differ between operating systems and their specific versions. After clearing the cache, attempt to connect to the same webpage again to see if the error persists.
4. Manually Configure DNS
Change the DNS configuration manually on your system to try and reset the DNS settings. Below are steps for different operating systems.
Windows
To manually configure DNS on a Windows machine, do the following:
1. Open the Start menu.
2. Search for Network Status and press Enter.
3. Under Advanced network settings, choose Change Adapter Options.
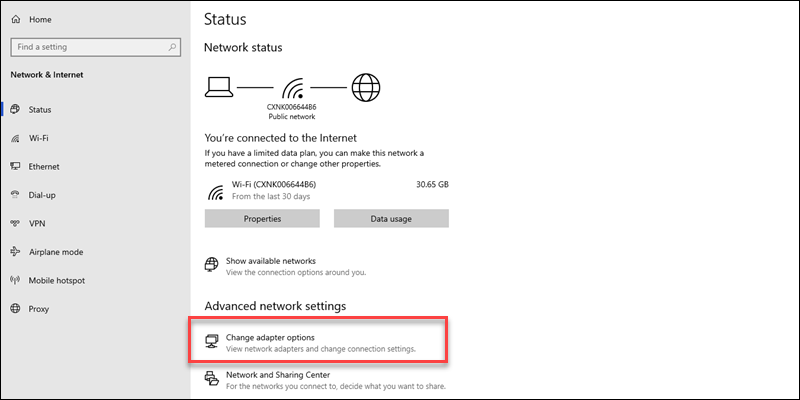
4. Right-click the network connection you wish to change and select Properties.
5. Find Internet Protocol Version 4 (TCP/IPv4) on the list and select the option.
6. Click the Properties button.
7. Select the Use the following DNS server addresses option.
8. Fill in the preferred and alternate addresses. For example, use Google’s 8.8.8.8 as preferred and 8.8.4.4 as an alternate.
9. Click Ok to save the changes.
10. Restart the browser and test the connection to see if the DNS_PROBE_FINISHED_BAD_CONFIG error is resolved.
macOS
To manually change the DNS configuration on macOS, follow the steps below:
1. Open the Apple menu.
2. Select System Settings.
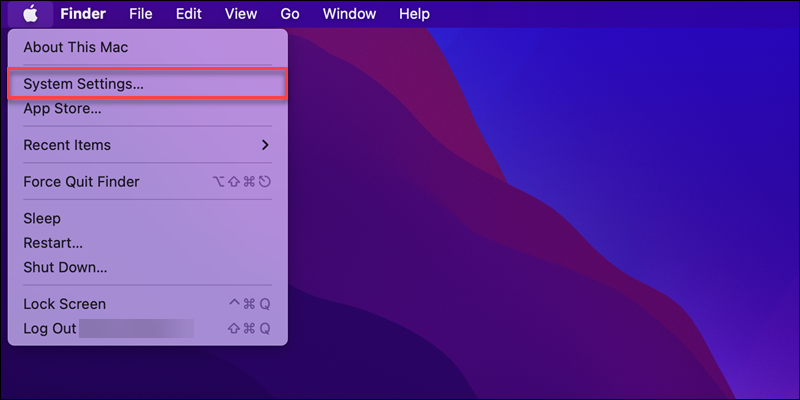
3. In the left pane, choose Network.
4. Select the connection you wish to configure from the list.
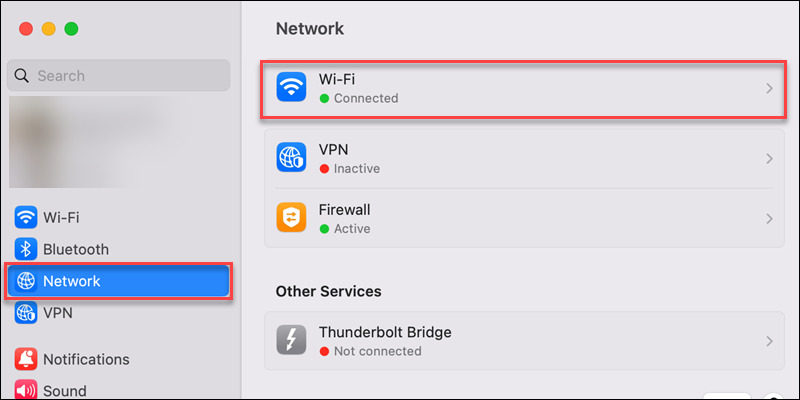
5. Open the Details page for the connection.
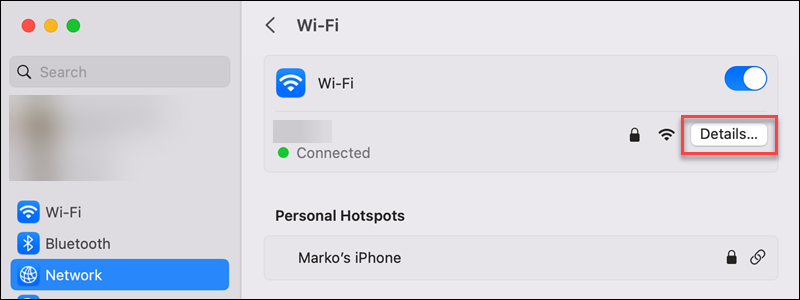
6. Switch to the DNS tab to see the DNS settings.
7. At the bottom of the left pane, click the plus (+) icon to add a new address.
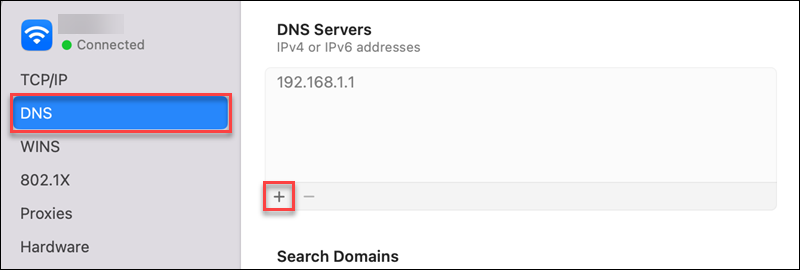
8. Add a primary and secondary address. For example, to use Google’s DNS, set the primary as 8.8.8.8 and the secondary as 8.8.4.4.
9. Click OK to save the changes.
Test the webpage connection again to see if the configuration error persists.
Linux
Linux allows manually changing DNS settings via GUI or through the terminal. Follow our detailed guide to set up a DNS nameserver on Ubuntu.
5. Remove Temporary Files
Every browser stores temporary data. Temporary files can conflict with DNS information and cause errors. To clear temporary browsing files from the system, follow the OS-specific steps below.
Windows
To manually remove temporary files in Windows, type %tmp% into the Windows search bar and press Enter.
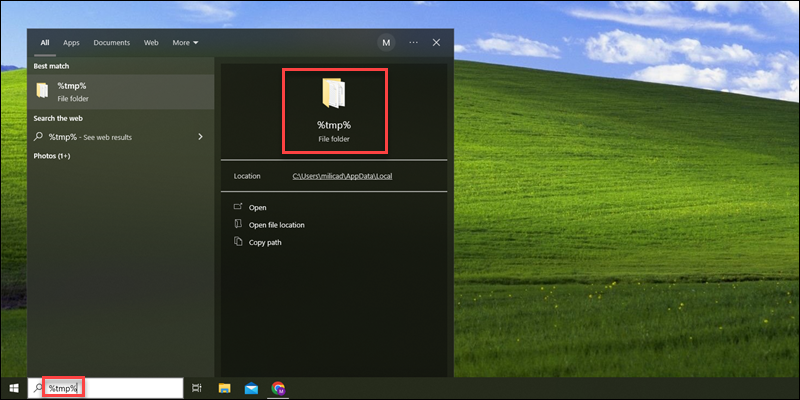
Windows Explorer opens the temp folder, which contains the temporary files. Delete all the files from the directory and recheck the connection.
macOS
To remove temporary files on macOS, open the finder and press CMD+Shift+G to open a search bar. Search for /Library/Caches and press Enter.
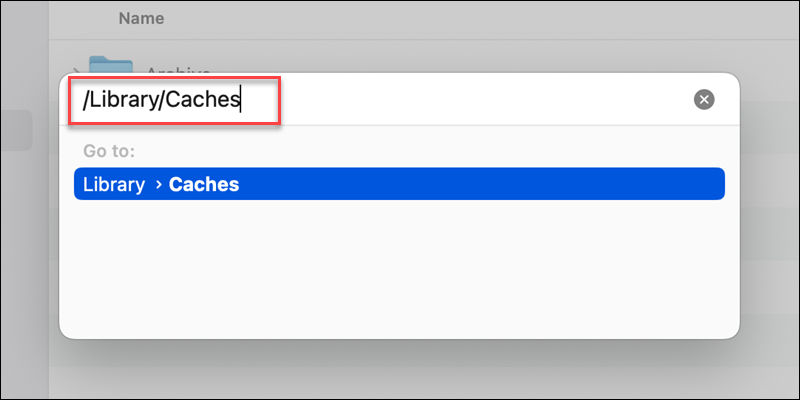
The result shows all relevant temporary cached folders to delete.
Linux
Temporary files reside in the /tmp directory on Linux systems, such as Ubuntu. The contents are automatically deleted upon system reboot. Use the command line to reboot a Linux system and reset the /tmp directory.
6. Check Firewall Settings
A firewall can block access to websites and cause conflicts with network settings. The easiest way to check if a firewall is the causing DNS issues is to disable firewall settings and try connecting to the webpage again. If the error disappears, the problem is due to the firewall’s settings.
Below are instructions to access firewall options on different OSes.
Windows
Check the firewall settings on Windows by following the steps below:
1. Press the Start button.
2. Search for «Windows Security» and press Enter.
3. Open Firewall & network protection.
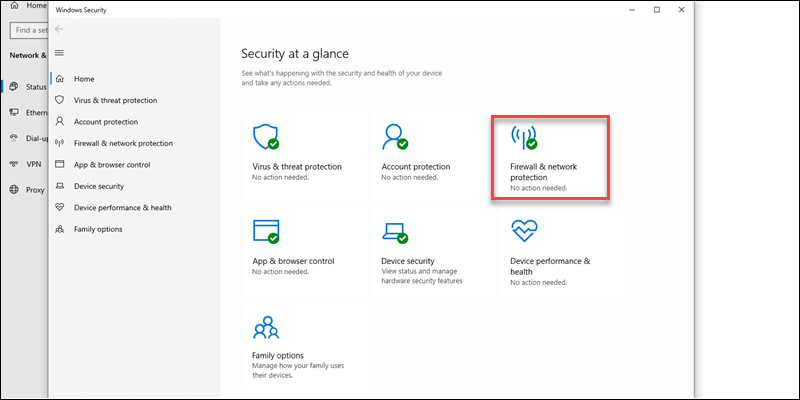
4. Choose the active network profile (Domain network, Private network, or Public network).
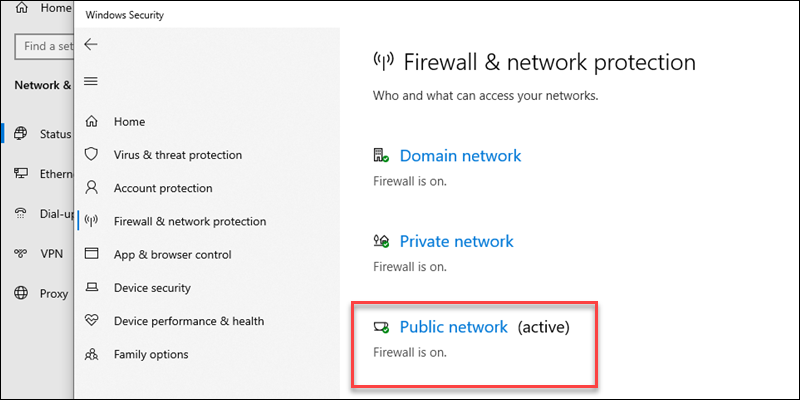
5. Switch the Microsoft Defender Firewall off and check if the problem persists.
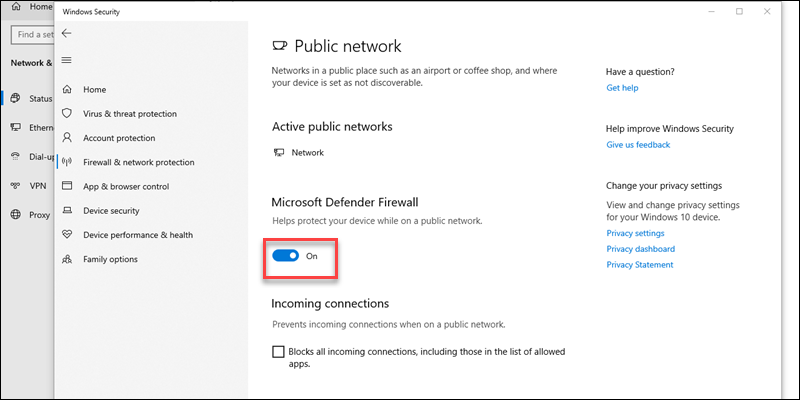
If the DNS problem disappears, double-check if the firewall settings block all traffic or access to specific websites.
macOS
To check the firewall settings on macOS, do the following:
1. Open the Apple menu.
2. Choose System Settings.
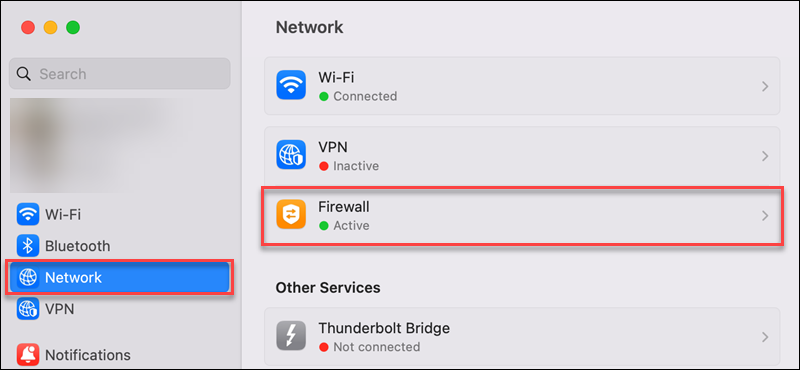
3. In the sidebar, select Network.
4. In the right pane, choose Firewall.
5. Turn off the firewall and see if the error persists.
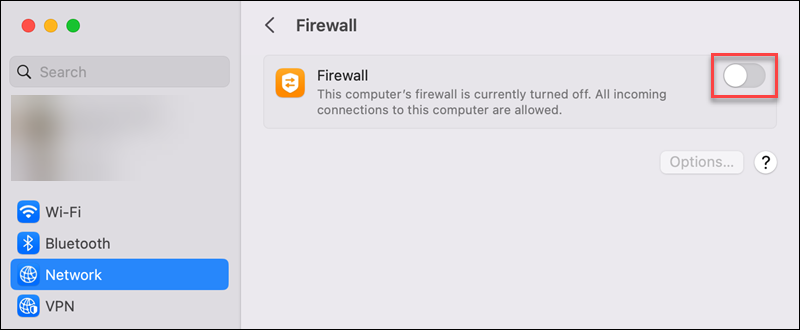
If the website is available after turning off the firewall, check the firewall options and whether any blocked websites cause the error.
Linux
Linux systems offer different firewalls depending on the distribution. Below are some useful guides for different firewalls and distributions:
- Enable/disable UFW on Ubuntu.
- Disable Firewalld on CentOS.
- Configuring Iptables (Ubuntu and CentOS).
Note: Check out our guide on the types of firewalls to learn more about them and how do they work.
7. Update Network Drivers
Outdated or corrupt network drivers cause various network issues, including DNS problems. Check if the system or its drivers require updating.
Follow the steps below for different operating systems.
Windows
System updates automatically handle network drivers. Windows also allows to manually check for newer versions of specific drivers. Follow the steps below to update a network driver:
1. Open the Start menu.
2. Type «Device Manager» and press Enter.
3. Expand the Network adapters field.
4. Right-click the network adapter and choose Update driver.
5. Restart the machine and try reopening the website.
macOS
To check for the latest updates on macOS, do the following:
1. Open the Apple menu.
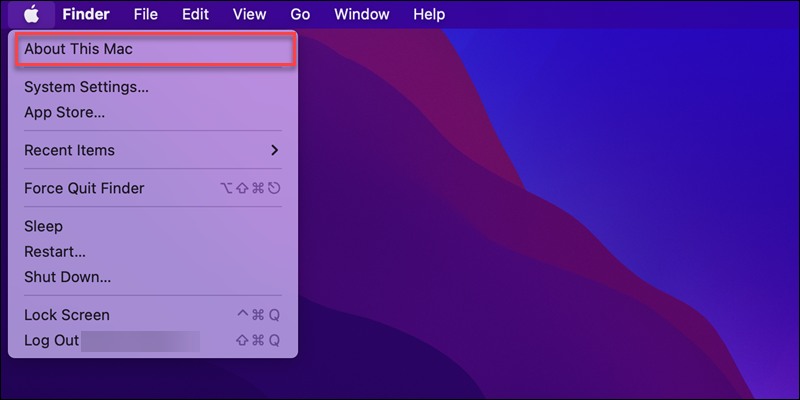
2. Select About This Mac.
3. Click the More Info button.
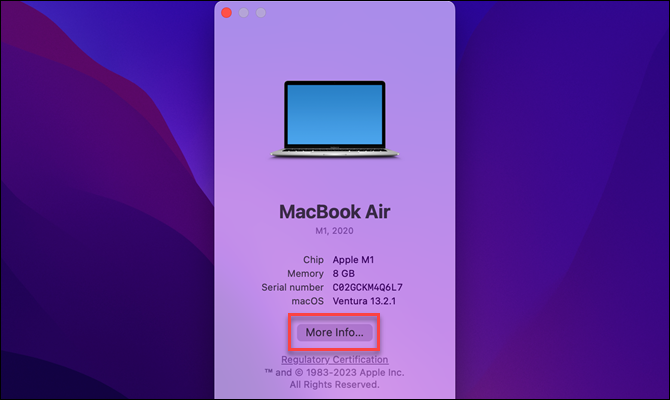
4. Check if the system is already at the newest version. If the system version is visible in the macOS section, the system is up to date.
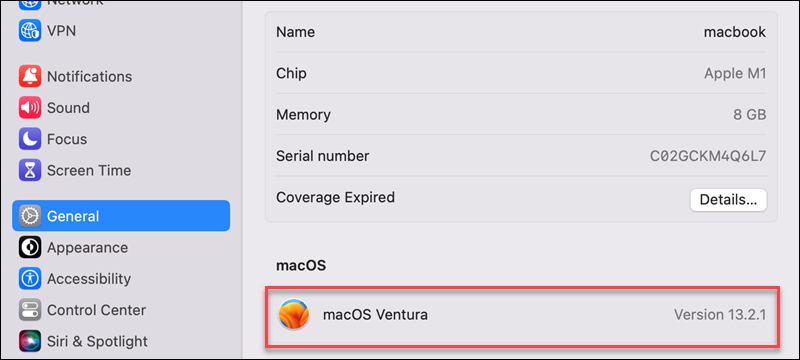
If the Update button displays, update the system to the newest version. Check if the DNS_PROBE_FINISHED_BAD_CONFIG error is gone.
Linux
To check for network driver updates in Linux, run the following commands in the terminal (CTRL+Alt+T):
1. Run the lshw command to list network hardware information:
sudo lshw -class network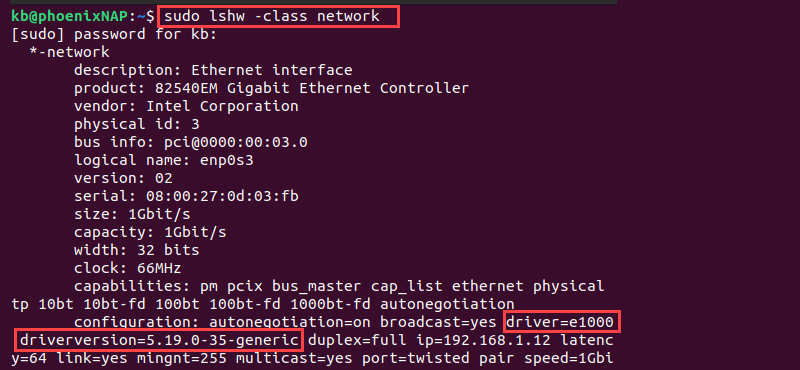
The output shows the driver’s name and version.
2. Search the apt library for the driver using the driver name:
apt search <driver name>
Compare the version from the outputs of the two commands.
3. If the driver is not the newest version, update it with:
sudo apt install <package name>Wait for the installation to finish and recheck the connection.
8. Check Browser Add-ons
Some add-ons block websites or cause connectivity issues. Try turning off browser add-ons to pinpoint the one causing DNS issues.
If the connection issues disappear, check the specific add-on’s settings to see if there are configurations that block connections to a webpage. Alternatively, try reinstalling or removing the add-on.
9. Scan the Computer for Malware
Malware, viruses, and other threats can tamper with cached DNS records. Scan the device for malware if you suspect malicious software or files are on the machine.
DNS is frequently targeted by attackers as that gives them an opportunity to redirect users to fake websites. Follow DNS security best practices to fortify the infrastructure and ensure protection from cyber attacks.
Conclusion
After going through this troubleshooting guide, you know the possible causes and resolutions to the DNS_PROBE_FINISHED_BAD_CONFIG error in a browser. Another DNS error that you might encounter in the browser is DNS_PROBE_FINISHED_NXDOMAIN which you can resolve by following our guide.
DNS errors are common, and learning how to resolve different DNS errors is a crucial skill for any network administrator.
“DNS_Probe_Finished_Bad_Config”; do you see this error often? If you are an active user of Google Chrome Web Browser, it is possible that you must have come across a Domain Name System (DNS) error at some point in time. In simple language, DNS errors are some bugs in the browser which prevent access to a specific web address.

The DNS errors occur when a web address that you are looking for is unreachable. In this article, we have discussed the various methods to fix the dns_probe_finished_bad_config error. It is usually seen in Chrome, but other browsers also have this issue, although with a slightly different error message.
Table of Contents
- 1 How to Fix DNS_Probe_Finished_Bad_Config Issue
- 1.1 Method 1: Configure DNS manually
- 1.2 Method 2: Reset IP Configuration
- 1.3 Method 3: Clear cookies, cache, and temporary files
- 1.4 Method 4: Update Network Drivers
- 1.5 Method 5: Disable Firewall and Antivirus Programs
- 1.6 Method 6: Disconnect and Reconnect to Network
- 1.7 Method 7: Use a Different Browser
- 2 Conclusion
How to Fix DNS_Probe_Finished_Bad_Config Issue
The general causes of the error mentioned above message are network issues, maybe minor or significant, and some malicious files in the system. Every time we have a new error, we come up with various methods to get rid of them too. Those methods have been discussed further in this article.
Bookmark this: Is Softonic Safe to Download?
Method 1: Configure DNS manually
1. At first, open Network and Sharing Center in the Control Panel.
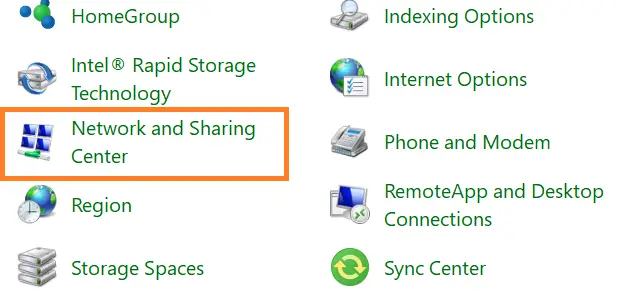
2. Then click on Change adapter settings.
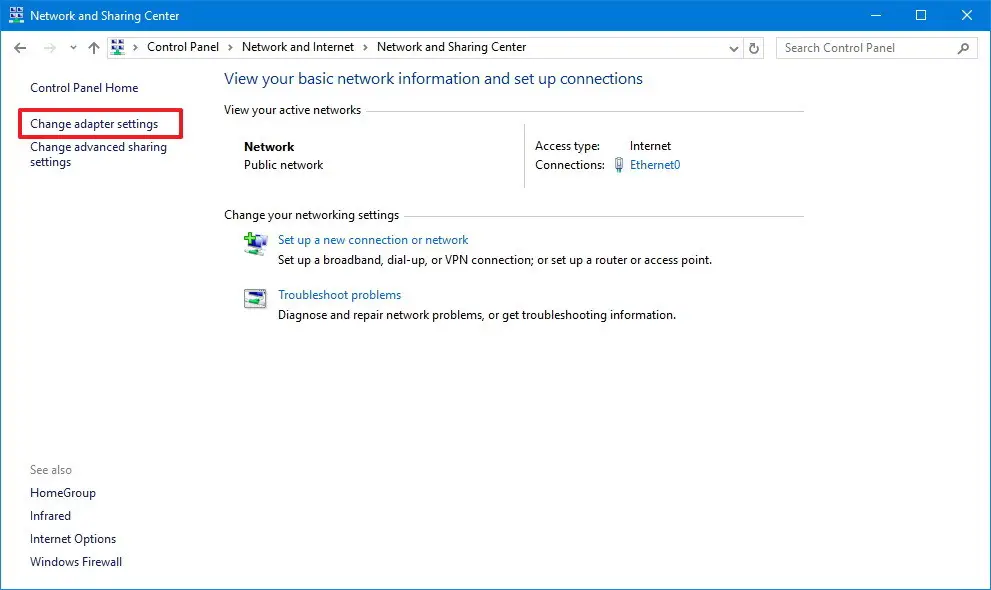
3. Select LAN and click on the Properties tab.
4. Select Internet Protocol Version 4 (TCP/IPv4) & click on Properties.
5. Select the Use the Following DNS Server Addresses option.
6. In the Preferred address bar, type 8.8.8.8.
7. In the Alternate address bar, type 8.8.4.4.
8. Select Validate settings upon exit and click on OK.
9. Finally, Restart the computer system. Also, check for any errors such as Unidentified Network No Internet Access in Windows.
Once the DNS has been configured manually, the dns_probe_finished_bad_config error message would not pop on to your screen again. In case the issue has not been fixed, use the methods discussed below as one of them would work for you.
Also, read –
- 7 Ways to Fix This Site Cannot Be Reached in Google Chrome
- {Solved} 8 Ways to Fix WOW51900319 Error Code
- 4 Ways to Fix Err_Network_Changed in Google Chrome
Method 2: Reset IP Configuration
Sometimes, the dns_probe_finished_bad_config error might have been caused due to IP configuration. Thus, it is possible to solve the issue by resetting the IP configuration. To reset the IP configuration, the steps are:
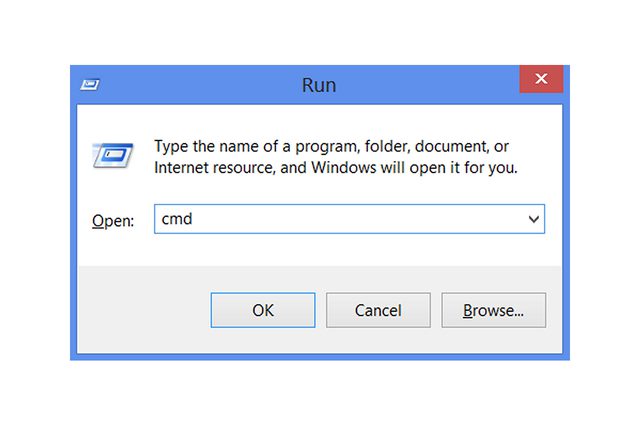
1. At first, click on the Start button and then open the Run dialog box.

2. In the run command, type in “cmd” and press the enter key.
3. In the Command Window, type in the following commands:
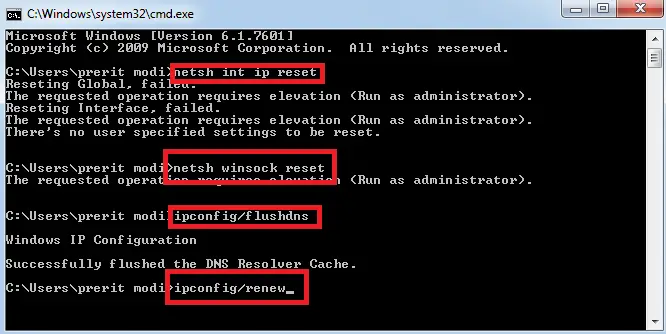
netsh int ip reset
netsh winsock reset
ipconfig/flushdns
ipconfig/renew
4. Finally, Restart the computer system and check if the issue has been resolved.
It is possible that the dns_probe_finished_bad_config issue would have been resolved by the above method. If this has not happened yet, then try the methods discussed below and you will find a solution to the issue.
Don’t miss out –
- {Solved} 13 Ways to Fix USB Ports Not Working Error
- 6 Ways to Fix Wi-Fi Doesn’t Have a Valid IP Configuration
- 3 Ways to Fix ERR_NAME_RESOLUTION_FAILED Error
Method 3: Clear cookies, cache, and temporary files
It is possible that the dns_probe_finished_bad_config error has been caused due to specific temporary files that have got accumulated in your system. A simple way to get rid of the issue, in this case, is to let go of the cookies, cache, and temporary files. Following these steps might help you in doing that:
Increase System Speed: Delete System Error Memory Dump Files
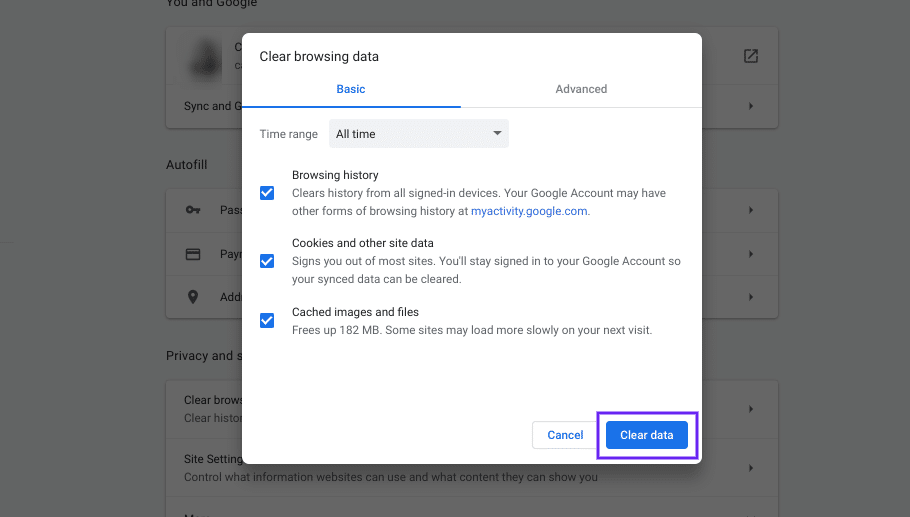
1. Press Ctrl+Shift+Del keys and check cookies and cache items.
2. Click on Clear Data.
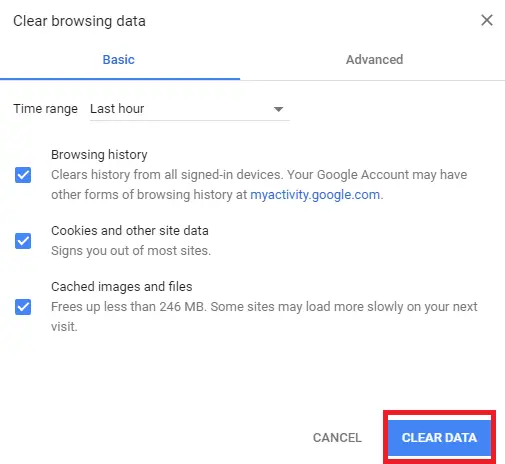
Your cookies, cache and temporary files have gone now. Close and reopen the browser, and you should not face the issue anymore. But, we still have some more methods to discuss.
Check Out:
- 6 Ways to Fix Driver WUDFRd Failed to Load
- {Solved} 5 Ways to Fix Epson Error Code 0x97
- 6 Ways to Fix Ethernet Doesn’t Have a Valid IP Configuration
Method 4: Update Network Drivers
Most of the users do not have the habit of updating the software regularly which is a significant cause of such issues. Every time the developers update a software, they fix some bugs and enhance its performance. Thus to fix the dns_probe_finished_bad_config error, you can try updating the drivers. The steps to do the same are:
1. At First, press Windows Key+X.
2. Select Device Manager.
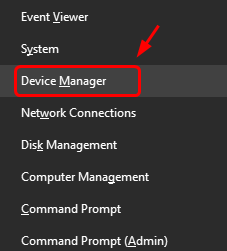
3. Check for any updates for the drivers. If found, update the drivers.
4. Finally, Restart the system.
Now, if the cause of the issue was an outdated driver in your system, the issue would have been fixed. But if that was not the case, then the methods discussed below might help you.
You may also like –
- {Solved} One or More Network Protocols are Missing on This Computer
- 8 Ways to Fix DNS Address Could Not be Found Error
- How to Fix Avast Blocking League of Legends (LOL) Launcher
Method 5: Disable Firewall and Antivirus Programs
Sometimes, the Windows security features such as the Firewall and Anti-virus software are behind such issues. They block the websites if they find it suspicious. So, the fix to this issue is to disable the firewall and Antivirus.
But, this method involves a lot of risks as your system becomes vulnerable to attacks without a firewall or Anti-Virus. Be careful what sites you visit while your Firewall is turned off. If this method fixes your dns_probe_finished_bad_config error, then you should try using a different Anti-Virus software so that your system is safe from attacks.
Also, read –
- 10 Ways to Fix DNS_Probe_Finished_No_Internet in Chrome
- 6 Ways to Fix ERR_QUIC_PROTOCOL_ERROR in Chrome
- {Solved} Fix Error 0x8004010F: Outlook Data File Cannot be Accessed
Method 6: Disconnect and Reconnect to Network
This method would work only if there were an issue with the router of your LAN. Disconnecting and reconnecting to the network usually fixes the dns_probe_finished_bad_config error if the router was causing the error. To do that, follow these steps:
1. First, Click on the network icon on the taskbar.![]()
2. Select the network connected to and disconnect. Also, check for any Windows Error such DNS Server Not Responding.
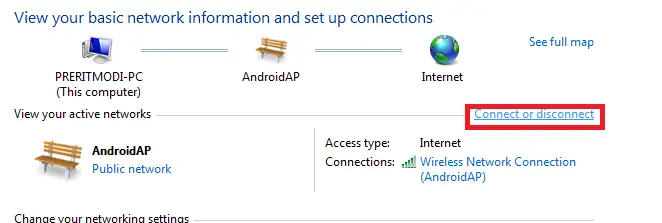
3. Now, switch off the router and switch it on after a few minutes.
4. Finally, Now connect to the network.
If there was an issue with the router, your problem would have been fixed by now. If not, then you should try method 7.
Lastly, check these too –
- 3 Methods to Fix FFXIV Unable to Download Patch Files
- 4 Ways to Fix Kmode Exception Not Handled in Windows Error
- 3 Ways to Fix Windows Update Service Not Running
Method 7: Use a Different Browser
Sometimes, a web browser itself faces some issues in accessing some websites. Initially, check if you’re seeing Err_Network_Changed in Google Chrome (In Most Cases). It is not only with you but with everyone using that browser. To check if you are a victim of a faulty browser, try accessing the web address using some other web browser. If the dns_probe_finished_bad_config error does not occur, discard your old browser until the new update.
Don’t miss out –
- 6 Ways To Fix Could Not Connect To Steam Network Error
- 10 Ways to Fix YouTube ‘An Error Occurred, Please Try Again
Conclusion
These were the methods that would help you to fix the dns_probe_finished_bad_config error in your system. One of them would have come out to be useful for you as well. But whenever dealing with errors in the computer system, always keep your critical data backed up as it could lose even by a minor mistake.

Gravit Sinha: Founder of ValidEdge, a problem-solving website, driven by his lifelong passion for fixing issues.
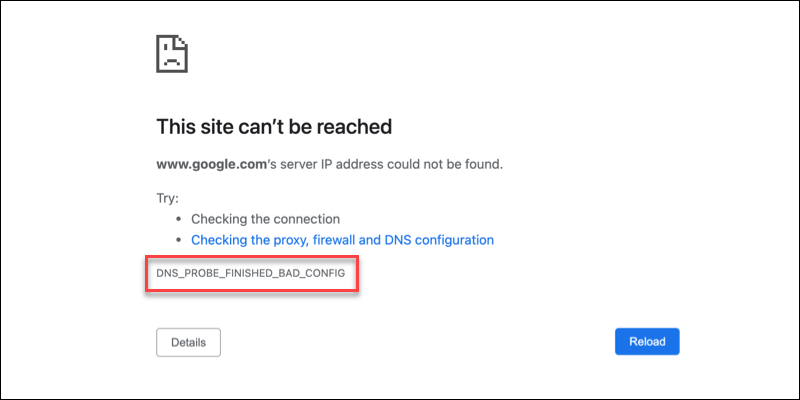
You open Chrome and navigate to your favorite website. But instead of the webpage, you get This site can’t be reached, with the error code DNS_PROBE_FINISHED_BAD_CONFIG. This error message indicates that there is something wrong with your DNS settings.
It’s possible that only one device in your network gets this error, but when the problem is related to your DNS server then multiple devices can have the same error. DNS errors are quite common and can easily be fixed.
With the steps below you should be able to get back online in a couple of minutes. We are going to start with the most common solution, that will work for most. If it doesn’t work for you, just go to the next step.
The error message dns_probe_finished_bad_config indicates that your browser is unable to resolve the DNS address. When you visit a website, the domain name will be translated to the corresponding IP address of the webserver.
When your browser is unable to contact the DNS server you will first see the error DNS_PROBE_STARTED followed a few seconds later with the message DNS probe finished bad config. To solve this error we are going to flush the local caches and check our network settings.
1. Flush the local DNS Cache and reset Network Configuration
The first step is to flush the local DNS cache. Your computer keeps a local list of all DNS addresses that you have used. Sometimes it gets outdated or corrupt, which can result in the error dns_probe_finished_bad_config.
To clear the cache we can use a simple command that we can run in PowerShell or command prompt:
- Right-click on start or press Windows key + X
- Choose Windows PowerShell or Windows Terminal (on Windows 11)
- Type all the commands below and press enter after each command:
- ipconfig /flushdns
- ipconfig /release
- ipconfig /renew
- netsh winsock reset
- netsh int ip reset
Refresh the webpage to see if the problem is resolved.
2. Change your DNS server
The DNS server that your computer uses is assigned by the modem or router of the network that you are connected with. For your home network is this most of the time the DNS server from your internet service provider.
There could be an issue with the DNS server. DNS records change all the time, but some DNS servers are slow with updating their record. So we are going to change the DNS server that your computer is using to the best DNS server that is available.
You can safely do this, your computer will still work on other networks as well. The steps are slightly different in Windows 11, so I have created different steps for Windows 10 and 11.
Steps for Windows 10 (scroll down for the steps in Windows 11)
- Right-click your startmenu
- Select Network Connections
- Click on Change adapter options
- Double-click on your (wireless) network adapter
- Click on Properties
- Double-click on Internet Protocol version 4 (TCP/IPv4)
- Enable Use the following DNS servers addresses
- Enter 1.1.1.1 for preferred and 1.0.0.1 for alternate DNS Server
Click Ok to apply the settings and close all the screens.
Steps for Windows 11
- Right-click the start menu or press Windows key + X
- Click on network connections
- Open Ethernet settings
- Scroll down and Edit the DNS Server Assignment
- Change the setting to Manual
- Enable IPv4
- Enter 1.1.1.1 as preferred DNS and 1.0.0.1 as alternate DNS
Restart your browser and see if you are able to visit the webpage in question.
If this solution worked for you and the issue occurred in your home network, then change the DNS server settings in your router as well. This way other network devices in your house won’t have any issues either.
3. Disable IPv6 to resolve dns_probe_finished_bad_config
Another command cause of DNS issues like dns_probe_finished_bad_config is the use of IPv6. This new network protocol is turned on by default on most computers these days, but not all networks are configured correctly yet.
So your computer might be using the new IPv6 protocol but is this way unable to resolve the DNS server. We can safely turn off IPv6 in Windows using the following steps (again different steps for Windows 10 and 11)
First steps for Windows 10:
- Right-click on start or press Windows key + X
- Open Network Connections
- Click on Change adapter options
Continue below the steps for Windows 11
First steps for Windows 11
- Open the start menu
- Search for Network Connections
- Open View network connections
Continue here for both Windows 10 and 11
- Double-click on your (wireless) network adapter
- Click Properties
- Turn off Internet Protocol version 6 (TCP/IPv6)
Click Ok to close all the screens and restart your computer. Test the website again to see if the error is resolved.
4. Disable Extensions in Chrome
Browser extensions in Chrome can be de cause of DNS-related issues. Some extensions, like ad blockers, for example, interact with the connection to the website. They block or alter requests send by your browser, resulting in errors like dns_probe_finished_bad_config.
We can simply disable these extensions temporarily to see if they are the cause of the issue.
- Open Chrome and click on Options
- Expand More tools
- Select Extensions
Turn off all extensions and reload the webpage in question. If this solved the problem, then turn the extension on one by one and test between every step if the problem returns. This way you can determine which extension caused the issue.
5. Clear the Chrome DNS Cache
Often not the cause of the issue, but worth a try if all the other steps didn’t help. Chrome also has its own DNS cache. Records in this cache can be outdated or wrong as well. So just to be sure we are going to clear the host cache.
- Open Chrome
- Enter the following address in the addressbar: chrome://net-internals/#dns
- Click on Clear host cache
Reload the webpage to check if the issue is resolved.
6. Turn off internet security software
Keeping your computer secure is important, but some internet security software, like Norton Internet Security, can cause problems with your internet connection. It’s worth a try to turn the software off to see if this resolves the issue “dns probe finished bad config” in Google Chrome
7. Scan your computer for Malware
Some malware is capable of changing your DNS settings, preventing you from accessing the internet (or redirecting your internet traffic). If all the steps above didn’t solve the error dns_probe_finished_bad_config then it is a good idea to run an anti-malware scanner.
A good malware scanner is for example Hitmanpro which you can run with the free trial to see if your computer is infected or not.
Wrapping Up
The Google Chrome error “dns probe finished bad config” is related to an issue with your DNS server. With the steps above you should be able to get back online. Other options that you can try are to restart your router/modem or try a different browser.
If you have any questions, just drop a comment below.