I’ve been using Visual Studio (2017) for quite a long time now, to program mostly in C#, for Unity games. Recently though, I noticed that it was not displaying any errors in the code anymore, or at least most of them. I initially started making some small tests, for example removing variables that were being used multiple times in the scripts. Visual Studio was not showing any errors, while when going back to Unity, it was showing all the correct errors in the console (as always). Instead, if I tried to remove a parenthese, it was, after a bit, showing errors all over the place. Again, it was really strange.
After one day, I was still testing, and I noticed that if I first opened Visual Studio, and then in «recent» I clicked on the the .sln file, that opened all the scripts for one Unity project, it was immediately showing all the right errors, like it had always done and how (I think) it should always do. I started looking for some differences between what I was seeing there, and what I was seeing when opening the .cs files (in the way that wasn’t working):
- At the top, I wasn’t seeing «Debug» and «Any CPU» how I was when it was working:


-
Another thing was that, between the «Project» and the «Debug» buttons (at the top, that open the drop-down lists), I didn’t have the «Compile» button.
-
Also, under the the «Debug» drop-down many options like «start debug» were not available / disabled.
-
At the top left, under the left-most script name, I have «External files» instead of «Assembly-CSharp»
-
At the right of where there should be «Debug» and «Any CPU», I have «Connect» instead of «Start» (Or something similar, my system’s language is not english, these are translations)
Another (maybe less relevant) thing that has changed from before, when it was working:
- I have installed Visual Studio 2019, and uninstalled after a few minutes (I’ve always preferred Visual Studio 2017!).
Programming without seeing the errors realtime takes much more time, so I’d really like to fix this problem, if it is possible to do so. Is there anything that I have to activate? Did I accidentally press a combination of keys?
Thanks in advance! 
Working on a project I made a class with properties and when I tried to auto-generate a class constructor I got an error saying something on lines of «auto generation of class constructor failed… and will be disabled» and ever sense then the «generate constructor» option has been taken off the Refactor menu and on top of that I don’t get syntax error highlighting anymore and intellisense doesn’t seem to be working proper or at all.
I tried using going into Tools > Options > Text Editor > various fields including «C#» and «general») and I don’t see anything obviously wrong. I also tried to use Visual Studio Installer to try to repair and that didn’t do anything. I am completely out of ideas and I can’t find anything that is remotely close to my case. TIA
asked Apr 26, 2022 at 5:02
2
I can’t add this reply as a comment as I don’t have 50 reputation.
I created a .Net 6.0 C# console project in Visual Studio 2022, add a class, and add two private fields. Selecting these two fields, press Alt+Enter to quickly generate the constructor. I did not encounter your issue.
Please try:
- Go to Visual Studio Installer, click
Modify, uncheckIntelliCodein Individual components, then clickModifybutton to save the change, wait for the installation to complete, and then reinstallIntelliCode. - In Visual Studio, go to Tools->Options->IntelliCode to check if the setting is Default.
answered Apr 27, 2022 at 8:27
Peng GePeng Ge
2091 silver badge4 bronze badges
8
Go to Tools menu, and select Options. Under Intellicode select General. Just uncheck “C# Suggestions”. Then restart Visual Studio and check that intellisence and syntax errors are appearing.
Note, I was not able to figure out what this option does, as the C# code suggestions seemed to continue to work as expected.
answered Nov 4, 2022 at 19:11
MichaelBMichaelB
5714 silver badges13 bronze badges
Tools/Import and export settings/Reset all settings
this procedure worked for me
answered May 28 at 22:06
Adding this because I came here via google and this is a less nuclear action to take than reinstalling intellisense and Visual Studio.

Check Tools > Options… > Text Editor > General. In my case I had unchecked «Show error squiggles» and had forgotten I had done this.
answered Feb 21 at 18:13
step 1 — uninstall visual studio
step 2 — upgrade to windows 11
step 3 — install visual studio
this works for me
answered Mar 2 at 13:31
![]()
Shivam GoelShivam Goel
3764 silver badges9 bronze badges
Very important: Make sure to check the Super cool! But i don’t use eslint section! Wich provide a global solution! By setting up tasks! And explained in details!
Note: If you feel the document is blottered! Make sure to skim and get to the titles that catch you! Even though every section may matter! (TLDS (TOO LONG DO SKIM)).
Javascript and Eslint
To add upon @Ajay Raghav answer!
This section show how to run the task on question! And the output of the execution!
For javascript, Vscode Eslint extension provide such a feature! Which if you are using Eslint (and not jshint) then you are having it already installed!
Usage as described on @Ajay Raghav answer! Are explained on the Eslint extension page!
https://marketplace.visualstudio.com/items?itemName=dbaeumer.vscode-eslint
eslint.lintTask.enable: whether the extension contributes a lint task to lint a whole workspace folder.
eslint.lintTask.options: Command line options applied when running the task for linting the whole workspace (https://eslint.org/docs/user-guide/command-line-interface). An example to point to a custom .eslintrc.json file and a custom .eslintignore is:
{
  "eslint.lintTask.options": "-c C:/mydirectory/.eslintrc.json --ignore-path C:/mydirectory/.eslintignore ."
}
Using the extension with VS Code’s task running
From the doc:
The extension is linting an individual file only on typing. If you want to lint the whole workspace set
eslint.lintTask.enabletotrueand the extension will also contribute theeslint: lint whole foldertask. There is no need anymore to define a custom task intasks.json.
If you are not familiar with task! Here how you use the above!
- Go to Command pallet (CTRL + P + SHIFT)
> tasks run- Hit
Tasks: run Task - You’ll find
eslint: lint whole folder - Hit and that’s it


If eslint have no configuration setup! You’ll get the following error!

If as such, Run eslint --init
And follow the interactive terminal!
Note if you don’t have eslint command avaialble globally!
Intall it globally by running npm i -g eslint!
Result of the run
First the task run on the terminal!


You can see a detailed report! You can use the click link on terminal feature (CTRL + CLICK)! To directly open the file in question!

You can see too that the problems will automatically be listed in the problems tab! Which is cool!
Super cool! But i don’t use eslint
Typescript and TSLINT
If you are a typescript user and you use TSLINT!
Then we need to go to the global way! And that’s by creating a task!
Just like eslint did! (problemMatcher: $tsc) [you’ll get to know what that is just a bit bellow].
(Make sure to check TSLINT is deprecated title)!
I use a complete other language (c#, java, c++, php, python …)
Yup yup! We need a global way! And the global way is through creating a task!
Creating a task (The global way)
(Support all languages (to be configured for each))
We need to create a task!
The vscode documentation explains it pretty awesomely and in details!
https://code.visualstudio.com/docs/editor/tasks
Check the documentation!
Now in short! I would resume what a task is in:
A vscode tool and feature! That allow us to setup tasks based on tools and scripts and run them within vscode! Analyse there output within vscode! And activating and profiting from other vscode features! That includes Click link navigation on terminal! And problems listing on problem tab! Auto fixing and suggestions! Integration with the debugging tool! …etc! It depends on the task type!

A task get set through a setting file (task.json)! For a workspace or the whole user! (Some tasks types need to be set for only a workspace! They depends on the variables of a workspace)!
Also the task feature contains a lot of options and features! And is a big piece! For more just check the documentation!
Back to our problem!
We want linting of a whole project! And errors detection!
We need to have the errors listed on the problems tab! And preferably too with fixes suggestions!
All this gonna be done through a task.
Setting up the task! And core elements
Through vscode task features and integration! We need to configure it to allow good output! And integration with the problems tab!
The config will go as such:
{
  // See https://go.microsoft.com/fwlink/?LinkId=733558
  // for the documentation about the tasks.json format
  "version": "2.0.0",
  "tasks": [
    {
      "type": "npm",
      "script": "lint",
      "problemMatcher": ["$eslint-stylish"]
    }
  ]
}
(Here eslint through npm run lint)
The most important thing here to see! Is the type which determine the category and the task handling and launch setup! The script which define what get executed! And lastly and importantly problemMatcher!
For the whole tasks setting up! And options you can check the doc!
Here another example for typescript:
{
  // See https://go.microsoft.com/fwlink/?LinkId=733558
  // for the documentation about the tasks.json format
  "version": "2.0.0",
  "tasks": [
    {
      "type": "typescript",
      "tsconfig": "tsconfig.json",
      "problemMatcher": ["$tsc"],
      "group": {
        "kind": "build",
        "isDefault": true
      }
    }
  ]
}
TSLINT is deprecated
Yo ! You just shown how, a line above! Yea there is something important!
We can see typescript problems through tsc compile process! Or Through TSLINT! TSLINT will support code style rules and so on! BUT mmmm TSLINT is deprecated! And ESLINT is taking on! And in simple words use Eslint! And so we can use Eslint for Typescript! And that can be more rich!
Check the link bellow from the official link:
https://code.visualstudio.com/api/advanced-topics/tslint-eslint-migration
And humor face: Don’t be affraid to do this

Already did!
Should i migrate Tslint to eslint
Another reason would be: TSLint is a linter that can only be used for TypeScript, while ESLint supports both JavaScript and TypeScript.
Reason for the choice and deprecation is:
In the TypeScript 2019 Roadmap, the TypeScript core team explains that ESLint has a more performant architecture than TSLint and that they will only be focusing on ESLint when providing editor linting integration for TypeScript.
Check it here and how to setup .eslintrc.js without the migration tool!
or https://www.npmjs.com/package/@typescript-eslint/eslint-plugin
Which in short would be like:
module.exports = {
  "parser": "@typescript-eslint/parser", // set eslint parser
   "parserOptions": {
       "ecmaVersion": 12, // latest ecma script features
       "sourceType": "module" // Allows for the use of imports
   },
   "plugins": [
       "@typescript-eslint"
   ],
  extends: [
    "plugin:@typescript-eslint/recommended" // Uses the recommended rules from the @typescript-eslint/eslint-plugin
  ],
  rules: {
    // Place to specify ESLint rules. Can be used to overwrite rules specified from the extended configs
    // e.g. "@typescript-eslint/explicit-function-return-type": "off",
  }
};
And sure : npm install --save-dev eslint @typescript-eslint/parser @typescript-eslint/eslint-plugin
Make sure to use
eslint --ext .js,.tswhen executing eslint! Since by default eslint will only search for .js files.
Make sure to use the code styles versions that support typescript like this one for airbnb:
https://www.npmjs.com/package/eslint-config-airbnb-typescript
(The next section is the most important)!
Processing task output with problem matchers
https://code.visualstudio.com/docs/editor/tasks#_processing-task-output-with-problem-matchers
VS Code can process the output from a task with a problem matcher. Problem matchers scan the task output text for known warning or error strings, and report these inline in the editor and in the Problems panel. VS Code ships with several problem matchers ‘in-the-box’:
- TypeScript:
$tscassumes that file names in the output are relative to the opened folder. - TypeScript Watch:
$tsc-watchmatches problems reported from the tsc compiler when executed in watch mode. - JSHint:
$jshintassumes that file names are reported as an absolute path. - JSHint Stylish:
$jshint-stylishassumes that file names are reported as an absolute path. - ESLint Compact:
$eslint-compactassumes that file names in the output are relative to the opened folder. - ESLint Stylish:
$eslint-stylishassumes that file names in the output are relative to the opened folder. - Go:
$gomatches problems reported from the go compiler. Assumes that file names are relative to the opened folder. - CSharp and VB Compiler:
$mscompileassumes that file names are reported as an absolute path. - Lessc compiler:
$lesscassumes that file names are reported as absolute path. - Node Sass compiler:
$node-sassassumes that file names are reported as an absolute path.
OK but you said JAVA, C/C++, PHP, Python …
=> We need to write our own problemMatcher
C/C++ (GCC)
The c/c++ support in vscode is added through the official ms extension ms-vscode.cpptools
https://marketplace.visualstudio.com/items?itemName=ms-vscode.cpptools
The extension provide $gcc problemMatcher!
A task will go as:
{
  "version": "2.0.0",
  "tasks": [
    {
      "type": "shell",
      "label": "g++ build all",
      "command": "/usr/bin/g++",
      "args": ["${workspaceFolder}/src/*.cpp", "-o", "${workspaceFolder}/build"],
      "options": {
        "cwd": "/usr/bin"
      },
      "problemMatcher": ["$gcc"],
      "group": {
        "kind": "build",
        "isDefault": true
      }
    }
  ]
}
Note that i just made the compilation to go for files in src (one level)
One can use cmake to build!
May like to check :
https://code.visualstudio.com/docs/cpp/config-linux#_build-helloworldcpp
Defining a problem matcher
You can check the doc section bellow:
https://code.visualstudio.com/docs/editor/tasks#_defining-a-problem-matcher
An example for gcc was given for c/c++!
A compilation outcome will be like:
helloWorld.c:5:3: warning: implicit declaration of function ‘prinft’
We set a matcher by the following
{
  // The problem is owned by the cpp language service.
  "owner": "cpp",
  // The file name for reported problems is relative to the opened folder.
  "fileLocation": ["relative", "${workspaceFolder}"],
  // The actual pattern to match problems in the output.
  "pattern": {
    // The regular expression. Example to match: helloWorld.c:5:3: warning: implicit declaration of function ‘printf’ [-Wimplicit-function-declaration]
    "regexp": "^(.*):(d+):(d+):s+(warning|error):s+(.*)$",
    // The first match group matches the file name which is relative.
    "file": 1,
    // The second match group matches the line on which the problem occurred.
    "line": 2,
    // The third match group matches the column at which the problem occurred.
    "column": 3,
    // The fourth match group matches the problem's severity. Can be ignored. Then all problems are captured as errors.
    "severity": 4,
    // The fifth match group matches the message.
    "message": 5
  }
}
Directly in the task config that can go as:
{
  "version": "2.0.0",
  "tasks": [
    {
      "label": "build",
      "command": "g++",
      "args": ["${workspaceFolder}/src/*.cpp", "-o", "${workspaceFolder}/build"],
      "problemMatcher": {
        "owner": "cpp",
        "fileLocation": ["relative", "${workspaceFolder}"],
        "pattern": {
          "regexp": "^(.*):(d+):(d+):s+(warning|error):s+(.*)$",
          "file": 1,
          "line": 2,
          "column": 3,
          "severity": 4,
          "message": 5
        }
      }
    }
  ]
}
You can see how staight forward the setting is!
You can check the doc link above for more details!
Defining multiple line problem matcher
https://code.visualstudio.com/docs/editor/tasks#_defining-a-multiline-problem-matcher
Some tools spread problems found in a source file over several lines, especially if stylish reporters are used. An example is ESLint; in stylish mode it produces output like this:
test.js
  1:0   error  Missing "use strict" statement                 strict
✖ 1 problems (1 errors, 0 warnings)
I’ll not go about the details check the doc! it explains it well (check the loop property too!
{
  "owner": "javascript",
  "fileLocation": ["relative", "${workspaceFolder}"],
  "pattern": [
    {
      "regexp": "^([^s].*)$",
      "file": 1
    },
    {
      "regexp": "^s+(d+):(d+)s+(error|warning|info)s+(.*)ss+(.*)$",
      "line": 1,
      "column": 2,
      "severity": 3,
      "message": 4,
      "code": 5,
      "loop": true
    }
  ]
}
Modifying an existing problem matcher
https://code.visualstudio.com/docs/editor/tasks#_modifying-an-existing-problem-matcher
Simply check the doc!
JAVA
oK now we know, how to make problems matchers! We didn’t do java yet! So let’s do that for it! (Wait i just googled and here someone that did it)
{
    // compiles all files in the folder of the currently opened file
    "taskName": "javac all",
    "args": ["$env:CLASSPATH += ';${fileDirname}'; javac ${fileDirname}*.java -Xlint"],
    "showOutput": "silent",
    "problemMatcher": {
        "owner": "java",
        "fileLocation": "absolute",
        "pattern": {
            "regexp": "^(.*):([0-9]+): (error|warning): (.*)$",
            "file": 1,
            "line": 2,
            "severity": 3,
            "message": 4
        }
    }
}
PHP
Here a php task too that use code sniff!
src (googling again): https://github.com/bmewburn/vscode-intelephense/issues/1102
{
  "version": "2.0.0",
  "tasks": [
    {
      "label": "PHP: CodeSniff Workspace",
      "type": "shell",
      "command": "${config:phpcs.executablePath}",
      "args": [
        "--standard=${config:phpcs.standard}",
        "--extensions=module,inc,install,php,theme,test,js,css",
        "--report=csv",
        "--basepath=${workspaceFolder}",
        "web/modules/custom"
      ],
      "options": {
        "cwd": "${workspaceFolder}"
      },
      "problemMatcher": {
        "owner": "php",
        "fileLocation": [
          "relative",
          "${workspaceFolder}"
        ],
        "pattern": {
          "regexp": "^"(.*?)",(d+),(d+),(error|warning),"(.*)",.*$",
          "file": 1,
          "line": 2,
          "column": 3,
          "severity": 4,
          "message": 5
        }
      }
    }
  ]
}
Problem matcher and auto fixing
Ok so how the problem matcher make the auto fixing suggestions? The answer is it doesn’t! It can be clear! Or you may said at the first time you get to see the problem matcher, hey it may have a relation!
It isn’t! The languages support or linters extensions are what provide such a feature! And that through using vscode Action api!
Check
https://code.visualstudio.com/api/references/vscode-api#CodeAction
https://code.visualstudio.com/api/references/vscode-api#CodeActionKind
https://code.visualstudio.com/api/references/vscode-api#CodeActionProvider%3CT%3E
So simply: The problemMatcher set how the output of a task run is parsed and outputed on the problems tab!
And the languages support extension implement the auto fixes! Or linters! (Extensions) [I can make a play ground extension if i want]!
To note too that the yellow bulbe in the problems tab! Works and allow auto fixing! Because the problem matcher provide the line for the problem! That get mapped with the output of the extension fixing suggestions range! That get precised on the CodeActionProvider!
Добавлено 27 марта 2021 в 16:24
Когда вы пишете свои программы, компилятор проверяет, соблюдаете ли вы правила языка C++ (при условии, что вы отключили расширения компилятора, как описано в уроке «0.10 – Настройка компилятора: расширения компилятора»).
Если вы сделали что-то, что определенно нарушает правила языка, во время компиляции компилятор выдаст ошибку, предоставив как номер строки, содержащей ошибку, так и некоторый текст о том, что ожидалось и что было найдено. Реальная ошибка может быть в этой или в предыдущей строке. После того, как вы определили и исправили строку кода, содержащую ошибку, вы можете попробовать скомпилировать программу снова.
В других случаях компилятор может найти код, который, кажется, может быть ошибочным, но компилятор не может быть в этом уверен (помните девиз: «доверяй программисту»). В таких случаях компилятор может выдать предупреждение. Предупреждения не останавливают компиляцию, но являются предупреждением программисту о том, что что-то не так.
Лучшая практика
Не позволяйте предупреждениям накапливаться. Решайте их по мере их появления (как если бы это были ошибки).
В большинстве случаев предупреждения можно устранить, исправив ошибку, на которую указывает предупреждение, или, переписав строку кода, генерирующую предупреждение, таким образом, чтобы предупреждение больше не генерировалось.
В редких случаях может потребоваться явное указание компилятору не генерировать конкретное предупреждение для рассматриваемой строки кода. C++ не предоставляет официальный способ сделать это, но многие отдельные компиляторы (включая Visual Studio и GCC) предлагают решения (через непортируемые директивы #pragma) для временного отключения предупреждений.
По умолчанию большинство компиляторов генерируют предупреждения только о наиболее очевидных проблемах. Однако вы можете попросить свой компилятор быть более настойчивым в предупреждении о вещах, которые он считает странными.
Лучшая практика
Увеличьте уровень предупреждений до максимума, особенно во время обучения. Это поможет вам определить возможные проблемы.
Повышение уровня предупреждений
Для пользователей Visual Studio
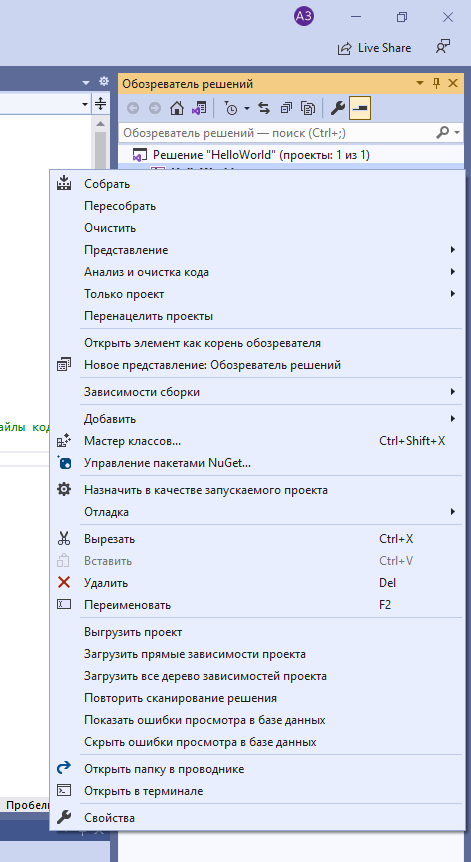
Чтобы повысить уровень предупреждений, кликните правой кнопкой мыши на имени проекта в окне обозревателя решений и выберите Свойства:
В диалоговом окне проекта сначала убедитесь, что в поле Конфигурация (Configuration) установлено значение Все конфигурации (All Configurations).
Затем кликните C/C++ → вкладка Общие (General) и установите Уровень предупреждений (Warning Level) на Уровень4 (/W4):

Примечание: не выбирайте Включить все предупреждения (/Wall) (EnableAllWarnings (/Wall)), иначе вас завалит предупреждениями, генерируемыми стандартной библиотекой C++.
Для пользователей Code::Blocks
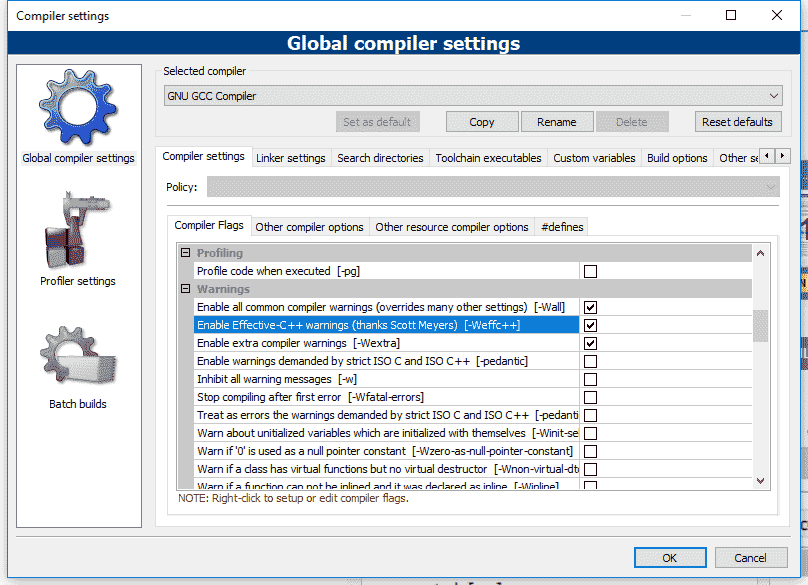
В меню меню Settings (Настройки) → Compiler (Компилятор) → вкладка Compiler Settings (Настройки компилятора) найдите и включите параметры, которые соответствуют параметрам -Wall, -Weffc++ и -Wextra:
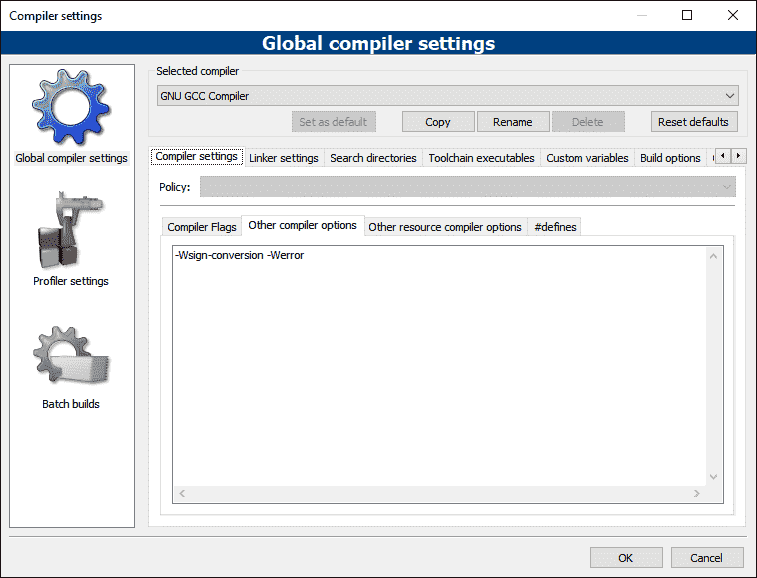
Затем перейдите на вкладку Other compiler options (Другие параметры компилятора) и добавьте -Wsign-conversion в текстовое поле:
Примечание. Параметр -Werror объясняется ниже.
Для пользователей GCC/G++
Добавьте в командную строку следующие флаги: -Wall -Weffc++ -Wextra -Wsign-conversion.
Считайте предупреждения ошибками
Также можно указать вашему компилятору обрабатывать все предупреждения, как если бы они были ошибками (в этом случае компилятор остановит компиляцию, если обнаружит какие-либо предупреждения). Это хороший способ обеспечить соблюдение рекомендации о том, что необходимо исправлять все предупреждения (если вам не хватает самодисциплины, что характерно для большинства из нас).
Для пользователей Visual Studio
Чтобы рассматривать предупреждения как ошибки, кликните правой кнопкой мыши имя проекта в окне обозревателя решений и выберите Свойства:
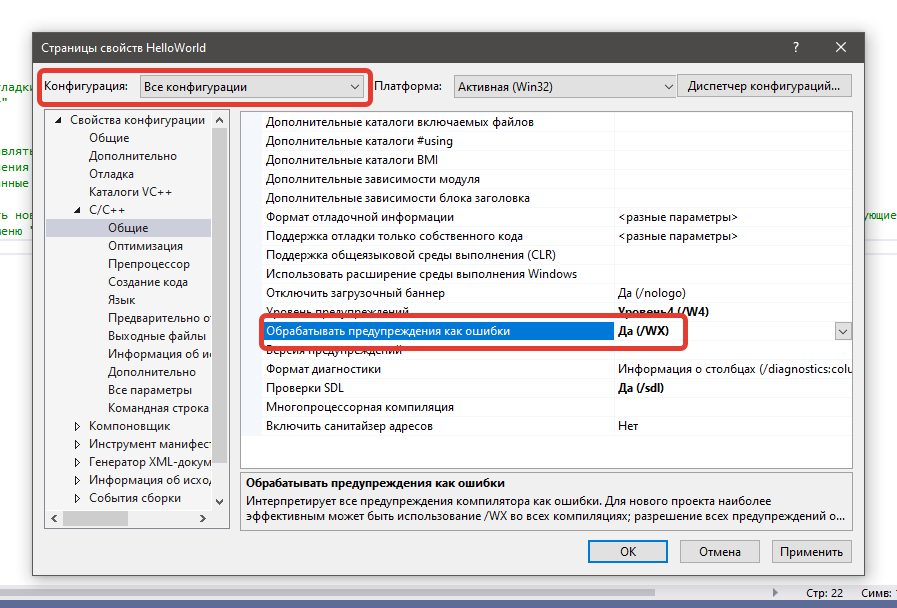
В диалоговом окне проекта сначала убедитесь, что в поле Конфигурация (Configuration) установлено значение Все конфигурации (All Configurations).
Затем кликните C/C++ → вкладка Общие (General) и установите для параметра Обрабатывать предупреждения как ошибки (Treat Warnings As Errors) значение Да(/WX) (Yes (/WX)).
Для пользователей Code::Blocks
В меню меню Settings (Настройки) → Compiler (Компилятор) → вкладка Other compiler options (Другие параметры компилятора) добавьте -Werror в область редактирования текста:
Для пользователей GCC/G++
Добавьте в командную строку флаг -Werror.
Теги
C++ / CppCode::BlocksIDELearnCppVisual StudioДля начинающихКомпиляторОбучениеПрограммирование
Я использую Visual Studio (2017) довольно давно, чтобы программировать в основном на C# для игр Unity. Однако недавно я заметил, что он больше не отображает никаких ошибок в коде, или, по крайней мере, большинство из них. Сначала я начал делать небольшие тесты, например, удаляя переменные, которые многократно использовались в скриптах. Visual Studio не показывала никаких ошибок, а при возврате в Unity отображала все правильные ошибки в консоли (как всегда). Вместо этого, если бы я попытался убрать круглую скобку, через некоторое время она показывала ошибки повсюду. Опять же, это было действительно странно.
Спустя один день я все еще проводил тестирование и заметил, что если я сначала открыл Visual Studio, а затем в «недавнем» щелкнул файл .sln, открывший все сценарии для одного проекта Unity, он сразу показал все правильные ошибки, как это было всегда и как (я думаю) всегда должно быть. Я начал искать некоторые различия между тем, что я там видел, и тем, что я видел при открытии файлов .cs (таким образом, который не работал):
- Наверху я не видел «Отладка» и «Любой процессор», как это было, когда он работал:

-
Другое дело, что между кнопками«Проект» и «Отладка» (вверху, открывающими раскрывающиеся списки) у меня не было кнопки «Скомпилировать».
-
Кроме того, в раскрывающемсясписке «Отладка» многие параметры, такие как «начать отладку», были недоступны / отключены.
-
Вверху слева, подкрайним левым именем скрипта, у меня есть «Внешние файлы» вместо «Assembly-CSharp».
-
Справа от того места, где должны быть «Отладка» и «Любой процессор», у меня есть «Подключить» вместо «Пуск» (или что-то подобное, язык моей системы не английский, это переводы)
Еще одна (возможно, менее актуальная) вещь, которая изменилась по сравнению с предыдущим, когда работала:
- Я установил Visual Studio 2019 и удалил его через несколько минут (я всегда предпочитал Visual Studio 2017!).
Программирование без просмотра ошибок в реальном времени занимает гораздо больше времени, поэтому я бы очень хотел исправить эту проблему, если это возможно. Мне нужно что-нибудь активировать? Я случайно нажал комбинацию клавиш?
Заранее спасибо!:)
2020-05-27 17:34
9
ответов
Решение
Удаление файла.suo может помочь при неустойчивом поведении Visual Studio.
Файл содержит пользовательские настройки решения, включая точки останова, параметры отладки, закладки, и может быть поврежден или сохранен в нежелательном состоянии.
Если вы удалите его, новый файл.suo будет создан после повторного открытия решения в Visual Studio.
2020-06-04 12:53
Просто откройте форму списка ошибок View -> Error List или используйте ярлык Ctrl + , E

2020-05-27 18:50
У меня тоже была эта проблема. Для меня это было вызвано открытием проекта вместо решения. Когда я открыл решение (файл .sln), все функции редактора начали работать.
15 июл ’21 в 16:17
2021-07-15 16:17
2021-07-15 16:17
Вам нужно включить ошибки подчеркивания в параметрах редактора в Visual Studio.
Эти варианты можно найти здесь:
Инструменты> Параметры> Текстовый редактор> C# > Дополнительно> Справка редактора
2020-05-29 19:09
У меня была такая же проблема в предварительной версии VS 2022.
Решением было проверить: Инструменты -> Параметры -> Текстовый редактор -> Общие -> Показывать волнистые линии ошибок.
Диалог настроек
18 авг ’21 в 02:22
2021-08-18 02:22
2021-08-18 02:22
Перейдите к настройке, введите Error Squiggles в настройках поиска и включите его.
2021-11-17 21:18
Для меня это был файл, который не был включен в проект.
После переключения некоторых веток вновь созданный файл перестал включаться в проект и не считывался на наличие ошибок. Мне пришлось нажать «Показать все файлы» в обозревателе решений, щелкнуть правой кнопкой мыши файл и выбрать «Включить в проект».
2022-07-07 09:24
Попробуйте удалить папку bin в каталоге проекта, это заставит перекомпилировать код.
Просто не забудьте сохранить в папке bin все файлы .dll, которые могли быть добавлены вручную. Вы можете увидеть их в разделе «Ссылки» в обозревателе решений и добавить их обратно после.
Visual Studio повторно создаст папку bin, не волнуйтесь!
2021-04-16 16:51
У меня была эта проблема какое-то время, и это было связано с моим решением. Я зашел в свой проект, провел анализ кода, а затем перенаправил его на более старую версию.
Понятия не имею, почему это сработало, но проблема устранилась.
2020-05-30 07:20
|
0 / 0 / 0 Регистрация: 18.03.2021 Сообщений: 4 |
|
|
1 |
|
|
VS 2019 18.03.2021, 10:36. Показов 16528. Ответов 18
Добрый день! Вчера перестало работать подчёркивание ошибок. IntelliSense показывает инфу по типам переменных, функциям и т.д., но подчёркивания ошибок нет. Любая чушь, введённая в поле с кодом, будет приниматься программой и в списке ошибок будет писаться «Проблемы не найдены» до того момента, пока не проведёшь отладку. Менял настройки по советам из интернета, сбрасывал настройки полностью, перезагружал и студию и комп несколько раз. Результата нет. Может быть, кто-то с этим сталкивался? Не хотелось бы сносить VS и ставить заново, но пока других вариантов я не вижу
0 |

|
2125 / 2009 / 451 Регистрация: 17.02.2019 Сообщений: 3,256 |
|
|
18.03.2021, 11:22 |
2 |
|
forMax, а так пробовали Кликните здесь для просмотра всего текста
0 |
|
0 / 0 / 0 Регистрация: 18.03.2021 Сообщений: 4 |
|
|
18.03.2021, 12:01 [ТС] |
3 |
|
Да, пробовал. Не помогает. Он не только не подчёркивает ошибки, но и не проверяет правильность кода при написании — то есть внизу будет указано 0 ошибок, даже если они есть и они очевидны
0 |
|
2125 / 2009 / 451 Регистрация: 17.02.2019 Сообщений: 3,256 |
|
|
18.03.2021, 13:24 |
4 |
|
РешениеМожет через Visual Studio Installer попробовать восстановить Кликните здесь для просмотра всего текста
1 |
 Сообщение было отмечено forMax как решение
|
0 / 0 / 0 Регистрация: 18.03.2021 Сообщений: 4 |
|
|
18.03.2021, 15:12 [ТС] |
5 |
|
January29, спасибо, это помогло. Но частично. Теперь в новых проектах подсказки и исправления работают. А вот в старых, увы, проблема осталась. Благо, их у меня пока немного
0 |
|
2125 / 2009 / 451 Регистрация: 17.02.2019 Сообщений: 3,256 |
|
|
18.03.2021, 15:24 |
6 |
|
Решение
А вот в старых, увы, проблема осталась. Странно, наверно там когда ошибки, записывает какой то файл с ошибками. Может быть, я точно не знаю.
1 |

|
0 / 0 / 0 Регистрация: 18.03.2021 Сообщений: 4 |
|
|
19.03.2021, 10:05 [ТС] |
7 |
|
January29, очистил, пересобрал и…. Оно заработало как надо. Спасибо огромное за помощь
0 |
")
|
2125 / 2009 / 451 Регистрация: 17.02.2019 Сообщений: 3,256 |
|
|
19.03.2021, 10:28 |
8 |
|
forMax, не за что я рад что заработало
0 |
|
фрилансер 4815 / 4417 / 941 Регистрация: 11.10.2019 Сообщений: 11,652 |
|
|
19.03.2021, 15:47 |
9 |
|
January29, это лечится (возможно) так: в любом открытом файле правой кнопкой мыши —
0 |
|
2125 / 2009 / 451 Регистрация: 17.02.2019 Сообщений: 3,256 |
|
|
19.03.2021, 16:32 |
10 |
|
Алексей1153, Вот что то нет у меня вот этого
0 |

|
фрилансер 4815 / 4417 / 941 Регистрация: 11.10.2019 Сообщений: 11,652 |
|
|
19.03.2021, 16:58 |
11 |
|
January29, нуу, я не знаю, почему так )
0 |
|
Администратор
15668 / 12629 / 5003 Регистрация: 17.03.2014 Сообщений: 25,708 Записей в блоге: 1 |
|
|
20.03.2021, 09:42 |
12 |
|
в любом открытом файле правой кнопкой мыши — Это вроде только для С/С++ файлов.
0 |
|
1 / 1 / 0 Регистрация: 30.11.2021 Сообщений: 4 |
|
|
21.01.2023, 10:28 |
13 |
|
Такая же проблема появилась на версии 2022 17.
0 |
|
2125 / 2009 / 451 Регистрация: 17.02.2019 Сообщений: 3,256 |
|
|
21.01.2023, 14:32 |
14 |
|
Не подчеркивает, пишет, что 0 ошибок в коде Пробовали с поста 2. Попробуйте через Visual Studio Installer восстановить студию, как в посте 4.
0 |
|
1 / 1 / 0 Регистрация: 30.11.2021 Сообщений: 4 |
|
|
21.01.2023, 15:38 |
15 |
|
Пробовали с поста 2. Пробовал. Галка уже стоит. Пробовал убирать и заново ставить
Попробуйте через Visual Studio Installer восстановить студию Восстанавливал и переустанавливал несколько раз. Как будто настройка где-то сохраняется в другом месте.
Может собачка зарыта в скрытой папке .vs, удалите её или переименуйте если не хотите удалять. В инете видел этот совет и удалял. Дело в том, что не подчеркивает ошибки не просто в старом проекте, но и в новых.
Ещё может быть наверно цвет волнистой линии для ошибок изменен в цвет фона. Про это тоже читал. Менял цветовую схему на другую и возвращал обратно. Миниатюры
0 |
|
2125 / 2009 / 451 Регистрация: 17.02.2019 Сообщений: 3,256 |
|
|
21.01.2023, 18:01 |
16 |
|
Tsarst, кажись нашел пробуйте Скрин
1 |

|
1 / 1 / 0 Регистрация: 30.11.2021 Сообщений: 4 |
|
|
21.01.2023, 18:40 |
17 |
|
Это то, что надо! Спасибо.
0 |
|
2125 / 2009 / 451 Регистрация: 17.02.2019 Сообщений: 3,256 |
|
|
21.01.2023, 18:52 |
18 |
|
Это то, что надо! а что там было, если не секрет?
0 |
|
1 / 1 / 0 Регистрация: 30.11.2021 Сообщений: 4 |
|
|
21.01.2023, 18:56 |
19 |
|
Эта настройка была выключена. Установил на текущий документ, стало всё подчёркивать, показывать опечатки
1 |
|
IT_Exp Эксперт 87844 / 49110 / 22898 Регистрация: 17.06.2006 Сообщений: 92,604 |
21.01.2023, 18:56 |
|
19 |