Цветные принтеры OKI на сегодняшний день являются пожалуй самыми инновационными. Одна только светодиодная технология чего стоит. Не все об этом знаю, но цветные принтеры и МФУ OKI так же имеют монохромный режим печати. При печати в этом режиме цветной тонер не тратится в отличии от остальных производителей. Данный режим достигается достаточно просто, для этого в монохромном режиме производится физическое отсоединение цветных драм-картриджей от привода.
За отключение цветных драм картриджей в 300-й и 500 серии цветных принтеров и МФУ OKI отвечает специальная муфта. При активации монохромного режима в драйвере принтера муфта сдвигает в сторону планку, которая приподнимает цветные драм-картридж вверх. В этом режиме драм-картриджей не касается бумага и прочие подвижные части процесса печати. Данный режим позволяет не только избежать расхода тонера, но и в разы увеличить ресурс цветных драм-картриджей. Кстати в этом режиме так же повышается скорость печати стразу на несколько страниц.
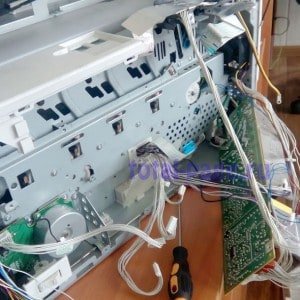
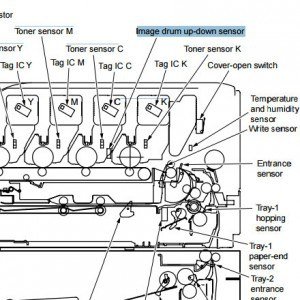
Image drum up-down sensor
Несмотря на все достоинства реализации монохромного режима, этот режим иногда доставляет неудобства в связи с возникновением ошибки «SERVICE CALL 142:ERROR». Эта ошибка указывает на сбой переключения режимов «монохромного» и «полноцветного». Эта ошибка чаще всего возникает из-за застревания одного из драм-картриджей в своем посадочном месте. У муфты привода не хватает мощности приподнять драмы и датчик «Image drum up-down sensor» выдает ошибку SERVICE CALL 142. Решается проблема переустановкой драм-картриджей и смазкой посадочных мест. Бывает, что датчик «Image drum up-down sensor» запылился или вышел из строя. В нашем последнем ремонте причиной возникновения ошибки стал выход из строя самой муфты переключения режимов. Муфту приобрести оказалось нереально сложно, но нам повезло, так как на складе лежал списанный трудяга OKI C511, вот с него эту муфту и переставили.
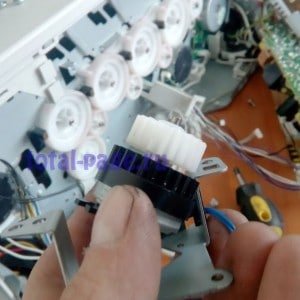
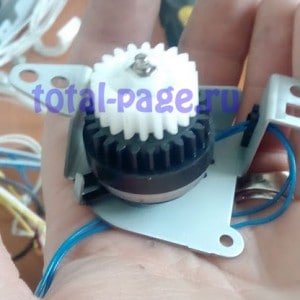
Муфта переключения с полноцветного режима в монохромный
Оцените качество заметки
![]() Загрузка…
Загрузка…
4 комментария
-
Ренат / 02.11.2015
Спасибо за статью!
Ушло в копилку знаний. -
Дмитрий / 07.02.2018
Спасибо!!! очень помогла статья.
-
Михаил / 30.11.2021
Похоже у меня тоже муфта накрылась. Снял панель слева, там на плате стоит оптопара которая регистрирует поднятие. Полоска с зубцами двигается вперед, поднимает картриджи и перекрывает оптопару. Замерял время от включения(нажал на кнопку) до момента когда картриджи поднялись, оказалось 16,31 секунды (выскакивает ошибка). Выключил аппарат. Потом нажал кнопку включения и пальцем подталкивал эту полоску начиная с 13 секунды, аппарат стартанул нормально.
-
Если муфту не найдете, пишите, есть донор
-


Оставить комментарий
Обращаю внимание, что ошибки с номерами 300-600 являются пользовательскими ошибками, которые кроме номера содержат довольно подробное описание самой ошибки, а при нажатии на кнопку HELP можно получить подробное описание того, как эти ошибки разрешить.*Некоторые из этих ошибок приведены ниже
Пользовательские ошибки
Oki printer errors 140, 141 and 142
The Oki error codes 140, 141 and 142 all relate to the performance of your printers drum. The drum is crucial to the performance of your Oki printer, so you’ll need to resolve the problem before you’re allowed to print again.
The number you are receiving indicates which drum is having the issue:
- Error 140 – Yellow Oki Drum
- Error 141 – Magenta Oki Drum
- Error 142 – Cyan Oki Crum
Have you recently replaced the drum in your Oki machine?
This is likely causing the fault, so remove it from your machine and attempt to re-install it.
If the error persists, and you’re certain you’ve installed the drum unit correctly, contact Oki for further assistance on getting rid of the error. (Either email them or phone customer support on 01753 819819)
If you’ve not recently replaced your drum
Go into your printers menu and find the remaining life of the drum in your Oki printer. If it is reporting close to 0% we’d advise replacing that drum, which should resolve the issue.
If all of them seem fit and healthy, and the error persists, there’s likely an internal issue in your machine and you’ll need to contact Oki support.
– Compatible Printer model: OKI MC351
– OKI MC351 Error Code description:
- Code: 001
- Display: Inspection is required. 001 : Error
- Description: Machine Check Exception
A hardware error was detected (board failure or insufficient power supply capacity). - Troubleshooting Guides: Replace the CU/ PU board.
- Code: 002, 006, 009, 011
- Display: Power OFF/ON 002 : Error 006 : Error 009 : Error 011 : Error
- Description: CPU Exception
- Troubleshooting Guides: Is the error display provided again?
Remove any RAM DIMM and turn off and on the MFP. Replace the CU/ PU board. Reinstall the RAM DIMM.
- Code: 020
- Display: Inspection is required. 020 : Error
- Description: CU ROM Hash Check Error
- Troubleshooting Guides: Is the error display provided again? Yes Turn off and on the MFP. Replace the CU/ PU board.
- Code: 024, 025
- Display: Inspection is required. 024 : Error 025 : Error
- Description: Kanji Font Error
- Troubleshooting Guides:
- Code: 030
- Display: Inspection is required. 030 : Error
- Description: CU RAM Check Error
- Troubleshooting Guides: Is the error display provided again? Yes Turn off and on the MFP. Replace the CU/ PU board.
- Code: 031, 036
- Display: Inspection is required. 031 : Error 036 : Error
- Description: CU optional RAM check error
- Troubleshooting Guides: Is RAM DIMM installed properly? Does the MFP recover by replacing the RAM DIMM?
Reinstall the RAM DIMM. Replace the RAM DIMM. Replace the CU/ PU board.
- Code: 040
- Display: Inspection is required. 040 : Error
- Description: CU EEPROM error
- Troubleshooting Guides: Is the error display provided again? Yes Turn off and on the MFP. Replace the CU/ PU board.
- Code: 041
- Display: Inspection is required. 041 : Error
- Description: CU flash memory error or CU board flash ROM error
- Troubleshooting Guides: Is the error display provided again? Yes Turn off and on the MFP. Replace the CU/ PU board.
- Code: 042, 043, 045
- Display: Inspection is required. 042 : Error 043 : Error. 045 : Error
- Description: Flash memory file system error
Accessing the flash ROM directly mounted on the CU/ PU board failed. - Troubleshooting Guides: Accessing the flash ROM directly mounted on the CU/ PU board failed. Turn off and on the MFP. Replace the CU/ PU board.
- Code: 052
- Display: Power OFF/ON 052 : Error
- Description: Image processor driver error
- Troubleshooting Guides: Is the error display provided again? Yes Turn off and on the MFP. Replace the CU/ PU board.
- Code: 064
- Display: Inspection is required. 064 : Error
- Description: SD Card Missing Error
- Troubleshooting Guides:
- Code: 067, 068
- Display: Inspection is required. 067 : Error 068 : Error
- Description: Interface monitor error
- Troubleshooting Guides:

Solve OKI MC351 Error codes
- Code: 069
- Display: Inspection is required. 069 : Error
- Description: NIC Chip Error
- Troubleshooting Guides:
- Code: 070
- Display: Power OFF/ON 070 : Error
- Description: PostScript error
Error is deteced inside the postscript core - Troubleshooting Guides: Error is deteced inside the postscript core Take note of the address that is displayed on LCD. Turn off and on the MFP.
- Code: 072
- Display: Power OFF/ON 072 : Error
- Description: Engine interface error or PU-CU interface error
- Troubleshooting Guides: Is the CU/PU board installed properly?
Reinstall the CU/ PU board properly. Replace the CU/ PU board.
- Code: 073
- Display: Power OFF/ON 073 : Error
- Description: Video error. An error was detected in expanding image data (an invalid data was received)
- Troubleshooting Guides: Is the CU/PU board installed properly? Does the error occur again?
Reinstall it properly. Change the PC to a high-specification one or decrease the resolution, and perform printing again. Replace the CU/ PU board. Replace the interface cable. Reinstall the PC printer driver.
Is the CU/PU board installed properly? Does the error occur again? Does the error depend on print data?
Reinstall it properly. Perform printing again. Print other data. Replace the CU/PU board. Ask design people to analyze the data.
- Code: 074, 075
- Display: Power OFF/ON 074 : Error 075 : Error
- Description: Video error. An error was detected in expanding image data.
- Troubleshooting Guides: Is the CU/PU installed properly?
Reinstall it properly. Replace it.
- Code: 081
- Display: Inspection is required. 081 : Error
- Description: Parameter matching check error
Reading from or writing into EEPROM or flash memory cannot be made properly. - Troubleshooting Guides: Reading from or writing into EEPROM or flash memory cannot be made properly. Turn off and on the MFP. Replace the CU/PU board when the symptom persists.
- Code: 104
- Display: Inspection is required. 104 : Error
- Description: An engine EEPROM read/write error was detected.
- Troubleshooting Guides: Does the error occur again? Yes Turn off and on the MFP Replace the CU/PU board.
- Code: 106
- Display: Inspection is required. 106 : Error
- Description: Engine control logic error
- Troubleshooting Guides: Does the error occur again? Yes Turn off and on the MFP Replace the CU/PU board.
- Code: 112
- Display: Inspection is required. 112 : Error
- Description: The 2nd tray for a model different from the MFP was detected.
- Troubleshooting Guides: Is the 2nd tray for the MFP installed? No Install proper 2nd tray.
- Code: 121
- Display: Inspection is required. 121 : Error
- Description: High-voltage power supply interface error
- Troubleshooting Guides: Is the cable between the CU/ PU board and the highvoltage power unit connected properly? Is a contact faulty?
Reconnect it properly. Check the highvoltage line for no poor connection. Replace the highvoltage power supply.
- Code: 122
- Display: Inspection is required. 122 : Error
- Description: Rear-fan error
- Troubleshooting Guides: Does the fan at the rear of the MFP operate? Is the connector of the fan connected properly?
Be sure of the connection of the fan. Replace the CU/PU board. Connect the fan properly. Replace the CU/PU board.
- Code: 123
- Display: Inspection is required. 123 : Error
- Description: Ambient humidity error or non connection of humidity sensor
- Troubleshooting Guides: Is the cable from the CU/PU board to the toner sensor board connected properly?
Re-connect it properly. Replace the toner sensor board.
- Code: 124
- Display: Inspection is required. 124 : Error
- Description: Ambient temperature error
- Troubleshooting Guides: Is the cable from the CU/PU board to the toner sensor board connected properly?
Re-connect it properly. Replace the toner sensor board.
- Code: 128.05
- Display: Inspection is required. 128 : Error 05
- Description: Image drum fan error
- Troubleshooting Guides: Is the connector of the fan connected properly? Does the error occur again?
Re-connect it properly. Replace the fan motor. Replace the CU/PU board.
- Code: 128.08
- Display: Inspection is required. 128 : Error 08
- Description: Front fan error
- Troubleshooting Guides: Is the connector of the fan connected properly? Does the error occur again?
Re-connect it properly. Replace the fan motor. Replace the CU/PU board.
- Code: 131 … 134
- Display: Inspection is required. 131 : Error – 134 : Error
- Description: LED head detection error (131=Y, 132=M, 133=C, 134=K)
- Troubleshooting Guides: Is the LED head installed properly? Is the LED head fuse broken? Does the error occur again?
Install the LED head unit. Check the LED head fuse. Check the fuse. Turn off and on the MFP. Replace the LED head unit.
- Code: 142
- Display: Inspection is required. 142 : Error
- Description: Image drum up-down movement position detection error
- Troubleshooting Guides: Is the image drum unit removed and installed smoothly? Is the connector of the image drum up-down clutch is connected properly?
Re-install it. Be sure of the connection of the image drum up-down clutch connector. Replace the toner sensor board. Connect the image drum updown clutch properly.
- Code: 153
- Display: Inspection is required. 153 : Error
- Description: Image drum unit fuse-cut error
- Troubleshooting Guides: Is the image drum unit installed properly? Does the error occur again? Is the MFP recovered by replacing the toner sensor board.
Re-install it. Turn off and on the MFP. Be sure of the cable connection from the CU/PU board to the toner sensor board, and then replace the toner sensor board. Replace the CU/PU board.
- Code: 154
- Display: Inspection is required. 154 : Error
- Description: Belt unit fusecut error
- Troubleshooting Guides: Is the belt unit installed properly? Does the error occur again?
Re-install it. Turn off and on the MFP. Be sure of cable connection, and then replace the CU/PU board.
- Code: 155
- Display: Inspection is required. 155 : Error
- Description: Fuser unit fuse-cut error
- Troubleshooting Guides: Is the fuser unit installed properly? Does the error occur again?
Clean the connection connector of the fuser unit, and then reinstall the fuser unit. Turn off and on the MFP. Be sure of cable connection, and then replace the CU/PU board.
- Code: 160 … 163
- Display: Inspection is required. 160 : Error – 163 : Error
- Description: Toner sensor detection error (160=Y, 161=M, 162=C, 163=K). This error does not occur with the MFP in the factory shipped configuration.
- Troubleshooting Guides: Is the toner cartridge installed? Is the toner slide shutter set?
Install the toner cartridge. Turn it to the fixed position. Turn off and on the MFP. Replace the toner sensor assembly.
- Code: 167
- Display: Inspection is required. 167 : Error
- Description: Thermistor slope error
- Troubleshooting Guides: Does an error message appear? Does the error occur again?
Turn off and on the MFP. Turn off and on the MFP after leaving it for 30 minutes.
- Code: 168
- Display: Inspection is required. 168 : Error
- Description: Compensation thermistor error
- Troubleshooting Guides: Does an error message appear? Does the error occur again?
Turn off and on the MFP. Turn off and on the MFP after leaving it for 30 minutes.
- Code: 170, 171
- Display: Inspection is required. 170 : Error 171 : Error
- Description: A fuser thermistor short or open circuit was detected.
- Troubleshooting Guides: Does the error occur again? Yes Turn off and on the MFP. Replace the fuser unit.
- Code: 172, 173
- Display: Inspection is required. 172 : Error 173 : Error
- Description: A fuser thermistor temperature error (high or low temperature) was detected.
- Troubleshooting Guides: Does the error occur again? Turn off and on the MFP. Replace the fuser unit. Replace the lowvoltage power supply, and then replace the CU/PU board when the error occurs again.
- Code: 174
- Display: Inspection is required. 174 : Error
- Description: A backup thermistor shot circuit was detected (high temperature)
- Troubleshooting Guides: Does the error occur again? Yes Turn off and on the MFP. Replace the fuser unit.
- Code: 175
- Display: Inspection is required. 175 : Error
- Description: A backup thermistor open circuit was detected (low temperature)
- Troubleshooting Guides: Does the error occur again? Yes Turn off and on the MFP. Replace the fuser unit.
- Code: 176, 177
- Display: Inspection is required. 176 : Error 177 : Error
- Description: A backup thermistor temperature error (high or low temperature) was detected.
- Troubleshooting Guides: Does the error occur again? Turn off and on the MFP. Replace the fuser unit. Replace the lowvoltage power supply.
- Code: 182
- Display: Inspection is required. 182 : Error
- Description: Option unit I/F error
- Troubleshooting Guides: Does the error occur again? Turn off and on the MFP. Be sure of connector connection. Replace the option unit.
- Code: 190
- Display: Power OFF/ON 190 : Error
- Description: System memory overflow
- Troubleshooting Guides: Does the error occur again? Yes Turn off and on the MFP. Replace the CU/PU unit.
- Code: 200, 201, 202
- Display: Inspection is required. 200 : Error – 202 : Error
- Description: PU firmware download error
- Troubleshooting Guides: An error occurred in rewriting the PU firmware. Turn off and on the MFP, and then redownload it (In general use of the MFP, this re-writing is not performed and this error does not occur).
- Code: 203 … 214
- Display: Power OFF/ON
203 : Error
204 : Error
207 : Error
208 : Error
213 : Error
214 : Error
F0C : Error
FFE : Error
FFF : Error - Description: CU program error (203 to 214 do not occur in general use of the MFP)
- Troubleshooting Guides: Invalid processing was performed with a CU program.
Replace the CU/PU board.
- Code: 209
- Display: Power OFF/ON 209 : Download error
- Description: Custom Media Type table downloading failure
- Troubleshooting Guides: Custom Media Type table downloading failed. Turn off and on the MFP, and then redownload it (In general use of the MFP, this downloading is not performed and this error does not occur).
- Code: 231
- Display: Inspection is required. 231 : Error
- Description: TAG interface error
IA TAG interface error was detected.
01 : A short-circuit error.
02 : TAG communication error. - Troubleshooting Guides: Be sure the toner cartridges and the image drums are properly set. Replace the toner cartridges. When the error occurs again after the image drums are re-installed, be sure of the cable connection from the CU/PU board to the toner sensor board.
- Code: 250
- Display: Power OFF/ON 250 : Error
- Description: SD card error
- Troubleshooting Guides:
- Code: 251
- Display: Inspection is required. 251 : Error
- Description: SD card erasure error
- Troubleshooting Guides:
- Code: 252 … 255
- Display: Inspection is required. 252 : Error – 255 : Error
- Description: SD card security error
- Troubleshooting Guides:
- Code: 256, 257
- Display: Inspection is required. 256 : Error 257 : Error
- Description: SD card error
- Troubleshooting Guides:
- Code: 802, 803, 805, 807, 808
- Display: Power OFF/ON
Error : 802
Error : 803
Error : 805
Error : 807
Error : 808 - Description: SU Exception
- Troubleshooting Guides:
- Code: 811, 812, 813
- Display: Power OFF/ON
Error : 811
Error : 812
Error : 813 - Description: SU Communication Error
- Troubleshooting Guides:
- Code: 890
- Display: Power OFF/ON Error : 890
- Description: SU System Memory Overflow
- Troubleshooting Guides:
- Code: 901 … 904
- Display: Power OFF/ON 901 : Error – 904 : Error
- Description: Belt temperature error 901: Short circuit 902: Open circuit 903: High temperature 904: Low temperature
- Troubleshooting Guides: Is the cable from the belt thermistor to the CU/PU board connected properly? Does the error occur again?
Connect the cable properly. Turn off and on the MFP. Replace the belt thermistor.
- Code: 923
- Display: Power OFF/ON 923 : Error
- Description: A lock error with black image drum
The image drum does not revolve properly. - Troubleshooting Guides: The image drum does not revolve properly. Does the error display is provided again by turning off and on the MFP?
Be sure the image drum is properly installed properly. Replace the image drum unit. Replace the image drum motor.
- Code: 928
- Display: Power OFF/ON 928 : Error
- Description: Fuser motor lock error
- Troubleshooting Guides: The fuser does not operate properly? Does the error occur again?
Check that the fuser is properly installed. Replace the fuser. Replace the fuser motor.
- Code: 933
- Display: Power OFF/ON 933 : Error
- Description: Tray-2 CPU clock frequency error
- Troubleshooting Guides:
- Code: 941, 942, 943, 944
- Display: Power OFF/ON
941 : Error
942 : Error
943 : Error
944 : Error - Description: PU Error
A PU error was detected.
941 : Watch Doc Timer Error 942 : Detection of Unassigned Interruption 943 : CPU Error Detection 944 : Dcon Access Error - Troubleshooting Guides: Turn off and on the MFP. When this error occurs again, replace the CU/ PU board.
- Code: 980
- Display: Inspection is required. 980 : Error
- Description: Duplicate toner cartridge detection error
Multiple toner cartridges for the same color ware detected. - Troubleshooting Guides: Turn off the MFP. Replace the fuser.
- Code: 983
- Display: Inspection is required. 983 : Error
- Description: Duplicate toner cartridge detection error
Multiple toner cartridges for the same color ware detected. - Troubleshooting Guides: Install toner cartridges for specified colors at the proper positions.
- Code: 990
- Display: Inspection is required. 990 : Error
- Description: Waste toner sensor detection error
- Troubleshooting Guides: Is the K toner cartridge installed? Does the error occur again?
Install the K toner cartridge. Be sure of cable connection, and then perform board replacement.
- Code: F0C, FFE, FFF
- Display: Power OFF/ON
203 : Error
204 : Error
207 : Error
208 : Error
213 : Error
214 : Error
F0C : Error
FFE : Error
FFF : Error - Description: CU program error (203 to 214 do not occur in general use of the MFP)
- Troubleshooting Guides: Invalid processing was performed with a CU program.
Replace the CU/PU board.
– Get more information about Epson XP 15000 troubleshooting, click here
– Get more error code list with quick guide to fix printer product, click here
– About get help with reseting Epson inkpad or others, click here
Waste Ink Pad Counter Utility Functions:
– Cleaning printhead.
– Ink charge.
– Fix Epson red lights blinking Error

– Fix Epson Service Required Error: A printer’s ink pad at the end of its service life Please contact Epson Support.
– Check the current value of waste ink counters and ink level counters.
– Clear Waste Ink Counters.
– Read and write serial number.
– Read and write USB ID.
– Read and write HEAD ID.
– Make EEPROM dump, backup.
– Paper feed test.
– Nozzle check.
– Color check pattern.
– Initialize (disable) PF deterioration offset.
– Retrieve device information
Contact us to get support with OKI MC351 Error case
Telegram: https://t.me/hyperaktiv
Facebook: https://www.facebook.com/dngnm/
Or click here to get more ways.
Коды ошибок OKI, сервисные коды и фатальные ошибки цветных принтеров и МФУ OKI (Service Call, Fatal Error, Error Code) расшифровка фатальной ошибки, обнуление сервисной ошибки, сброс ошибки OKI. Что делать при появлении на экране аппарата критической | фатальной ошибки:
Вызов технической помощи
XXX: Неисправимая ошибка
Появление фатальных/неисправимых ошибок с индикацией сервисного кода (ХХХ на сообщении выше) обычно означает наличие довольно серьёзной ошибки в принтере, которая не может быть разрешена простым выключением/включением. Ниже можно ввести номер ошибки и получить её описание. Эта информация предоставляется только как справочная: решение о корректных действиях по устранению ошибки должен принимать авторизованный сервисный инженер!
Обратите внимание, что процедуры сброса ошибок не существует: после устранения причины возникновения ошибки, сообщение об ошибке автоматически пропадает с дисплея принтера!
Для получения описания фатальной ошибки введите её номер в соответствующее поле ниже и нажмите кнопку [Расшифровать ошибку]. Например, при появлении ошибки, как указано на изображении ниже, нужно ввести в поле ввода число 134 и получить описание ошибки.

Обращаю внимание, что ошибки с номерами 300-600 являются пользовательскими ошибками, которые кроме номера содержат довольно подробное
описание самой ошибки, а при нажатии на кнопку HELP можно получить подробное описание того, как эти ошибки разрешить.*
Сведения об ошибках, расшифровку которых можно получить выше, подходят для следующих цветных принтеров и МФУ OKI:
C301 / C310 / C321 / C330 / C3100 / C3200 / C3300 / C331 / C332 / C3400 / C3450 / C3520 MFP / C3530 MFP / C3600 / C510 / C5100 / C511 / C5200 / C530 /
C5300 / C531 / C532 / C5400 / C542 / C5510 MFP / C5540 MFP / C5550 MFP / C5600 / C5650 / C5700 / C5750 / C5800 / C5850 / C5900 / C5950 / C610 / C612 /
C710 / C711 / C711WT / C712 / C7100 / C7200 / C7300 / C7350 / C801 / C810 / C821 / C822 / C823 / C824 / C830 / C831 / C833 / C834 / C841 / C843 / C844 / C8600 / C8800 /
C9200 / C9300 / C9400 / C9500 / C9600 / C9650 / C9655 / C911 / C931 / C9800 / C9800 MFP / C9850 / C9850 MFP / MC332 / MC342 / MC350 / MC351 / MC352 /
MC360 / MC361 / MC362 / MC363 / MC560 / MC561 / MC562 / MC563 / MC573 / MC760 / MC770 / MC780 / MC851 / MC853 / MC860 / MC861 / MC873 / Pro6410NC /
Pro7411WT / Pro8432WT / Pro9420WT / Pro9431 / Pro9541 / Pro9542 / Pro9431E / Pro9541E / Pro9542E
* — ошибки распространяются только на принтеры OKI C9600 / C9650 / C9800 / C9850 и МФУ на их базе
Четырехзначные ошибки распространяются только на принтеры C911/C931, ES9431/ES9541/ES9542 и Pro9431/Pro9541/Pro9542.
Список ошибок существенно пополнен по сравнению с той версией, что была ранее размещена на старой версии этого сайта и скопипастена всеми, кому не лень. Именно поэтому теперь отображается не таблица,
а форма для расшифровки конкретной ошибки.
Дата последнего обновления базы ошибок:
26 Апреля 2022.