Сегодня рассмотрим ситуацию, с которой уже сталкивались и/или могут еще столкнуться очень многие компьютерные пользователи. А именно, что делать, если забыли пароль на включение компьютера. Случиться такое может с каждым. Забыть или потерять записку с паролем можно тоже в два счета. Особенно, когда часто этот пароль приходиться менять, как делают некоторые пользователи (например, мамы, пытающиеся ограничить время, которое их дети проводят за компьютером).
Итак, сегодня рассмотрим, один из способов эффективного решения данной проблемы. Конечно, есть множество методов сброса или восстановления (или взлома) забытого пароля от входа в Windows или разблокировки пользователя. Постепенно я буду добавлять описания и других.
Этот способ отличает его универсальность. То есть, данный метод сброса забытого пароля от компьютера подходит для различных операционных систем Windows: 2000, XP, Vista, 7, Server 2003, Server 2008 и т.д.
Воспользуемся утилитой Offline NT Password and Registry editor.
Скачиваем подходящую версию Offline NT Password and Registry editor: для записи на диск или для записи на флешку. Распаковываем архив.
Соответственно в первом случае записываем файл образа на диск (читаем, как записать iso-образ на диск), во втором – создаем загрузочную флешку (в данном случае просто копируем на чистую флешку все файлы их архива). Выбирайте, какой вариант для вас удобней.
После того, как это сделано, вставляем наш диск или флешку в компьютер (нам необходимо загрузиться именно с одного из этих носителей) и включаем его. Если у вас все равно запускается операционная система и просит ввести забытый пароль, значит, придется еще немного поколдовать, чтобы запустить утилиту с диска/флешки. Читаем, как загрузиться с внешнего носителя.
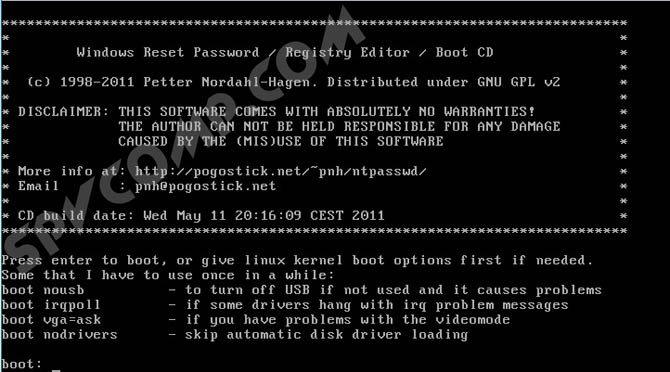
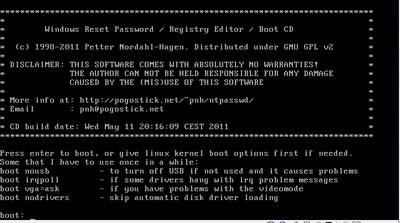
Если на экране появилась такая картинка, значит, все сделали правильно, и вам удалось загрузить Offline NT Password and Registry editor с диска/флешки.
Нажимаем Enter и ждем. Теперь программа предлагает нам выбрать раздел, на котором установлена операционная система (иными словами, где будем сбрасываться пароль). Диск выбирается вводом нужной цифры. На экране нам подсказывают, сколько в данный момент программой видится разделов, и какие они имеют объемы. Собственно, это единственная информация, доступная нам здесь о разделах, поэтому ориентироваться можем только на нее. Но не волнуйтесь, если выберите по ошибке не тот раздел, утилита просто не сможет стереть пароль, и вы вернетесь к этому меню, где вы сможете ввести другой номер раздела и попытаться заново.
В моем случае отображаются два раздела: 1 – объемом 10,7 Гб, 2 – 5490Мб. Если вы помните, какого объема был ваш Локальный диск C, то выбирайте раздел, обладающий схожим размером. Я выбираю раздел 1. Ввожу с клавиатуры цифру 1 и нажимаю Enter.

Далее требуется указать каталог, где находиться файл SAM (хранящий ветку реестра). Программа сама предлагает нам каталог по умолчанию (Windows/System32/config), где обычно и находиться этот файл. Соглашаемся, жмем Enter.

Далее нам предлагается выбрать, какое действие мы хотим произвести. Вводим цифру 1, что соответствует обнулению пароля (Password reset), и нажимаем Enter.

Следующий шаг – тоже выбрать желаемое действие. Вводим цифру 1 — изменить учетные записи и пароли (Edit user data and passwords). Нажимаем Enter.

Перед нами появляется табличка, где приводятся все имена пользователей (Username) и их идентификаторы (RID). Программа предлагает ввести имя пользователя из списка, для которого нужно сбросить пароль. Мне программа сразу предложила Admin – именно на этой учетной записи я и хочу стереть пароль. Поэтому нажимаю просто Enter.
Отступление. Вы, конечно, можете ввести и другое имя пользователя, но лучше, пожалуй, разблокировать администраторскую учетную запись, а уж потом из нее поменять всем, кому надо, пароли.

Если у вас имя пользователя записано на русском языке, то нормально оно не отразиться из-за кириллицы. В таком случае вместо имени пользователя указываем его RID в следующем виде: 0xRID. То есть в моем случае: 0x01f4. Жмем Enter.
Теперь программа предлагает нам следующие варианты действий для выбранной учетной записи: 1 – очистить пароль, 2 – изменить пароль, 3 – сделать пользователя администратором, 4 – разблокировать учетную запись, q – выйти и вернуться к выбору учетной записи. Вводим 1 и нажимаем Enter.

Пароль удален! Дело сделано, осталось выйти из приложения. Вводим восклицательный знак и жмем Enter.

Вводим q и жмем Enter.

Подтверждаем внесение изменений. Вводим y и нажимаем Enter.

Отказываемся от продолжения работы в Offline NT Password and Registry editor и вводим n, затем жмем Enter.

Извлекаем диск из провода или флешку из гнезда usb, перезагружаем компьютер и наслаждаемся результатом. Пароль на вход в Windows сброшен!
Естественно, статья предназначена помочь тем, кто действительно забыл пароль и не имел бы иначе другого выхода, как переустанавливать систему. Ни в коем случае приведенные сведения нельзя использовать для каких-либо вредительских целей.
Оцените статью. Вам не сложно, а автору приятно
admlshake wrote:Sorry to dig up an old thread, but I’m having this exact same issue. the partition my windows install is on is the second one (1 being the boot), and windows was installed into the default path. I’ve tried 1 and 2 but either way it still asks me where the default registry directory is at. I can’t get past this step anyone have any ideas?
——
[EDIT_UPDATE] 2014FEB25:
Offline Windows Password & Registry Editor 140201
(ntpasswd)
http://pogostick.net/~pnh/ntpasswd/
Among other changes:
A lot of users complained about user select being difficult to exit
(not understanding to use ! to quit), so after user edit, return
is to main menu or program exit (if not -i option)
So for future readers of this topic, please take note of this particular change if/when using an updated ntpasswd version.
[/EDIT_UPDATE]
——
Some general tips.
This tool DELETES the password. It does not RECOVERS the password. So if you have some encryption software, eventually you will still need to enter the correct password to get to your data. Some laptops and systems alike have encryption installed without the user even knowing it. If you don’t use encryption, then deleting the password should give you access to Windows so you can set a new one.
For Windows Seven, the «Windows» partition is usually number 2.
This is usually the problem with users not reading the complete screen with command line tools.
I can’t know if this is your case, but let me ask you; after accepting the default registry path, what did you do?
You should select the correct option to «Edit user data and passwords» (option 1, <enter>).
After that, you need to type in the correct exact user name (with the same lower or upper cases). If the user name is the default for that step, simply press <enter>.
Select option «1» to clear (blank) user password.
If there are no errors, then you should see a message like «Password Cleared!».
Now type «!» (without quotation marks) so to quit this part of the process.
Please do not reset your system YET. You are NOT FINISHED!!!
In the previous step you used «!» to quit only «a part» of the process. Now you need to press «q» (without quotation marks) to quit.
NOW it asks «Step FOUR — writing back changes». You need to type «y» so to actually right the changes.
The additional tip I can tell you is, be patient. As with the OP, sometimes it just takes a little bit more time.
If you still can’t find your correct Windows registry path, you may use PMagic in UBCD to find the correct drive «number» and the correct Windows Registry path for the correct «User name».
Are you seeing the «EDIT COMPLETE» message?
If you do, and you think that everything was done correctly, then press «n» <enter> so to finish the program.
Only NOW take out your CD and reset your system. When you get into your Windows account, go and set a new password.
I apologize if something of my message sounds somehow «rude» to someone. It is not my intention at all. I just know that many users that fail to correctly reset their passwords with this tool are actually failing just because they don’t get to the end of the process (they don’t read the instructions).
Для сброса пароля учетной записи пользователя в операционной системе Windows можно воспользоваться утилитой Offline NT Password and Registry Editor.
На данный момент программа протестирована на следующих версиях:
NT 3.51, NT 4, Windows 2000, Windows XP, Windows 2003 Server, Vista, Windows 7 и Server 2008.
Она должна работать со всеми пакетами обновлений (SP) и выпусками (Server, Professional, Home), а так же с 64-битными версиями.
Для того чтобы создать загрузочную USB-flash необходимо:
1. Распаковать файлы из архива на флэшку
— файлы на флэшке должны лежать в корне, а не в каталоге
— для установки нет необходимости форматировать носитель или удалять файлы
2. Установить загрузчик (необходимы права администратора)
— запустить с командной строки файл «syslinyx.exe», например:
J: syslinux.exe -ма J:
J — это буква, присвоенная вашему съемному носителю (замените ее на вашу)
параметр -ma можно убрать, если установщик выдает ошибку
Обратите внимание на то, что вам придется поменять настройки BIOS для загрузи с usb.
Официальная страница разработчика http://pogostick.net/~pnh/ntpasswd/
Архив утилиты Offline NT Password and Registry Editor http://pogostick.net/~pnh/ntpasswd/usb110511.zip
Процесс сброса пароля происходит следующим образом.
После загрузки вы должны увидеть это:
  ISOLINUX 3.51 2007-06-10  Copyright (C) 1994-2007 H. Peter Anvin
  ***************************************************************************
  *                                                                         *
  *  Windows NT/2k/XP/Vista Change Password / Registry Editor / Boot CD     *
  *                                                                         *
  *  (c) 1998-2007 Petter Nordahl-Hagen. Distributed under GNU GPL v2       *
  *                                                                         *
  * DISCLAIMER: THIS SOFTWARE COMES WITH ABSOLUTELY NO WARRANTIES!          *
  *             THE AUTHOR CAN NOT BE HELD RESPONSIBLE FOR ANY DAMAGE       *
  *             CAUSED BY THE (MIS)USE OF THIS SOFTWARE                     *
  *                                                                         *
  * More info at: http://pogostick.net/~pnh/ntpasswd/                       *
  * Email       : pnh@pogostick.net                                         *
  *                                                                         *
  * CD build date: Sun Sep 23 14:15:35 CEST 2007                            *
  ***************************************************************************
  Press enter to boot, or give linux kernel boot options first if needed.
  Some that I have to use once in a while:
  boot nousb          - to turn off USB if not used and it causes problems
  boot irqpoll        - if some drivers hang with irq problem messages
  boot nodrivers      - skip automatic disk driver loading
  boot:
Здесь достаточно просто нажать клавишу «Enter».
Затем будет показано сообщение об установленном на вашем компьютере оборудовании.
  Loading vmlinuz..................
  Loading scsi.cgz.........................
  Loading initrd.cgz..........
  Ready.
  Linux version 2.6.22.6 (root@athene) (gcc version 4.1.1 20060724 (prerelease)
(4.1.1-3mdk)) #2 Sun Sep 9 16:59:48 CEST 2007
  BIOS-provided physical RAM map:
   BIOS-e820: 0000000000000000 - 000000000009f800 (usable)
   BIOS-e820: 000000000009f800 - 00000000000a0000 (reserved)
   BIOS-e820: 00000000000ca000 - 00000000000cc000 (reserved)
   BIOS-e820: 00000000000dc000 - 0000000000100000 (reserved)
   BIOS-e820: 0000000000100000 - 00000000316f0000 (usable)
   BIOS-e820: 00000000316f0000 - 00000000316ff000 (ACPI data)
   BIOS-e820: 00000000316ff000 - 0000000031700000 (ACPI NVS)
   BIOS-e820: 0000000031700000 - 0000000031800000 (usable)
   BIOS-e820: 00000000fec00000 - 00000000fec10000 (reserved)
   BIOS-e820: 00000000fee00000 - 00000000fee01000 (reserved)
   BIOS-e820: 00000000fffe0000 - 0000000100000000 (reserved)
  792MB LOWMEM available.
  Zone PFN ranges:
    DMA             0 ->     4096
    Normal       4096 ->   202752
  early_node_map[1] active PFN ranges
 ...
  Serial: 8250/16550 driver $Revision: 1.90 $ 4 ports, IRQ sharing enabled
  serial8250: ttyS0 at I/O 0x3f8 (irq = 4) is a 16550A
  Floppy drive(s): fd0 is 1.44M
  FDC 0 is a post-1991 82077
  RAMDISK driver initialized: 16 RAM disks of 32000K size 1024 blocksize
  USB Universal Host Controller Interface driver v3.0
  Initializing USB Mass Storage driver...
  usbcore: registered new interface driver usb-storage
  USB Mass Storage support registered.
  serio: i8042 KBD port at 0x60,0x64 irq 1
  serio: i8042 AUX port at 0x60,0x64 irq 12
  usbcore: registered new interface driver usbhid
  drivers/hid/usbhid/hid-core.c: v2.6:USB HID core driver
  Using IPI Shortcut mode
  BIOS EDD facility v0.16 2004-Jun-25, 1 devices found
  Freeing unused kernel memory: 144k freed
  Booting ntpasswd
  Mounting: proc sys
  Ramdisk setup complete, stage separation..
  In stage 2
  Spawning shells on console 2 - 6
  Initialization complete!
  ** Preparing driver modules to dir /lib/modules/2.6.22.6
  input: AT Translated Set 2 keyboard as /class/input/input0
Далее происходит загрузка драйверов дисков.
  ** Will now try to auto-load relevant drivers based on PCI information
  ---- AUTO DISK DRIVER select ----
  --- PROBE FOUND THE FOLLOWING DRIVERS:
  ata_piix
  ata_generic
  mptspi
  --- TRYING TO LOAD THE DRIVERS
  ### Loading ata_piix
  scsi0 : ata_piix
  scsi1 : ata_piix
  ata1: PATA max UDMA/33 cmd 0x000101f0 ctl 0x000103f6 bmdma 0x00011050 irq 14
  ata2: PATA max UDMA/33 cmd 0x00010170 ctl 0x00010376 bmdma 0x00011058 irq 15
  ata2.00: ATAPI: VMware Virtual IDE CDROM Drive, 00000001, max UDMA/33
  ata2.00: configured for UDMA/33
  scsi 1:0:0:0: CD-ROM            NECVMWar VMware IDE CDR10 1.00 PQ: 0 ANSI: 5
  sr0: scsi3-mmc drive: 1x/1x xa/form2 cdda tray
  Uniform CD-ROM driver Revision: 3.20
  ### Loading ata_generic
  ### Loading mptspi
  Fusion MPT base driver 3.04.04
  Copyright (c) 1999-2007 LSI Logic Corporation
  Fusion MPT SPI Host driver 3.04.04
  PCI: Found IRQ 9 for device 0000:00:10.0
  mptbase: Initiating ioc0 bringup
  ioc0: 53C1030: Capabilities={Initiator}
  scsi2 : ioc0: LSI53C1030, FwRev=01032920h, Ports=1, MaxQ=128, IRQ=9
  scsi 2:0:0:0: Direct-Access     VMware,  VMware Virtual S 1.0  PQ: 0 ANSI: 2
   target2:0:0: Beginning Domain Validation
   target2:0:0: Domain Validation skipping write tests
   target2:0:0: Ending Domain Validation
   target2:0:0: FAST-40 WIDE SCSI 80.0 MB/s ST (25 ns, offset 127)
  sd 2:0:0:0: [sda] 83886080 512-byte hardware sectors (42950 MB)
  sd 2:0:0:0: [sda] Write Protect is off
  sd 2:0:0:0: [sda] Cache data unavailable
  sd 2:0:0:0: [sda] Assuming drive cache: write through
  sd 2:0:0:0: [sda] 83886080 512-byte hardware sectors (42950 MB)
  sd 2:0:0:0: [sda] Write Protect is off
  sd 2:0:0:0: [sda] Cache data unavailable
  sd 2:0:0:0: [sda] Assuming drive cache: write through
   sda: sda1
  sd 2:0:0:0: [sda] Attached SCSI disk
Эти сообщения драйверов о марке, модели и размерах найденных дисков.
  -------------------------------------------------------------
  Driver load done, if none loaded, you may try manual instead.
  -------------------------------------------------------------
  ** If no disk show up, you may have to try again (d option) or manual (m).
Все драйвера загружены.
Начинается процесс поиска учетных записей и сброса пароля. Здесь нет ничего страшного и обычно достаточно соглашаться с предложенными программой вариантами.
  *************************************************************************
  * Windows Registry Edit Utility Floppy / chntpw                         *
  * (c) 1997 - 2007 Petter N Hagen - pnh@pogostick.net                    *
  * GNU GPL v2 license, see files on CD                                   *
  *                                                                       *
  * This utility will enable you to change or blank the password of       *
  * any user (incl. administrator) on an Windows NT/2k/XP/Vista           *
  * WITHOUT knowing the old password.                                     *
  * Unlocking locked/disabled accounts also supported.                    *
  *                                                                       *
  * It also has a registry editor, and there is now support for           *
  * adding and deleting keys and values.                                  *
  *                                                                       *
  * Tested on: NT3.51 & NT4: Workstation, Server, PDC.                    *
  *            Win2k Prof & Server to SP4. Cannot change AD.              *
  *            XP Home & Prof: up to SP2                                  *
  *            Win 2003 Server (cannot change AD passwords)               *
  *            Vista 32 and 64 bit                                        *
  *                                                                       *
  * HINT: If things scroll by too fast, press SHIFT-PGUP/PGDOWN ...       *
  *************************************************************************
  =========================================================
  There are several steps to go through:
  - Disk select with optional loading of disk drivers
  - PATH select, where are the Windows systems files stored
  - File-select, what parts of registry we need
  - Then finally the password change or registry edit itself
  - If changes were made, write them back to disk
  DON'T PANIC! Usually the defaults are OK, just press enter
               all the way through the questions
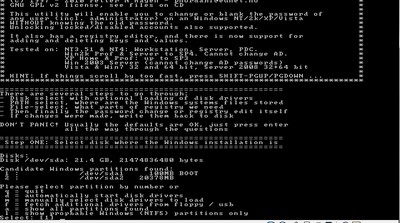
Шаг 1: Выбор диска, на котором установлена Windows
  =========================================================
  ¤ Step ONE: Select disk where the Windows installation is
  =========================================================
  Disks:
  Disk /dev/sda: 42.9 GB, 42949672960 bytes
  Candidate Windows partitions found:
   1 :        /dev/sda1   40958MB BOOT
Здесь найден один диск с одним разделом
  Please select partition by number or
   q = quit
   d = automatically start disk drivers
   m = manually select disk drivers to load
   f = fetch additional drivers from floppy / usb
   a = show all partitions found
   l = show propbable Windows (NTFS) partitions only
  Select: [1]
Наш выбор 1.
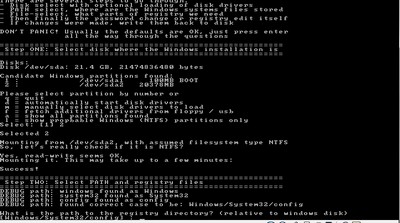
 Selected 1
  Mounting from /dev/sda1, with filesystem type NTFS
  NTFS volume version 3.1.
На выбран устройстве смонтирована файловая система NTFS.
Шаг 2: Указываем директорию реестра
  =========================================================
  ¤ Step TWO: Select PATH and registry files
  =========================================================
  What is the path to the registry directory? (relative to windows disk)
  [WINDOWS/system32/config] :
Показана директория по умолчанию и здесь достаточно просто согласиться и получаем список интересующих файлов.
  -rw-------    2 0        0          262144 Feb 28  2007 BCD-Template
  -rw-------    2 0        0         6815744 Sep 23 12:33 COMPONENTS
  -rw-------    1 0        0          262144 Sep 23 12:33 DEFAULT
  drwx------    1 0        0               0 Nov  2  2006 Journal
  drwx------    1 0        0            8192 Sep 23 12:33 RegBack
  -rw-------    1 0        0          524288 Sep 23 12:33 SAM
  -rw-------    1 0        0          262144 Sep 23 12:33 SECURITY
  -rw-------    1 0        0        15728640 Sep 23 12:33 SOFTWARE
  -rw-------    1 0        0         9175040 Sep 23 12:33 SYSTEM
  drwx------    1 0        0            4096 Nov  2  2006 TxR
  drwx------    1 0        0            4096 Feb 27  2007 systemprofile
  Select which part of registry to load, use predefined choices
  or list the files with space as delimiter
  1 - Password reset [sam system security]
  2 - RecoveryConsole parameters [software]
  q - quit - return to previous
  [1] :
Выбираем 1 для сброса пароля.
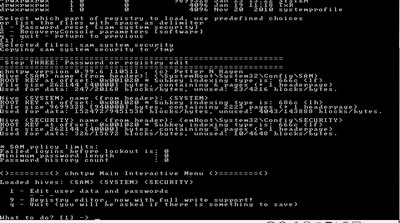
Шаг 3: Внесение изменений в учетные записи
Происходит копирование параметров SAM (диспетчер учетных записей безопасности) во временную папку.
  Selected files: sam system security
  Copying sam system security to /tmp
  =========================================================
  ¤ Step THREE: Password or registry edit
  =========================================================
  chntpw version 0.99.5 070923 (decade), (c) Petter N Hagen
  Hive  name (from header): <SystemRootSystem32ConfigSAM>
  ROOT KEY at offset: 0x001020 * Subkey indexing type is: 666c
  Page at 0x44000 is not 'hbin', assuming file contains garbage at end
  File size 524288 [80000] bytes, containing 11 pages (+ 1 headerpage)
  Used for data: 288/250904 blocks/bytes, unused: 15/23176 blocks/bytes.
  Hive  name (from header):
  ROOT KEY at offset: 0x001020 * Subkey indexing type is: 686c
  Page at 0x8b4000 is not 'hbin', assuming file contains garbage at end
  File size 9175040 [8c0000] bytes, containing 2117 pages (+ 1 headerpage)
  Used for data: 96982/6224016 blocks/bytes, unused: 4381/2830032 blocks/bytes.
  Hive  name (from header): <emRootSystem32ConfigSECURITY>
  ROOT KEY at offset: 0x001020 * Subkey indexing type is: 666c
  Page at 0x6000 is not 'hbin', assuming file contains garbage at end
  File size 262144 [40000] bytes, containing 5 pages (+ 1 headerpage)
  Used for data: 334/17312 blocks/bytes, unused: 7/3008 blocks/bytes.
  * SAM policy limits:
  Failed logins before lockout is: 0
  Minimum password length        : 0
  Password history count         : 0
  ======== chntpw Main Interactive Menu ========
  Loaded hives:
    1 - Edit user data and passwords
    2 - Syskey status & change
    3 - RecoveryConsole settings
        - - -
    9 - Registry editor, now with full write support!
    q - Quit (you will be asked if there is something to save)
  What to do? [1] ->
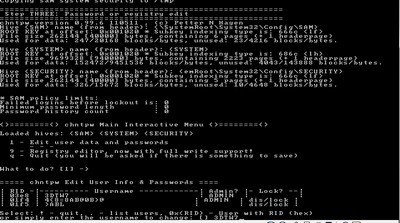
Выбираем интересующий нас пункт под цифрой 1 и получаем список всех локальных учетных записей, зарегистрированных в нашем Windows.
  ===== chntpw Edit User Info & Passwords ====
  | RID -|---------- Username ------------| Admin? |- Lock? --|
  | 03e8 | admin                          | ADMIN  |          |
  | 01f4 | Administrator                  | ADMIN  | dis/lock |
  | 03ec | grumf1                         |        |          |
  | 03ed | grumf2                         |        |          |
  | 03ee | grumf3                         |        |          |
  | 01f5 | Guest                          |        | dis/lock |
  | 03ea | jalla1                         | ADMIN  | *BLANK*  |
  | 03eb | jalla2                         |        | *BLANK*  |
  | 03e9 | petro                          | ADMIN  | *BLANK*  |
В крайней правой колонке Lock?отображается статус пароля. Отсутствует / заблокирован (dis/lock) или пустой (*BLANK*). Колонка Admin? показывает нам принадлежит ли учетная запись к группе администраторов. Мы выбираем учетную запись admin, что позволит нам завладеть учетной записью администратора компьютера. Для этого нам необходимо ввести RID или имя учетной записи.
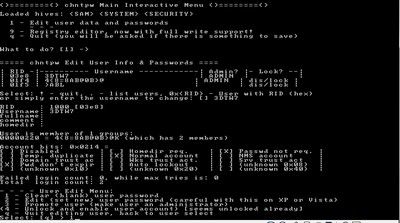
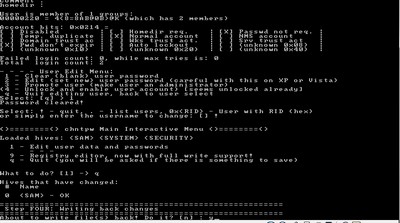
Select: ! - quit, . - list users, 0x - User with RID (hex)
  or simply enter the username to change: [Administrator] admin
  RID     : 1000 [03e8]
  Username: admin
  fullname:
  comment :
  homedir :
  User is member of 1 groups:
  00000220 = Administrators (which has 4 members)
Пользователь состоит в группе 220 — группа администраторов.
   Account bits: 0x0214 =
  [ ] Disabled        | [ ] Homedir req.    | [X] Passwd not req. |
  [ ] Temp. duplicate | [X] Normal account  | [ ] NMS account     |
  [ ] Domain trust ac | [ ] Wks trust act.  | [ ] Srv trust act   |
  [X] Pwd don't expir | [ ] Auto lockout    | [ ] (unknown 0x08)  |
  [ ] (unknown 0x10)  | [ ] (unknown 0x20)  | [ ] (unknown 0x40)  |
  Failed login count: 0, while max tries is: 0
  Total  login count: 3
Показана информация о статусе учетной записи.
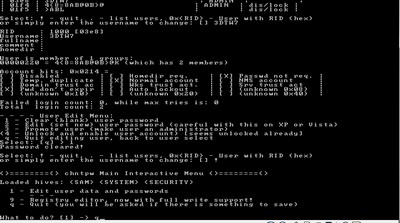
  - - - - User Edit Menu:
   1 - Clear (blank) user password
   2 - Edit (set new) user password (careful with this on XP or Vista)
   3 - Promote user (make user an administrator)
  (4 - Unlock and enable user account) [seems unlocked already]
   q - Quit editing user, back to user select
  Select: [q] > 1
  Password cleared!
Если бы учетная запись была заблокирована, то для разблокирования нужно выбрать 4. Но так как с пользователем все в порядке, то мы выбираем 1 и просто удаляем пароль.
  Select: ! - quit, . - list users, 0x - User with RID (hex)
  or simply enter the username to change: [Administrator] !
Затем возвращаемся в главное меню при помощи выбора символа «!»
======== chntpw Main Interactive Menu ========
Loaded hives:
1 - Edit user data and passwords
2 - Syskey status & change
3 - RecoveryConsole settings
- - -
9 - Registry editor, now with full write support!
q - Quit (you will be asked if there is something to save)
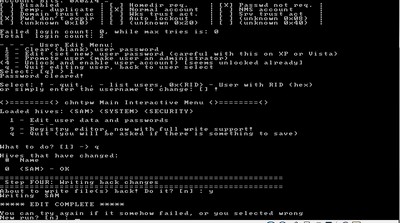
What to do? [1] -> q
Выбираем «q» для выхода.
Шаг 4. Записываем изменения. Отвечаем «y» для записи внесенных изменений
  Hives that have changed:
   #  Name
   0   - OK
  =========================================================
  ¤ Step FOUR: Writing back changes
  =========================================================
  About to write file(s) back! Do it? [n] : y
Writing sam
Редактирование завершено
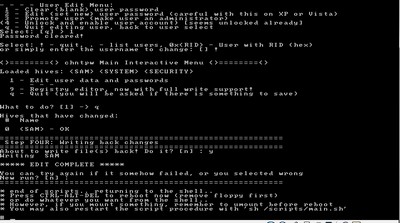
  ***** EDIT COMPLETE *****
  You can try again if it somehow failed, or you selected wrong
  New run? [n] : n
  =========================================================
  * end of scripts.. returning to the shell..
  * Press CTRL-ALT-DEL to reboot now (remove floppy first)
  * or do whatever you want from the shell..
  * However, if you mount something, remember to umount before reboot
  * You may also restart the script procedure with 'sh /scripts/main.sh'
  (Please ignore the message about job control, it is not relevant)
  BusyBox v1.1.0-pre1 (2005.12.30-19:45+0000) Built-in shell (ash)
  Enter 'help' for a list of built-in commands.
  sh: can't access tty; job control turned off
Выбираем «n» и завершаем работу с программой.
#1 
- Group: Members
- Posts: 117
- Joined: 13-August 04
Posted 05 October 2010 — 01:51 PM
I found an update for the «Offline NT Password & Registry Editor» by PNordahl. (This item is included in UBCD4Win.) I copied the updated files into UBCD4Win v3.60 and built a CD, generating the ISO image and everything works fine. I was able to use the BootCD to boot on a Windows 7 64-bit laptop and successfully reset the local administrator password.
So I then ran the UBUSB.EXE utility that comes with UBCD4Win to make a bootable thumb drive. We use the bootable USB thumbdrive all the time and it works very well. After running the UBUSB.EXE and having it format the thumbdrive and copy all the file, it all worked fine and copied the «Offline NT Password & Registry Editor» files into a isolinux folder. Since I’m using Grub4dos on the thumbdrive when it’s made, I need to edit the «menu.lst» file to add the entry to boot this item up. However, I can’t get the syntax to work so it boots properly and am hoping for some help.
Basically I got to a point where the Offline NT Password & Registry Editor to boots up, but it doesn’t seem to load any mass storage drivers, so it can’t see any hard drives or partitions.
Looking in the syslinux.cfg file for this, you see:
LABEL NTPWD
  MENU LABEL Offline Password & Registry Editor
  TEXT HELP
  * version: 2010-06-27
  * http://pogostick.net/~pnh/ntpasswd/
  Petter Nordahl's Offline NT Password & Registry Editor
  ENDTEXT
  KERNEL /isolinux/pnordahl
  APPEND rw vga=1 init=/linuxrc initrd=/isolinux/pnordahl.cgz,/isolinux/scsi.cgz
My understanding is the last two lines above are important to «convert» to grub4dos format. Looking at other examples, I came up with this for the menu.lst in grub4dos:
title Offline Password & Registry Editor
kernel /isolinux/pnordahl rw vga=1 init=/linuxrc
initrd /isolinux/pnordahl.cgz,/isolinux/scsi.cgz
This fails, telling me the file isn’t found. I assume it’s the «initrd» line since it is referencing more than one file there with the comma splitting the two items.
So I changed this to be this:
title Offline Password & Registry Editor
kernel /isolinux/pnordahl rw vga=1 init=/linuxrc
initrd /isolinux/pnordahl.cgz
This actually boots up, but it gets to a point where it scans for hard drives and can’t find any. I assume this is due to me removing the «scsi.cgz» info.
Basically I don’t really know what I’m doing and am hoping someone here has previously done this and can share the contents of their grub4dos menu entry for booting this Offline Password & Registry Editor. Can anyone help?
Thank you.
0
- Back to top
 Reply
Reply
#2 pcuser 
- Group: Moderator & Development
- Posts: 4276
- Joined: 20-November 04
- Gender:Male
- Location:Kneebrasskee
Posted 05 October 2010 — 02:21 PM
Remove the comma:
initrd /isolinux/pnordahl.cgz /isolinux/scsi.cgz
0
- Back to top
- Reply
#3 Hemo2
- Group: Members
- Posts: 117
- Joined: 13-August 04
Posted 05 October 2010 — 03:15 PM
Thanks for the reply pcuser. I don’t get the error anymore, but it doesn’t seem to load the disk drivers, just as if I left off the «/isolinux/scsi.cgz» part altogether. Not quite sure what else I can try for this, but it does work when booting from a CD, so we can use that format for now.
0
- Back to top
- Reply
#4 pcuser
- Group: Moderator & Development
- Posts: 4276
- Joined: 20-November 04
- Gender:Male
- Location:Kneebrasskee
Posted 05 October 2010 — 03:29 PM
What version of UBUSB/Grub4dos are you using? I don’t remember exactly when it was that Grub4dos started supporting both on the same line so if it’s an older UBUSB then try downloading and using the newest.
0
- Back to top
- Reply
#5 Hemo2
- Group: Members
- Posts: 117
- Joined: 13-August 04
Posted 06 October 2010 — 08:23 AM
I checked and the grub4dos is the grub.exe from the 0.4.4 version. The UBUSB.exe is the one that came with UBCD4WIN 3.60 and shows version 1.0.51 when I run it.
It’s like the scsi.cgz file is being passed as a parameter to the pnordahl.cgz image to use for the hard disk drivers. I suspect either grub4dos won’t work or maybe even more probable is that I just don’t know how to enter the syntax properly so it will work. I’m basically just trying different syntax to get it to work and so far no luck.
0
- Back to top
- Reply
#6 cdob
- Group: Moderator & Development
- Posts: 1719
- Joined: 19-October 05
Posted 06 October 2010 — 12:59 PM
 Hemo2, on 06 October 2010 — 09:23 AM, said:
I checked and the grub4dos is the grub.exe from the 0.4.4 version.
Update this. http://nufans.net/grub4dos/tinybit/
0
- Back to top
- Reply
#7 Hemo2
- Group: Members
- Posts: 117
- Joined: 13-August 04
Posted 06 October 2010 — 01:59 PM
Thanks cdob. I downloaded the latest 0.4.5.b version, but unfortunately it still doesn’t work from a thumb drive.
Just to be clear, I build the UBCD4Win and burn the .ISO to a CD and this works fine and I was able to reset the local admin password on a Win7 — 64-bit pc, thus the reason we’d really like to get this to run off the thumbdrive as not every pc has a CD Drive anymore. The CD not only boots fine and the Offline NT Password bootdisk comes up fine, but the Offline NT Password bootdisk also loads hard disk drivers during it’s boot process. You know it’s loaded the drivers because after it boots it shows you the available potential Windows partitions it finds. I assume these drivers are coming from that «scsi.cgz» file that gets passed to the pnordahl.cgz boot image and this works fine when booting from the CD, which uses a different way to bootup than the thumbdrive does.
When I then run UBUSB.EXE that comes with the UBCD4Win project to make a bootable USB thumbdrive, I format my thumbdrive as Fat32-LBA with a boot loader of Grub4dos. When it’s finished, I replace the CONFIG.SYS with customized one that gives us multiple menus options to choose from. To load the Offline NT Password & Registry Editor, I have the commands an «others.lst» menu file.
[OTHER]
DEVICE=HIMEM.SYS
DOS=HIGH
FILES=60
BUFFERS=30
device=grub.exe --config-file=/other.lst
Inside the «other.lst» menu file, I’m trying to use the below command to bootup the Offline NT Password bootdisk.
title Offline Password & Registry Editor
kernel /isolinux/pnordahl rw vga=1  init=/linuxrc
initrd /isolinux/pnordahl.cgz /isolinux/scsi.cgz
I initially tried it using a comma to split the two .cgz filenames, but that doesn’t work as you get a «file not found» error. Using the above commands does actually boot up the Offline NT Password bootdisk just fine. The problem though is it doesn’t appear to load any hard disk storage drivers. I say this because when the message comes up about the potential Windows partitions it finds, it’s blank and no partitions are found, thus you can’t select the Windows partition to reset the password. This is the problem I’m running into and was hoping that someone else succesfully is booting this particular bootdisk from their thumbdrive using grub4dos.
I suspect it’s not necessarily the version of grub4dos anymore that is the issue, but my complete lack of knowledge on how to properly tell it to load this scenario. All the examples I’ve found only reference loading a single image file with that «initrd» command and can’t find any examples to address the issue like this Offline NT Password bootdisk presents where it apparently somehow needs the second «scsi.cgz» file to get loaded or ‘passed’ to the first image file to use for the drivers.
At this point, I’ve randomly tried a variety of syntax’s but it’s clear to me I don’t understand this. I was able to «jerry rig» the newer Gparted bootdisk into working, but this one has me beat.
I really appreciate the replies here though and want to thank you very much for your help and info. I’ll keep an eye out on this thread in case some kind sole has already accomplished what I’m trying and can share their Grub4dos menu entry.
This post has been edited by Hemo2: 06 October 2010 — 02:00 PM
0
- Back to top
- Reply
#8 cdob
- Group: Moderator & Development
- Posts: 1719
- Joined: 19-October 05
Posted 07 October 2010 — 04:48 PM
Hemo2, on 06 October 2010 — 02:59 PM, said:
I suspect it’s not necessarily the version of grub4dos anymore that is the issue
Loading a splitted initrd was added to grub4dos lately, file load order is importand too.
Anyway there is another choice:
title Offline Password & Registry Editor (ISO direct mapping)
ls /images/cd100627.iso || find --set-root /images/cd100627.iso
map /images/cd100627.iso (0xff)
map --hook
root (0xff)
chainloader (0xff)
0
- Back to top
- Reply
#9 Hemo2
- Group: Members
- Posts: 117
- Joined: 13-August 04
Posted 08 October 2010 — 07:53 AM
Thanks cdob. The entries to boot the .iso image does work from the thumbdrive, so that’s the route I’ll take. It will be nice to have this bootdisk available on both the boot CD and USB thumbdrive that our techs use!
0
- Back to top
- Reply
#10 mkruger
- Group: Members
- Posts: 1
- Joined: 26-November 10
Posted 26 November 2010 — 08:40 AM
This thread was very helpful for me too. Thanks guys.
The plugin works great by just dropping the iso into the files subfolder of the plugin and modifying the offline.inf file a bit.
Here’s an updated offline.inf which includes the new grub4dos capability of this plugin.
; Created by Hilander999
; Updated by cdob 5/13/07 for new version
; Modified 2/14/2008 by pcuser to add syslinux/usb boot menu support
; Modified 11/26/10 by cdob to add grub4dos boot menu support

[Version]
Signature= "$Windows NT$"

[PEBuilder]
Name="!Multiboot: Offline NT Password & Registry Editor"
Enable=1
help=Offline.mht

[WinntDirectories]
a="isolinux",2
b="images",2

[SourceDisksFiles]
filesINITRD.CGZ=a,pnordahl.cgz,1
filesSCSI.CGZ=a,,1
filesVMLINUZ=a,pnordahl,1
filesisolinux.bin=a,,4
filescd100627.iso=b,,1

[Append]
BCDWBCDW.INI,offline_bcdw.ini
syslinuxsyslinux.cfg,offline_syslinux.ini
menu.lst,offline_grub4dos.ini
While loading the iso from a plugin works great, I suppose it could also be loaded directly from the root of the USB by adding it as a menu option using WinSetupFromUSB_1-0-beta6. Having tried a few different USB drive building utilities, that one is my favorite.
0
- Back to top
- Reply
Напоминаем, что попытки повторить действия автора могут привести к потере гарантии на оборудование и даже к выходу его из строя. Материал приведен исключительно в ознакомительных целях. Если же вы собираетесь воспроизводить действия, описанные ниже, настоятельно советуем внимательно прочитать статью до конца хотя бы один раз. Редакция 3DNews не несет никакой ответственности за любые возможные последствия.
В Windows уже давно для хранения паролей всех пользователей и управления ими используется система SAM. Вся информация в ней хорошо защищена, поэтому для того чтобы узнать пароль, придётся затратить кучу времени и ресурсов, особенно если он достаточно сложный. Чаще всего, однако, вовсе не требуется именно узнать пароль — достаточно сбросить его или поменять. Для этого разработано несколько утилит, одной из которых мы воспользуемся. Ещё один важный момент — очевидно, что, когда ОС запущена, она не позволит просто так влезать в хранилище паролей. Поэтому надо убедиться, что компьютер поддерживает загрузку с CD/DVD- или USB-носителя, чтобы запустить нужные утилиты.
Самая известная из них — это Offline NT Password and Registry editor, которая умеет работать с паролями и реестром Windows XP/Vista/7. Скачайте USB- или CD-версию утилиты, запишите загруженный образ на диск или воспользуйтесь нашими советами по созданию мультизагрузочной флешки. Утилита не имеет графического интерфейса, но пугаться этого не стоит — всё в ней довольно просто и понятно. К тому же часто нужная опция предлагается по умолчанию, так что от вас потребуется только нажать клавишу Enter.
Загрузитесь со съёмного носителя Offline NT Password and Registry editor. Вам вряд ли понадобятся дополнительные опции загрузки, но в некоторых случаях придётся опытным путём подобрать те, которые помогут утилите запуститься. На следующем этапе надо выбрать номер раздела, на котором установлена Windows. Ориентироваться придётся в первую очередь по его размеру. В принципе, до самого последнего момента программа не вносит никаких изменений в Windows, поэтому в случае ошибки можно просто начать процедуру сброса пароля заново.

Затем утилита попросит указать путь до папки, где находятся файлы SAM (фактически это куст реестра). По умолчанию это X:/Windows/System32/config, его же и предлагает вначале программа. Потом надо выбрать первый пункт (Password reset), так как мы собрались сбросить пароль.
Дальше всё просто. Выбираем первый пункт (Edit user data and password) и вписываем имя пользователя или его идентификатор в формате 0xabcd, где abcd — это RID, указанный в первом столбце. RID пригодится, если имя пользователя некорректно отображается или его не получается ввести. Например, при использовании кириллицы.

Осталось указать пункт 1 (сброс пароля) или 2 (смена пароля) для выбранного пользователя. Выходим из режима редактирования пароля, введя восклицательный знак и нажав Enter.
Всё, почти готово. Вводим q, нажимаем Enter, а затем соглашаемся с внесением изменений, введя y и ещё раз нажав Enter. Отказываемся от дальнейшей работы в Offline NT Password and Registry editor (n), извлекаем флешку или CD-диск и нажимаем заветную комбинацию Alt+Ctrl+Del для перезагрузки. Готово — пароль сброшен!
Это был простой способ сброса пароля Windows 7. Сложностей с ним быть не должно. Надо всего лишь быть внимательным и аккуратным. Проблемы могут возникнуть только при отсутствии необходимых драйверов для работы с жёстким диском. Тогда придётся закинуть их на дискету (если вы, конечно, найдёте живого представителя этого почти вымершего вида и рабочий привод для него) или на USB-флешку и на первом этапе выбрать пункт fetch additional drivers.
Для второго и третьего способов понадобится только установочный диск Windows 7 и больше ничего. Более сложный вариант подразумевает включение изначально скрытой учётной записи «Администратор» путём правки реестра из установочной среды Windows 7. В дальнейшем можно будет войти в систему под этой учёткой и отредактировать любой другой аккаунт в ОС. По умолчанию «Администратор» не имеет пароля, что только играет нам на руку.
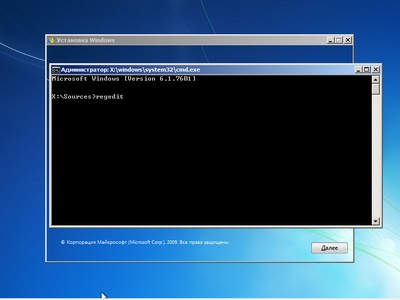
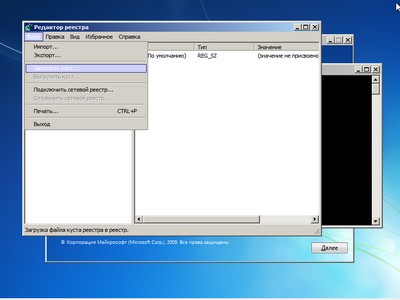
Итак, загружаемся с установочного диска и нажимаем Shift+F10 для вызова командной строки, где вбиваем regedit и жмём Enter для запуска редактора реестра.
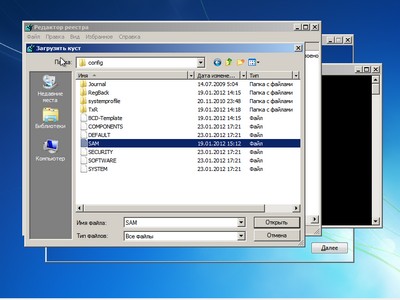
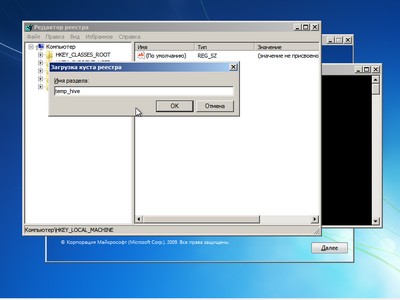
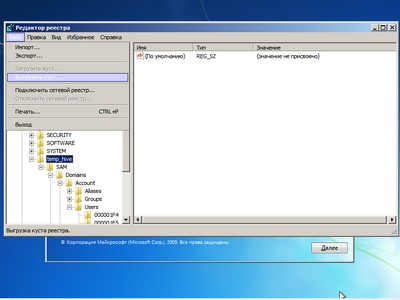
Выделяем раздел HKEY_LOCAL_MACHINE, а в меню выбираем «Файл» → «Загрузить куст…» (File → Load hive…). Нам надо открыть файл SAM, который находится в папке WindowsSystem32config на том разделе, где установлена Windows 7. При открытии будет предложено ввести имя загружаемого куста — вбивайте любое.

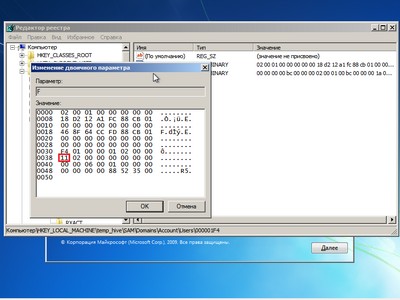
Теперь надо выбрать раздел HKEY_LOCAL_MACHINEимя_кустаSAMDomainsAccountUsers00001F4 и дважды кликнуть по ключу F. Откроется редактор, в котором надо перейти к первому числу в строке 038 — это 11. Его надо изменить на 10. Будьте аккуратны и не ошибитесь — поменять надо только его, не добавляя и не удаляя другие числа!

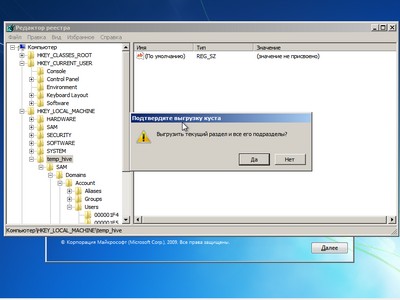
Теперь надо выделить наш куст HKEY_LOCAL_MACHINEимя_куста и в меню выбрать «Файл» → «Выгрузить куст…» (File → Unload hive…), а затем подтвердить выгрузку куста.
Всё, можно перезагрузиться, вытащив предварительно установочный диск, и войти в систему под администраторским аккаунтом. В панели управления Windows в разделе управления пользователями можно изменить настройки другой учётной записи. В том числе поменять пароль.

Остался последний способ, неправильный. Почему неправильный? Потому что мы займёмся подменой системных файлов, а это дело неблагородное. В чём заключается основная идея? Всё просто — в ОС по умолчанию включена функция детектирования залипающих клавиш. Вы с ней наверняка сталкивались хотя бы раз, а если нет — то просто быстро нажмите Shift не менее 5 раз, и вы увидите вот такое замечательное окошко:
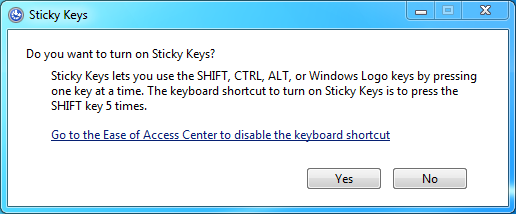
Окошко это принадлежит маленькой вспомогательной программке sethc.exe, которая лежит в системной директории Windows. Более того, она запускается даже на экране приветствия, когда вам предлагают выбрать пользователя и ввести пароль. Но ведь её можно заменить чем-нибудь полезным. К примеру, cmd.exe. Естественно, не прямо в запущенной ОС, а загрузившись с установочного диска Windows 7 и нажав Shift+F10.
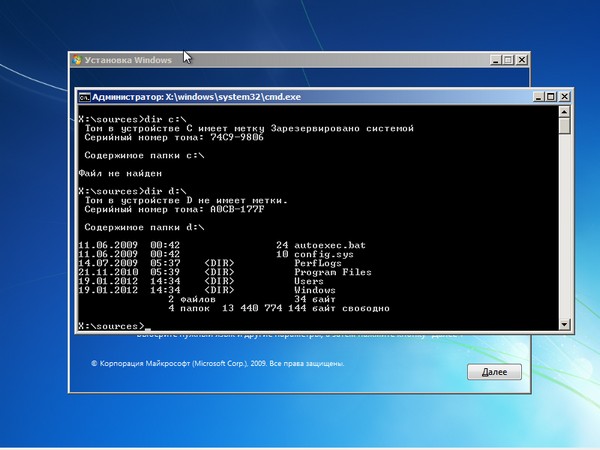
Начать надо с определения буквы диска, на котором установлена Windows. Самое легкое — просто просмотреть содержимое корня раздела командой dir. C:, скорее всего, будет виден как D:, но необязательно.
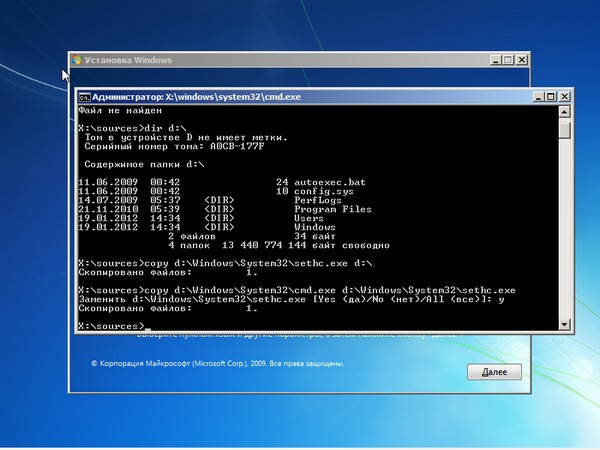
Определившись с буквой тома, выполняем две простые команды — одной копируем на всякий случай оригинальный файл sethc.exe в корень диска или куда душе угодно, а второй меняем его на cmd.exe.
copy d:windowssystem32sethc.exe d:
copy d:windowssystem32cmd.exe d:windowssystem32sethc.exe
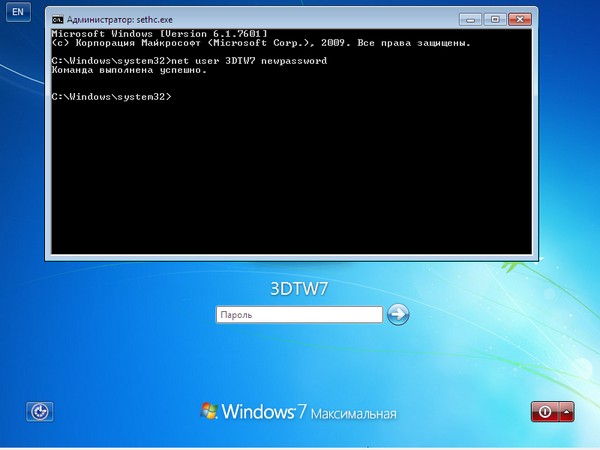
Перезагружаемся, быстро нажимаем несколько раз клавишу Shift (или Ctrl, или Alt) и наблюдаем окно с командной строкой. В нём надо ввести ещё одну команду, подставив соответственно имя нужного пользователя и новый пароль. С другими параметрами этой команды можно ознакомиться в официальной справке.
net user имя_пользователя новый_пароль
Если вы захотите вернуть всё на круги своя, то надо снова загрузиться с установочного диска, открыть консоль и выполнить команду:
copy d:sethc.exe d:windowssystem32sethc.exe
Впрочем, можно ничего не восстанавливать, а оставить такой маленький трюк в системе на всякий случай. Помимо перечисленных выше способов, есть множество других методик сброса или восстановления пароля в Windows, но сейчас мы их рассматривать не будем. Ещё раз призываем наших читателей быть внимательными и аккуратными при работе с внутренностями ОС, а ещё лучше не доводить ситуацию до «хирургического» вмешательства в SAM. Удачного вам восстановления доступа к учётным записям!
Если Вы заметили ошибку — выделите ее мышью и нажмите CTRL+ENTER.