-

- 4 ноя 2010
- 18
- Audi A48E 2.0
-

- 19 июн 2010
- 480
- audi A4/B5 1.6 96
Поставь те,которые нужно!
-
- 4 ноя 2010
- 18
- Audi A48E 2.0
-

у меня вообще тама светодиоды стоят, и комп не жу жу.
Stop hovering to collapse…
Click to collapse…
Hover to expand…
Нажмите, чтобы раскрыть…
-
- 4 ноя 2010
- 18
- Audi A48E 2.0
В светодиодных лампочках вмонтирована нагрузка нужного сопротивления. Поэтому ошибки и нет…
-
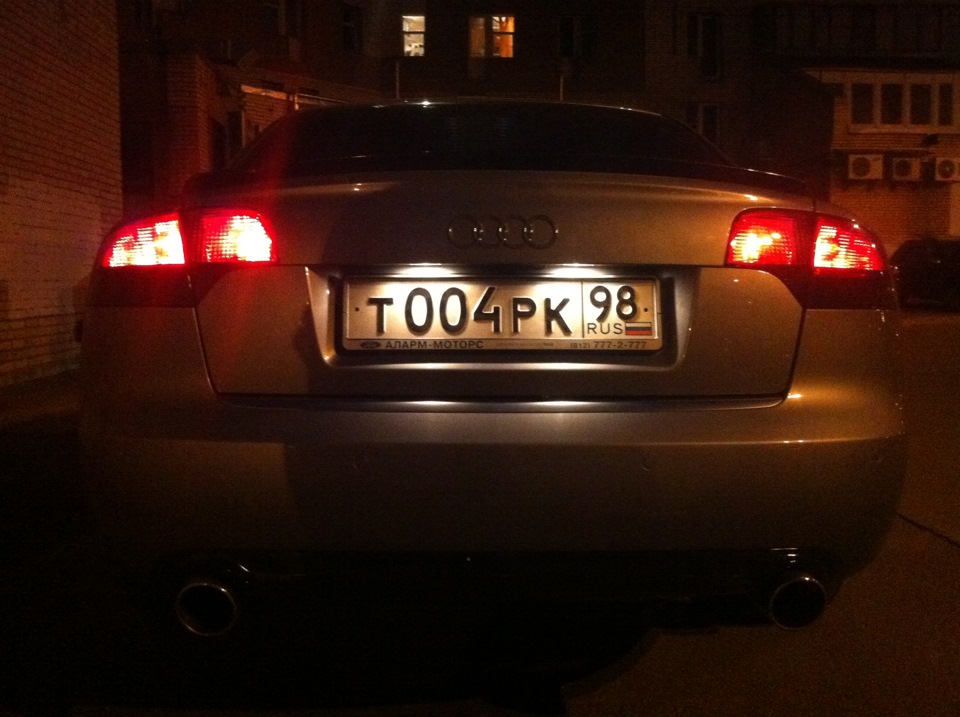
Лампочки целые контакты тоже но не горят в чем может быть причина, куда копать
-

- 15 дек 2003
- 13.466
- Санкт-Петербург
- A4/B6 AVANT 1.8T (AVJ+CVT) 2002
В проводах. В сторону перехода жгута от кузова к крышке багажника.
Stop hovering to collapse…
Click to collapse…
Hover to expand…
Нажмите, чтобы раскрыть…
-
- 4 апр 2006
- 11.754
- 8E-1,8TQ AVJ/0A3
Скоро еще и замок перестанет работать.
Stop hovering to collapse…
Click to collapse…
Hover to expand…
Нажмите, чтобы раскрыть…
-
Спасибо буду разбирать ,искать
-
В проводах от крышке багажника до крыши все целое
-

Garage.Inc
… отдает швартовый и проверяет шатку
- 19 дек 2006
- 16.641
- Москва
- cannondale sl2
ошибки читать не пробовал?
Stop hovering to collapse…
Click to collapse…
Hover to expand…
Нажмите, чтобы раскрыть…
-
Проводка до крыши целая ,что где ещё может быть зарыто
-
Ошибка 01504 обрыв или замыкание на массу
-
Есть ещё такие ошибки 01964 регулировка сидений ,удаляется и потом появляется рулева колонка не электрическая,и 01299
-
- 15 дек 2003
- 13.466
- Санкт-Петербург
- A4/B6 AVANT 1.8T (AVJ+CVT) 2002
схемы от авант и седан.
Вложения:
Stop hovering to collapse…
Click to collapse…
Hover to expand…
Нажмите, чтобы раскрыть…
-
- 15 дек 2003
- 13.466
- Санкт-Петербург
- A4/B6 AVANT 1.8T (AVJ+CVT) 2002
Чего не хватает на контактах ламп? Плюса или минуса?
Stop hovering to collapse…
Click to collapse…
Hover to expand…
Нажмите, чтобы раскрыть…
-
-
- 15 дек 2003
- 13.466
- Санкт-Петербург
- A4/B6 AVANT 1.8T (AVJ+CVT) 2002
У тебя авант?
Судя по схеме (стр.7), плюсовой провод от ламп идёт к разъёму в крышке, потом к разъёму слева под обшивкой в багажнике и оттуда в жгуте проводов прямиком на разъём блока центральной электроники j519.
Номера пинов в разъёмах, цвет провода и все,что нужно для прозвонки, есть.
Stop hovering to collapse…
Click to collapse…
Hover to expand…
Нажмите, чтобы раскрыть…
-
Ребята помогите разобраться может где что-то поставил не помню в Васе,перестала открываться с брелка через несколько минут, не горит индекатор,
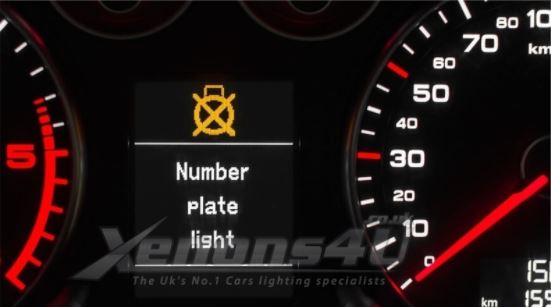
В один прекрасный день включил фары — услышал бесячий писк и увидел данное сообщение на приборной панели! )

Вышел посмотрел — на самом деле не горит левый плафон подсветки номера) Заехал купил лампочки — решил поменять обе сразу и потом пожалел!
Тот плафон, который не горел заработал, а когда я вскрыл второй — увидел, что там все окислилось, сам плафончик прогнил, контакты еле держутся и собрать все обратно практически нереально!
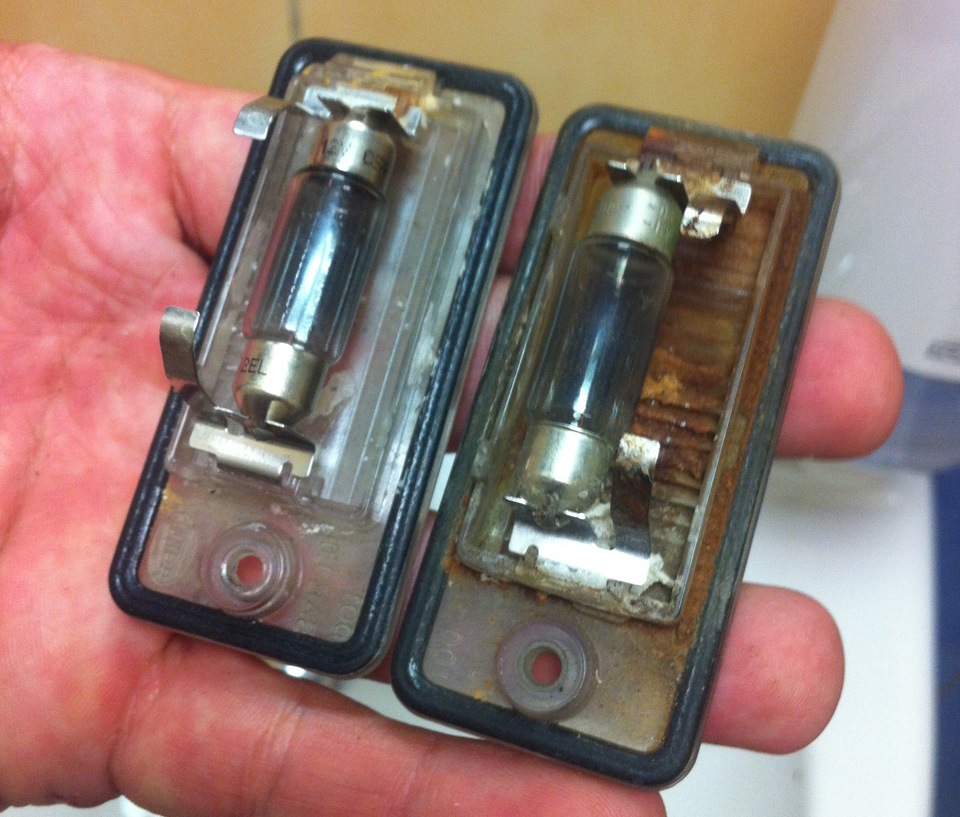
В итоге заказал новые плафоны оригинальные — 340 рублей за штуку. Пришли через пару дней, но я был очень удивлен НАЗОЙЛИВОЙСТИ ауди! Каждое включение габаритов сопровождалось этим дурацким писком, но мало того ВСЕ ВРЕМЯ езды горел желтый символ лампочки на всю верхнюю часть дисплея) ДОСТАЛО за это время в общем!
Плафончики пришли…чистые, новые, красивые и главное с новыми винтиками для них! Старые были в не самом лучшем состоянии — резба и место под отвертку были почти сорваны!
Все поменял — включил — ГОРИТ и главное НИЧЕГО НЕ ПИЩИТ! ))) счастье )
Цена вопроса: 780 ₽
Going back with 200 year old filament technology, car’s luminescent number plate lights have annoyingly short life-span and could be frustrating to change if soft mounting screws start to rust. Xenon lights have bypassed these inherited problems of lights and after 2010, most of the vehicle manufacturers adopted xenon light bulbs as standard component in almost all the places where lighting is used in a car. However, LED bulbs or units can be retrofitted in many cars manufactured before 2010 for improved lighting experience.
Apart from achieving a modern stylish look with bluish white bright light, which emits from these new generation xenon bulbs, many car brand manufacturers prefer xenon LED bulbs for their less energy consumption. Xenons lights are 10 times longer than halogen bulbs and can save up to 90% of the electricity. LED bulbs or units may be a bit more expensive than halogen bulbs but they worth spending in terms of their efficiency and advantages.
LED lights are used in many parts within a vehicle and play an important role to make them look stylish, law compliant and safe for others on the road. Most vehicles have two small lights located directly above the number plate. Number plate lights are also an important light and needs to be working all the time. Otherwise, you will receive a warning message on your dashboard followed by an error in number plate light.
In this article, we attempt to guide you on Audi Bulb out Number Plate light warning message and how to get rid of it. The procedure and implications are applicable to most of the other brand cars especially similar age Audis and Volkswagen.
How Audi indicates a bulb warning light?
When you receive a text warning message on your dashboard it does not come alone, it signifies the error with a picture of yellow bulb pointing downwards with a cross “X” on it. This indication appears when current going to the light bulbs is disrupted, blocked or stopped. This is known as cold diagnostic. But with LED bulbs this error is usually so common even when the bulbs are lit up because they consume little power and the computer of your car sense there is something wrong.
However, in some of the models this cold diagnostic can be turned OFF from the software just be changing electrical system’s long coding with the use of VAG-COM cable and VCDS but it couldn’t be the case with each model so if modifying the car’s software is not an option; you should not take this warning message easy and resolve this issue to save you from getting a ticket.
Symptoms to a faulty number plate light
There could be a few symptoms as well to let you know the lights are not working properly even if you do not receive any warning message on dashboard.
Number plate lights are solid lights and supposed to be turned ON with the headlights or parking lights without flickering. In most of the cases, number plate light flickers and that is most commonly due to a loose wiring or a connection that powers the license plate light. A flickering light can easily catch a “Fix it” ticket so it is necessary that you frequently check the number plate light by walking to the rear of your vehicle after the car is ignited.
Also, you may notice the number plate light does not illuminate at all. In that case, there is no second thought that the light bulb has gone bad. Now, there could be different reasons for a failure of bulb such as a problem with relay switch or a loose connection or simply the bulb itself.
If your model of Audi has factory fitted LED license plate light units then, you’ll need to replace whole unit with a new unit but if it is retrofitted or has conventional halogen bulbs – simple bulb replacement will do a job.
Why does it fail?
There could be both internal and external reasons for a bulb to fail. Internal reasons may be the completion of bulb’s life. Although LED bulbs are supposed to work longer but like every electronic component they may fail at any time. The external reasons may include moisture or damage to the bulb or unit due to the accident etc.
A simple and quick fix to this issue is the replacement of LED bulb or LED unit with a new one.
Diagnosis
Usually this happens for one side, left or right and in very rare cases, you will have both bulbs out of order. Before replacing we recommend that you diagnose which side is problematic since the message doesn’t specify which side has gone wrong.
Installation of LED bulbs in Audi
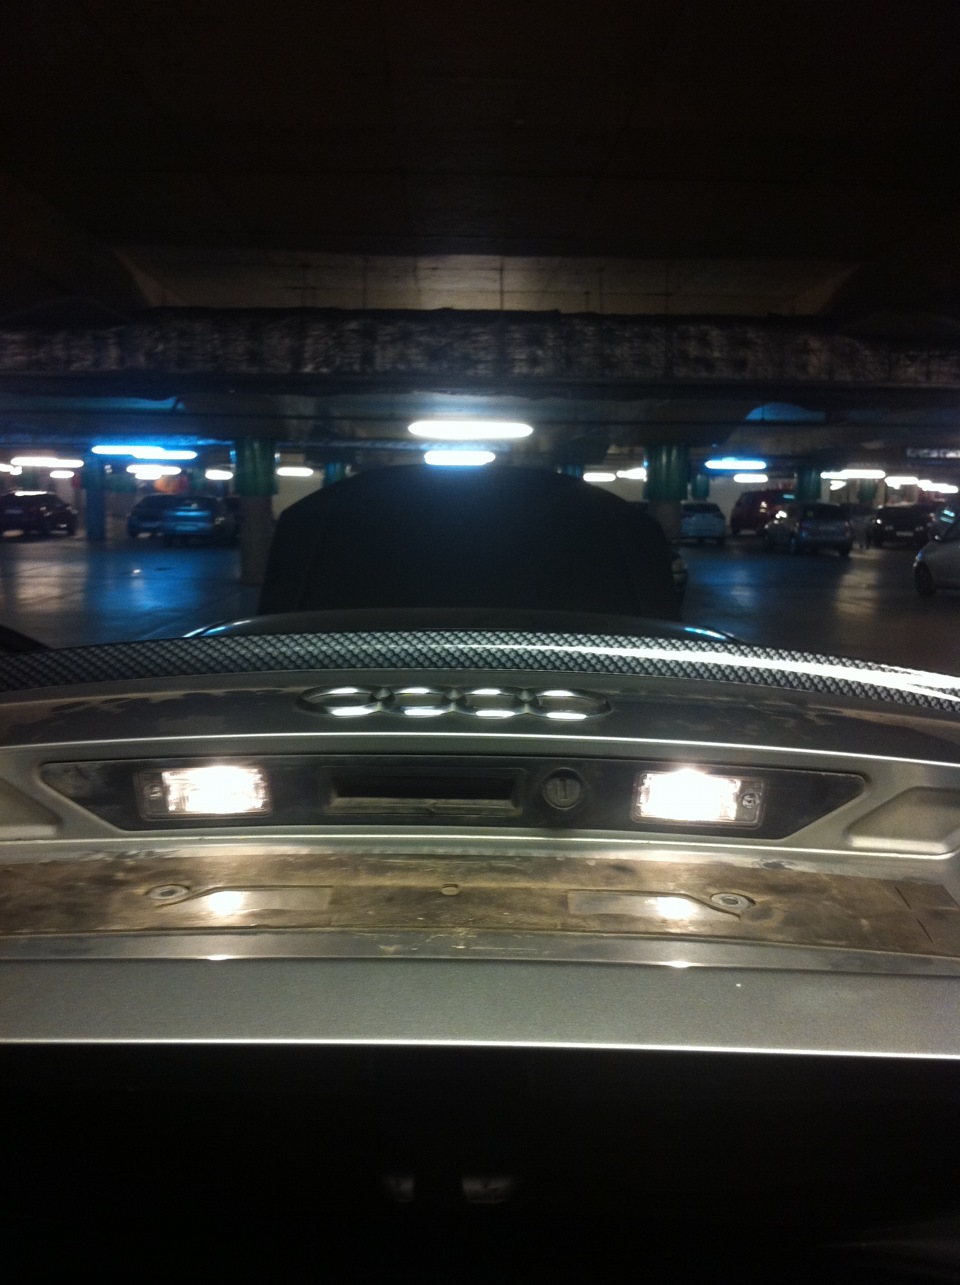
Since almost all cars have same number plate lights and it is extremely important that license plate lights are always in working condition all the time. There is no exception to number plate lights and installing LED bulbs in replacement of halogen bulbs is quite straightforward and easy if you know exactly what to do and how to do. LED lights you buy for your Audi might roughly look like Xenon or LED day time running lights in color temperature. You just need to install the bulbs to the covers.
Replacement of a faulty bulb with installing a new one may look easier but it can be tricky if the right size and type of bulb is not chosen. You can buy high quality, trusted auto parts from xenons4u as well as schedule an appointment for expert servicing of installation.
In this article, we change the Audi A3 number plate bulbs to LED’s and get rid of the number plate light warning that follows.
Xenon in the front and 200-year-old filament technology in the back. Car’s incandescent number plate lights have annoyingly short life-span, they are frustrating to change and after a while impossible, when the soft mounting screws start to rust.
Disclaimer: Please note that everything you do to your car is your responsibility, not mine.
Info in this article is valid but people make mistakes.Safety: Shorting the exposed wires might result in burnt fuses or a fried on-board supply control unit, disconnect the battery (negative lead first) before taking anything apart.
Legal: Car lights are highly standardized, using custom non E-approved parts might be illegal.
The car in this article is a 2010 Audi A3 Sportback 8PA 1.9 TDI, but the procedure and wiring should be applicable to most cars, especially other similar age Audis and Volkswagens.

Installing LED Number plate lights
Tools and materials needed
You will need basic mechanical and electrical tools. A trim-remover is handy to loosen the spring clips while removing the rear lid trim to get access to the cables.

- Two LED-festoon LED-bulbs
- Resistor adapter for licence plate LED or 25 ohm >10 W resistor
- T-20 Torx-screwdriver
- Zip-ties
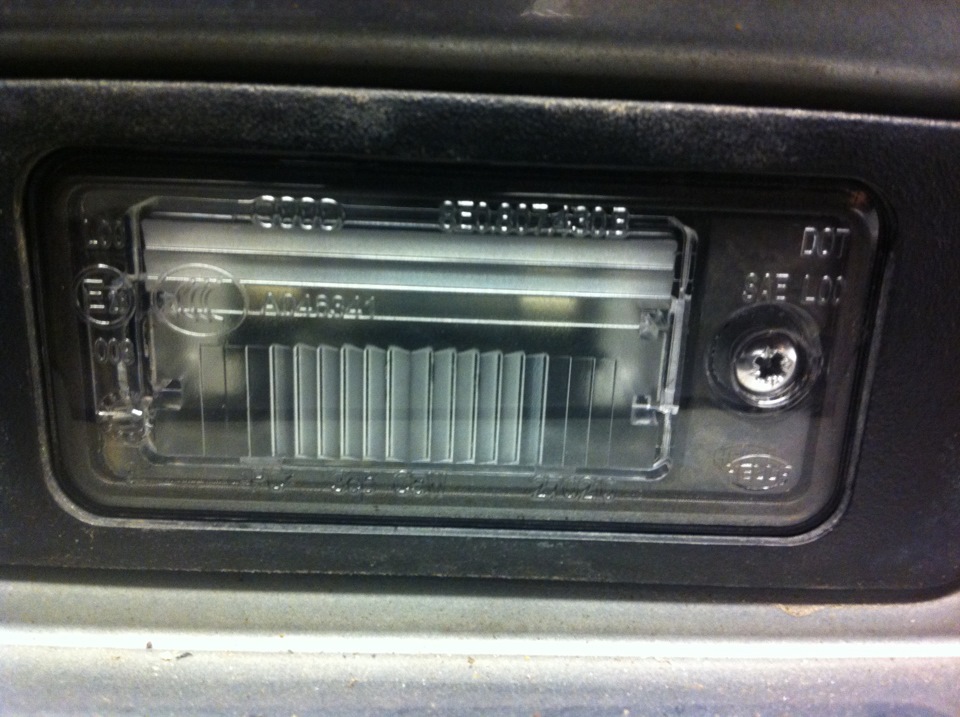
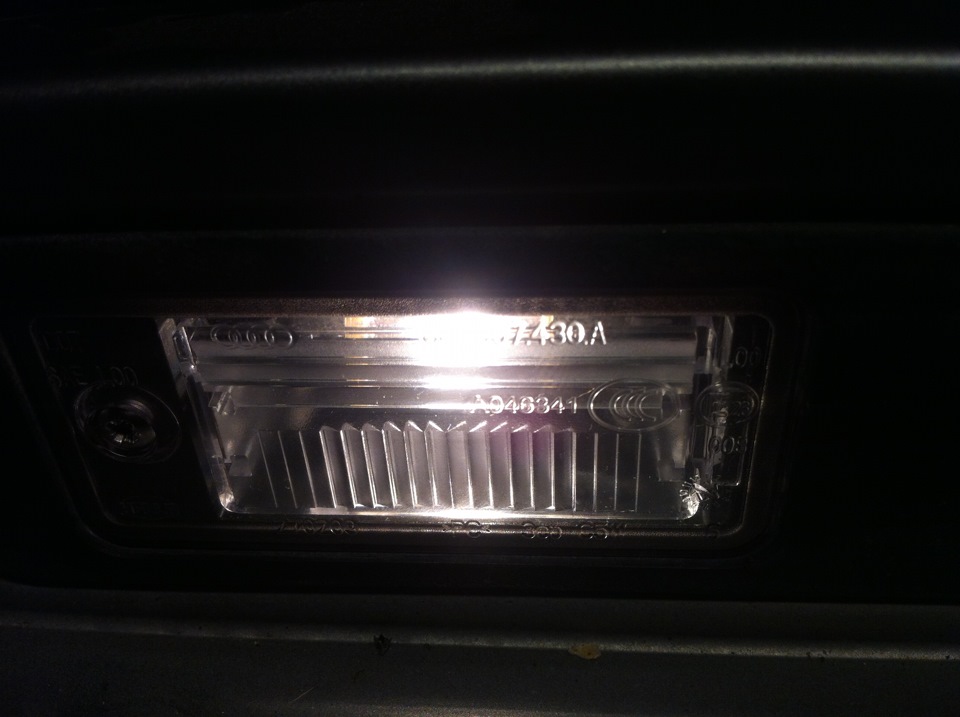
LED Number plate bulbs
Installing LED-bulbs in the place of regular filament ones is pretty straightforward, it is like changing the bulbs normally with two key differences:
- Lights are directional, they have to be oriented right
- LED-bulbs have a polarity
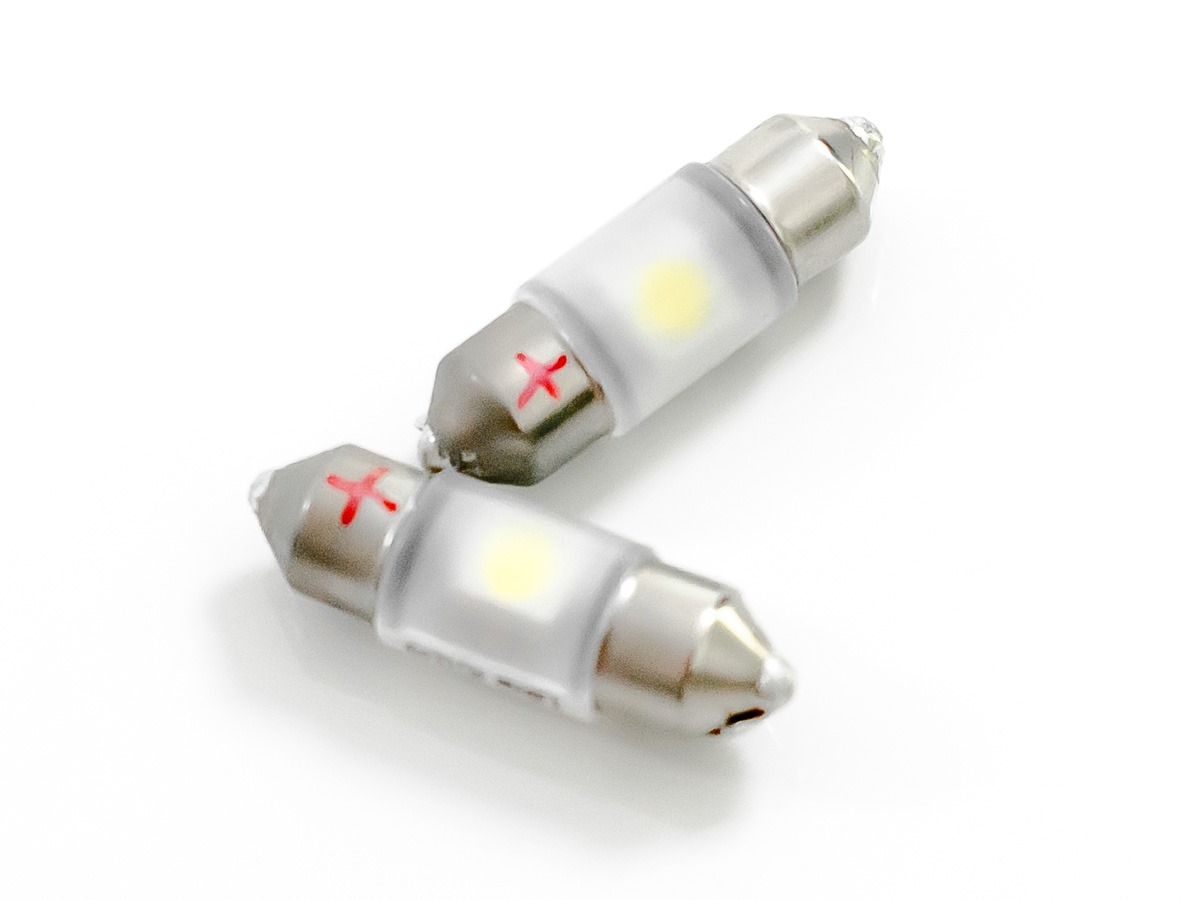
After you take your shiny new LED-bulbs out of the package, hook them up to a 12 V voltage source and mark the positive end with a marker.
Install the bulbs to the covers, so that the positive end faces away from the screw hole.
In my car, I used 6000K OSRAM LED-bulbs that roughly match the front Xenon- and LED daylight running lights in color-temperature.
A warning is shown on the dashboard when the car thinks the number plate light has a broken filament.

The car’s computer measures the current going to the light bulbs, if the filament is broken, this current drops and the familiar bulb-warning appears on the dashboard. This is called light cold diagnostics.
Usually, this is awesome and keeps you from getting a ticket but this approach is problematic with LED-bulbs. They consume so little power that the computer thinks there is something wrong, even when the butt of your car is shining with light!
On some models, it’s possible to turn off the cold diagnostics from software by changing the electrical system’s long coding using VAG-COM cable and VCDS but on my selected vehicle this is not an option.
Getting rid of the number plate light warning
If modifying the car’s software is not an option, we can always make the car think there is a light bulb connected with a properly sized resistor.
I tried 100 Ω, 50 Ω, 33 Ω and 25 Ω, the last one being the only one that worked.
A 25 Ω resistor in a 12 V circuit will have about 480 mA going through, emulating about 6 W light bulb.

Connecting a resistor in parallel with the LED-bulb makes more current run in the light circuit, making the computer think there is an intact filament.
Please note that when going this route you will have a heating component inside your trunk-lid (mount it properly) and you will never get another number plate bulb warning again.
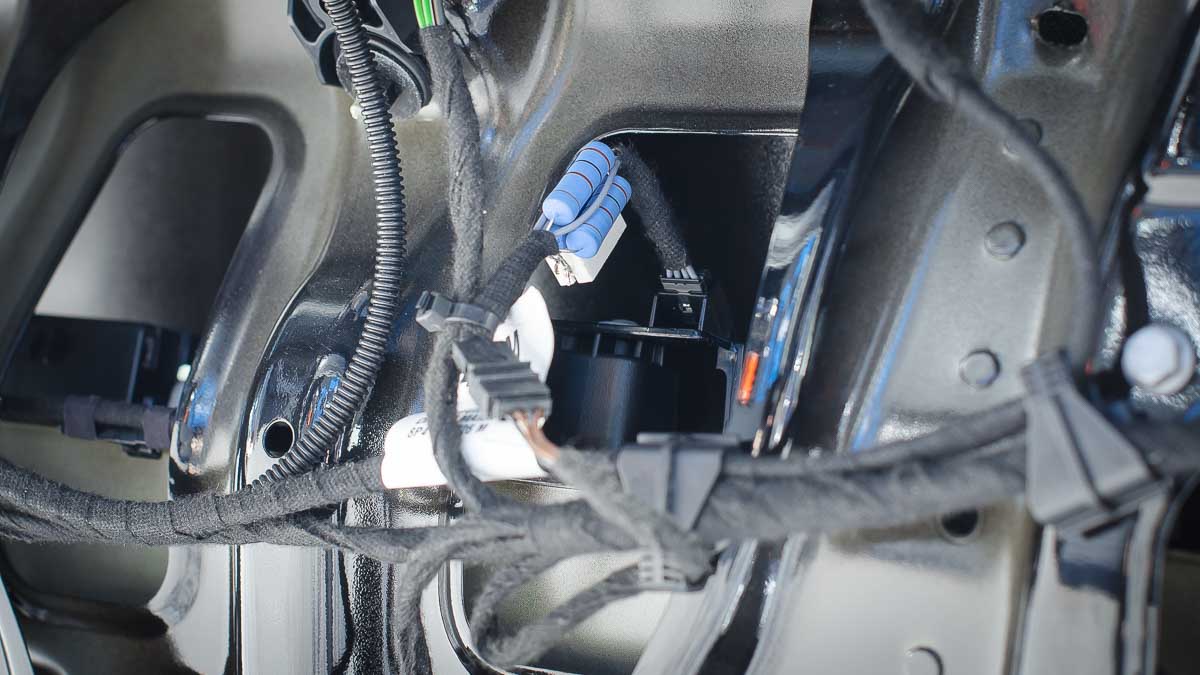
Installing a load-resistor
The proper way to install the load-resistor would be to put it in the wiring harness just before the connector leading to the handle/lamp carrier. This provides easy access and good mounting options for the resistor.
Mount the resistor in the air so it can cool properly and make sure it’s not touching any plastics that could melt.
Use secure connection methods like soldering or crimping to connect the load resistor to the wires of the harness.
The load resistor needs to be connected between:
- Pin 3, number plate output from the J519 (gray with brown stripes)
- Pin 4, ground (brown).
The schematic above has been drawn based on the Audi A3 wiring schematic, which according to Audi is valid for 2006-2010 A3 models.
Problems
I first tried to solve the number plate warning problem by adding 100 Ω load resistors inside the lights, so I would not need to take apart the trunk lid.
It is tempting to make this kind of installation but its worth doing the right way. Installing the resistors this way you will be dumping a lot of energy into the small plastic enclosure, which in my case has lead to the softeners being vaporized away from the plastic and causing them to crack.
The resistors also took too much space, the LED-bulbs had to be installed off-axis of the lens and the lighting pattern to the number plate was off.
What did not help either was that I put a too high value of resistors in there that were not enough to trick the computer so I ended up driving with the warning light on for a year. Number plate bulb warning hides the car’s thermometer on the screen and that shit is important in the land of ice and snow so I decided to fix it.
Pro-tip: Do not close trunk if you have removed the switch to open it.
Taking apart the rear lid

The plastic trim of the rear lid is held in with two T-20 Torx-screws and 8 metal spring clips.
Carefully release spring clips from the rear lid on the right and left edges of the trim and carefully pull trim off. Reach between the trim and rear lid and disengage other spring clips.
Assembling the rear lid is the same but in reverse order, attach the center spring clips, then the sides and finally the screws.
LED-adapter cable
After messing with the lights enough, I decided to set everything back as it was and go ahead with the second method:
I ordered a ready-made adapter cable from Amazon that has the resistors built in between two suitable connectors.

This makes installing (and removing!) the load resistors accessible enough for any moderately trained monkey, without damaging the original wiring harness.

Side note: People keep selling these adapter-cables as “CAN-bus compatible” which I find funny as there is no CAN-bus going to the rear lid number plate light/switch assembly.
I just pity the fool who installs one of these in the CAN-bus!
The adapter has three 100 Ω resistors connected in parallel to make up one 33 Ω power resistor. I still had problems with it but after some trial and error, I determined that it took 25 Ω resistor to trick the car computer.
I modified the adapter by adding one 100 ohm resistor more in parallel to drop its total resistance down to 25 Ω.

Bonus: Restoring the plastics
The screws keeping the light-covers in place were rusted so badly I could not take them off with a screwdriver anymore.
I had to cut the heads off with a small cutting-wheel and drill the rest. This damaged the plastics a little but this was nothing that a little epoxy would not solve. I guess European cars are not meant for heavily salted arctic/rainy Finnish climate.
The plastic covers had also gotten a bit cloudy so I decided to resurface them on the same go. This can be a simple fix:
- Fix any cracks and weirdly miss-drilled holes with 15 min epoxy
- Use emery-cloth on the glass to flatten the surfaces by sanding them
- Use spray clear-coat to transfer the matte-finish into translucent plastic again
- Let dry
- Use stainless steel screws in the future
Conclusion

This little mod was a fun afternoon build and took care of the problem for me. The car no longer complains about the “broken” number plate lights.
Verdict
- Driving with error-light on will make your passengers think less of you
- A thermometer is surprisingly important in a car up north
- Save effort, do it right the first time
What do you think of this post?
-
Awesome (57%)
-
Interesting (17%)
-
Useful (13%)
-
Like (4%)
-
Dislike (4%)
-
Boring (4%)
-
Surprising (0%)
-
Sucks (0%)
-
#1
Hey guys, really random issue which I can’t seem to diagnose but both my number plate lights stopped working, so I bought some LED lights. I’ve fitted them and they’re both working, however, the plate light error keeps popping up and I can’t understand why.
I’ve sat on my drive and turned the lights on, the error pops up and I’ll get out to check them and they’re still working, so I’m not sure why I’m getting the error. Occasionally the error will go off and then do a burst of that annoying error beep for around 10 seconds, which as you can imagine is seriously annoying to hear, then it’ll stay on for a minute or two and repeat the burst again.
Any help would be greatly appreciated!


-
#2
Leds dont take much current so can set off a can bus error, trying adding a normal 10w bulb in circuit and see if error goes.

-
#3
Bulb failure modules don’t like led’s as Darran says above. I’ve tried different versions from Ebay and they don’t work either, even if they say they can bus friendly or they fail after a few months. EM tuning sell ones that do work, they are on the ASN traders list. I fitted a complete set of EM tunings interior and exterior LED’s 2 years ago and they all still work.
-
#4
I’m an aircraft engineer but unfortunately the mechanical side of it, not electrics, so wiring is not my strong point unfortunately. I do understand the difference between in series and in circuit, however, how can I wire a bulb in to the LED section when there’s only just space for the LEDs? The LEDs I’ve got aren’t bulbs, they’re LEDs built in to the actual assembly.
-
#5
If you want to do it that way you need to modify the loom in the bootlid and put in an in-line bulb, i used a 501 and bulb holder, made a hole for it and cable tied in place away from anything that shouldn’t get hot! Works fine and has done for the last 6 months
-
#6
Ok thanks for the advice. Would wiring in an extra resistor between one of the contacts (if possible) work? I’ve got access to a soldering iron and solder at work, just need to work out what resistor to use.
-
#7
I tried 5/6 ohm but to no prevail nut i guess it wouldn’t hurt to have a play!
-
#8
I’m sure I could ‘acquire’ some through work from one of the lecky sections.
What I’d have to do is solder the resistor to one of the contacts, heatshrink over it but leave the opposing resistor leg out of the heatshrink to complete the connection.
I’ll do some digging around work tomorrow and see what I can sort out.
-
#9
Becareful with resistors as they will get hot. I always use a bulb which will also get hot but wont melt or short like the wrong resistor can !

-
#10
Wondering if the bulb failure monitors each bulb desperately , I’d be surprised, i assume the 2 lamps are wired parallel from the tailgate / boot harness ?
As mentioned above, try wiring a resistor in parallel with each led lamp assy. A 5W no plate light would draw c. 0.4A per light , so a resistor value of 33 ohm 10W ( Maplin do these I’m sure) for the resistor would draw an equivalent current , so that should ‘fool’ the lamp monitoring into thinking the is a std lamp in place. You could try using some resistor value of around 100 ohm 5W in parallel with each lamp, see how that goes . ( less current draw, less heat from the resistor etc ) Be interesting to here others experiences on values they have been able to get away with !
Remember the resistors will get hot , so make sure they’re not in contact with other wiring or plastics etc that could melt or be damaged.
Good luck !
-
#11
Becareful with resistors as they will get hot. I always use a bulb which will also get hot but wont melt or short like the wrong resistor can !
Valid point, I didn’t take the heat into consideration. I guess I’ll be taking my boot liner off for the following reason. I’ve done some research on Google and someone on here on the A3 section (unsure of which model) bought a cable from a company called Kuraft (or something close to that) and it was just a resistor built in to a connector which connects between the plate lights and the power cable. If I can see what the coloured lines are on the resistor I can work out its resistance level.
Wondering if the bulb failure monitors each bulb desperately , I’d be surprised, i assume the 2 lamps are wired parallel from the tailgate / boot harness ?
Good luck !
They’re definitely individually monitored. One of mine stopped working and when I changed the standard halogen bulbs, I left the lights on to see which one wasn’t working because I was interested to see if they were individually monitored like you are. I wasn’t thinking properly and just disconnected them both and the error beep sounded when I took the one out that was working. Put the LEDs in and had no issues for about 30 seconds and then it started sounding off every few seconds.
-
#12
Valid point, I didn’t take the heat into consideration. I guess I’ll be taking my boot liner off for the following reason. I’ve done some research on Google and someone on here on the A3 section (unsure of which model) bought a cable from a company called Kuraft (or something close to that) and it was just a resistor built in to a connector which connects between the plate lights and the power cable. If I can see what the coloured lines are on the resistor I can work out its resistance level.
They’re definitely individually monitored. One of mine stopped working and when I changed the standard halogen bulbs, I left the lights on to see which one wasn’t working because I was interested to see if they were individually monitored like you are. I wasn’t thinking properly and just disconnected them both and the error beep sounded when I took the one out that was working. Put the LEDs in and had no issues for about 30 seconds and then it started sounding off every few seconds.
Be interested to hear the resistor value used in the Kufatech loom, presume it was this one ? :
http://www.kufatec.co.uk/shop/en/Audi/A4-B6/8E/Adapter-plate-LEDs-Audi-A4-B6-B7-/-Audi-A3-8P
Haven’t had the opportunity to use LEDs in the plate light as yet, ( but it is on the to do list !) unfortunately can’t offer any help on specifically where to install the resistors, other than in parallel with each led used, but I’d guess that they could have a couple of fly leads soldered on to the resistor if room near to the lamp unit is tight.
-
#13
Be interested to hear the resistor value used in the Kufatech loom, presume it was this one ? :
http://www.kufatec.co.uk/shop/en/Audi/A4-B6/8E/Adapter-plate-LEDs-Audi-A4-B6-B7-/-Audi-A3-8P
Haven’t had the opportunity to use LEDs in the plate light as yet, ( but it is on the to do list !) unfortunately can’t offer any help on specifically where to install the resistors, other than in parallel with each led used, but I’d guess that they could have a couple of fly leads soldered on to the resistor if room near to the lamp unit is tight.
That’s the exact one I was talking about. Kuraft haha, I was kind of close. Still, €35 for a resistor is a lot of money when you could produce the same thing for a lot, lot cheaper.
I’ll have a word with the avionics lads and get them to work out the resistance of it and get back to you.
The guy with the A3 I was on about had some good pictures of that cable installed in. Instead of using the cable, you could splice into the existing wiring and install the resistors that way. Although it’s a trashy job splicing into existing cable, who’s going to see it when the boot liner is back on?
I’ll try and find the guy with the A3 and see if he minds me using the pictures in here if you’re interested? It’s easier to look at than to explain.
-
#14
Ok the avionics lads think the colours are: brown black red then gold which would make it a 1k ohm resistor. But because there’s 2 in parallel that works out to be 2k ohms which, to me, sounds far too high a resistance. I must’ve clicked an old link compared to the one you provided because the price came up as €35 not £25. Still, £25 to get some LEDs to work is a lot of money.
-
#15
yes €35 isn’t cheap, but I guess it gives a plug & play answer for those that want to go that route.
Yeah, be good to see the pics. Thanks ![]()
-
#17
Its strange how some of us fit number plate leds and never get a fault, i have them and have no faults , have you fitted leds to the front sidelights or anywhere else ?
-
#18
I’ve noticed so many people who have said that they’ve never had issues, it’s frustrating. I’ve ordered full interior, LED DRLs and LED sidelights from Trups, just waiting for them to arrive but because he didn’t have the DRL kit in he didn’t want to do 2 separate lots of posting. I think they arrived in last Thursday so just waiting for them all to turn up.
-
#19
Id plug vcds in and investigate deeper, much simpler .
-
#20
Unfortunately I don’t have £270 spare to buy VCDS got a baby on the way and I own a house, so money is slightly tight at the minute.
-
#21
Look on the map on this site , type vcds map in search and find someone nearby , most are more than willing to help , i do regulaly, im in derbyshire.
-
#22
I didn’t know about that. Cheers, I’ll check it out now.
-
#24
Cheers for the link, however it doesn’t work. I am on tapatalk so that might be why it’s not working.

-
#26
I’ve noticed so many people who have said that they’ve never had issues, it’s frustrating. I’ve ordered full interior, LED DRLs and LED sidelights from Trups, just waiting for them to arrive but because he didn’t have the DRL kit in he didn’t want to do 2 separate lots of posting. I think they arrived in last Thursday so just waiting for them all to turn up.
Have a look at this link http://www.audi-sport.net/xf/threads/em-tuning-vag-panel-led-fitting-guide.133195/#post-2352318 Will help you out when you get your led kit.
-
#27
I haven’t bought the number plate LEDs from Trups, but I’m starting to contemplate buying some from him, so cheers for the link.
-
#28
The link is for the interior lamps, number plate lamps are just straightforward festoon bulps and an awkward size to find.
-
#29
Can buy a complete led number plate light unit or 2 as the case maybe ,whole unit screws in and replaces festoon carrier.
-
#30
Can buy a complete led number plate light unit or 2 as the case maybe ,whole unit screws in and replaces festoon carrier.
That’s exactly what I bought.
