Background info:
My IDE
Android Studio 3.1.3
Build #AI-173.4819257, built on June 4, 2018
JRE: 1.8.0_152-release-1024-b02 amd64
JVM: OpenJDK 64-Bit Server VM by JetBrains s.r.o
Windows 7 6.1
First solution:
Import the project again and don’t agree to upgrade the android gradle plug-in.
Second solution:
Your files should contain these fragments.
build.gradle:
buildscript {
  repositories {
    jcenter()
    google()//this is important for gradle 4.1 and above
  }
  dependencies {
    classpath 'com.android.tools.build:gradle:3.1.3' //this android plugin for gradle requires gradle version 4.4 and above
  }
}
allprojects {
  //...
  repositories {
    jcenter()
    google()//This was not added by update IDE-wizard-button.
    //I need this when using the latest com.android.support:appcompat-v7:25.4.0 in app/build.gradle
  }
}
Either follow the recommendation of your IDE to upgrade your gradle version to 4.4 or consider to have this in
gradle/wrapper/gradle-wrapper.properties
distributionUrl=https://services.gradle.org/distributions/gradle-4.4-all.zip
Optional change buildToolsVersion in app/build.gradle:
android {
compileSdkVersion 25
buildToolsVersion '27.0.3'
app/build.gradle: comment out the dependencies and let the build fail (automatically or trigger it)
dependencies {
//compile fileTree(dir: 'libs', include: ['*.jar'])
//compile 'com.android.support:appcompat-v7:25.1.0'
}
app/build.gradle: comment in the dependencies again. It’s been advised to change them from compile to implementation, but for now it’s just a warning issue.
dependencies {
compile fileTree(dir: 'libs', include: ['*.jar'])
compile 'com.android.support:appcompat-v7:25.1.0'
}
After project rebuilding, the import statement shouldn’t be greyed-out anymore; try to invoke Ctrl+h on the class.
But for some reason, the error markers on those class-referencing-statements are still present.
To get rid of them, we need to hide and restore the project tree view or
alternatively close and reopen the project.
Finally that’s it.
Further Readings:
Update Gradle
Use the new dependency configurations
If you prefer a picture trail for my solution, you can visit my blog
Есть 2 компьютера с Android Studio версии 3.5.3. На одном из них был написан небольшой проект, в котором в основной класс был имплементирован View.OnClickListener:
public class NameActivity extends AppCompatActivity implements View.OnClickListener {}
Также был импортирован поддерживающий это класс:import android.support.v7.app.AppCompatActivity;
В таком виде код прекрасно работает.
Создал аналогичный проект на другой машине — не работает. Насколько мне удалось понять, на второй машине используются более новые библиотеки androidx.
Справочник разработчиков указывает, что ранее использованная мной библиотека была заменена на androidx.appcompat.app.AppCompatActivity. Эта новая библиотека у меня импортирована, но при ней студия ругается на «implements View.OnClickListener», а установить старую библиотеку уже не удается.
Прописывал ее напрямую в Gradle:
implementation 'com.android.support:appcompat-v7:28.0.0'
но проблему это не решает, синхронизация выдает ошибку, ругается на то, что надо использовать новую библиотеку androidx. Отключение поддержки androidx в файле настроек Gradle проблему тоже не решило. На старой машине в настройках Gradle поддержки androidx нет.
Что еще можно сделать?
Improve Article
Save Article
Like Article
Improve Article
Save Article
Like Article
When you create a project and extends activity AppCompatActivity, sometimes you must have observed Android Studio throws an error that is:
Cannot resolve symbol ‘AppCompatActivity’
and this error doesn’t go away easily. In this article, we are going to cover topics: why there is a need to solve this error and five different ways to get rid of this error.
Why There is a Need To Solve “Cannot resolve symbol ‘AppCompatActivity’”?
When you rename the application package name this error pops up. The import statement turns gray and says there’s no package for support.v7.app. Even after upgrading to appcompat-v7:22.1.0, in which AppCompatActivty (To get the most out of the Android Support Library that is, to get the latest features supported across the highest number of devices, we need AppCompatActivity) is added, the problem doesn’t go away. So we need to try the following methods to fix this problem in Android Studio.
How To Solve “Cannot resolve symbol ‘AppCompatActivity’”?
Method 1
- Go to your build.gradle(Module:app) file and in the dependencies section the appcompat one, you should see something like compile ‘com.android.support:appcompat-v7:XX.X.X’, change it to compile ‘com.android.support:appcompat-v7:XX.X.+’ or else hit ALT + ENTER on both appcompat & design dependencies then select the shown version.
- Then click on Sync.
Method 2
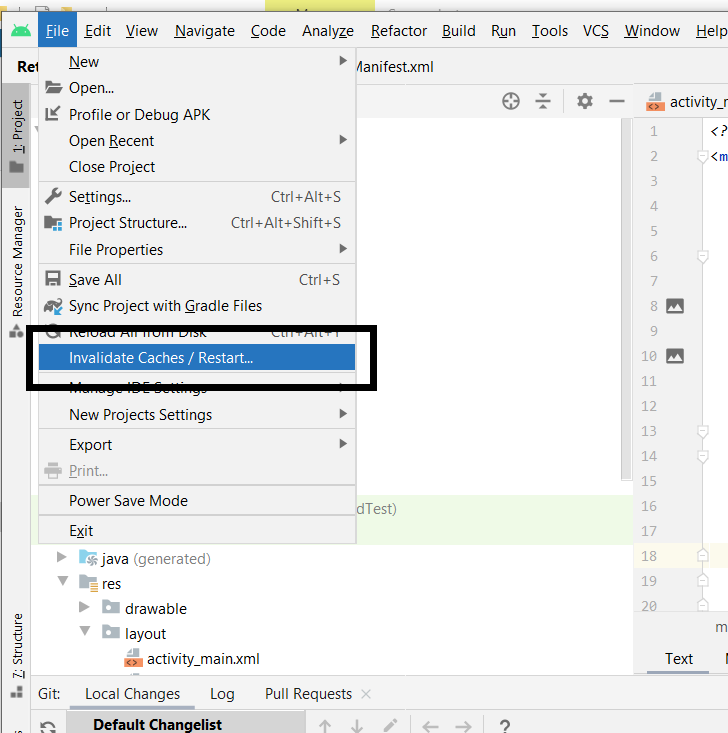
Navigate to File > Invalidate Caches/Restart and then disable offline mode and sync.
Method 3
Step 1: Delete the .idea folder. For .idea folder navigate to YourProject > app > .idea
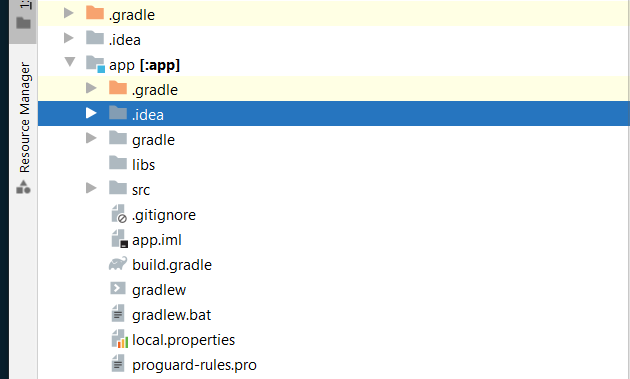
Step 2: Close and reopen the project
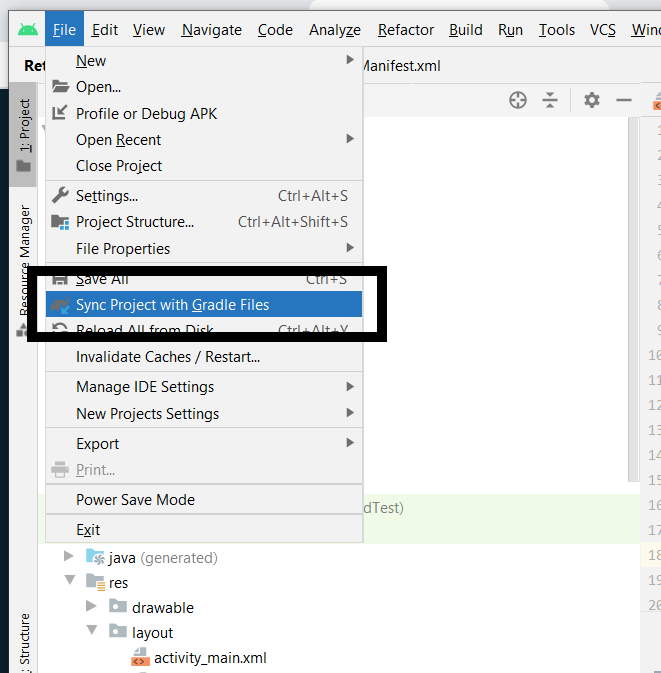
Step 3: File > Sync Project With Gradle Files
Method 4
- Exit Android Studio and reopen it.
- Navigate to the .idea folder in your project
- Just Rename the libraries folder
- Restart Android Studio. It should now recreate the libraries folder and work again.
Method 5
If you have added AndroidX support in Gradle.properties file (that is android.useAndroidX=true and android.enableJetifier=true and if you are using gradle version greater than 3.2),the conventional Appcompat dependency (implementation ‘com.android.support:appcompat-v7:27.1.1’) Replace this dependency with: implementation ‘androidx.appcompat:appcompat:1.1.0’. Moreover, change the AppCompatActivity import in your class file from this:
import android.support.v7.app.AppCompatActivity
to this:
import androidx.appcompat.app.AppCompatActivity
Last Updated :
09 Nov, 2021
Like Article
Save Article
When you create a project and extends activity AppCompatActivity, sometimes you must have observed Android Studio throws an error that is:
Cannot resolve symbol ‘AppCompatActivity’
and this error doesn’t go away easily. In this article, we are going to cover topics: why there is a need to solve this error and five different ways to get rid of this error.
Why There is a Need To Solve “Cannot resolve symbol ‘AppCompatActivity’”?
When you rename the application package name this error pops up. The import statement turns gray and says there’s no package for support.v7.app. Even after upgrading to appcompat-v7:22.1.0, in which AppCompatActivty (To get the most out of the Android Support Library that is, to get the latest features supported across the highest number of devices, we need AppCompatActivity) is added, the problem doesn’t go away. So we need to try the following methods to fix this problem in Android Studio.
How To Solve “Cannot resolve symbol ‘AppCompatActivity’”?
Method 1
- Go to your build.gradle(Module:app) file and in the dependencies section the appcompat one, you should see something like compile ‘com.android.support:appcompat-v7:XX.X.X’, change it to compile ‘com.android.support:appcompat-v7:XX.X.+’ or else hit ALT + ENTER on both appcompat & design dependencies then select the shown version.
- Then click on Sync.
Method 2
Navigate to File > Invalidate Caches/Restart and then disable offline mode and sync.
Method 3
Step 1: Delete the .idea folder. For .idea folder navigate to YourProject > app > .idea
Step 2: Close and reopen the project
Step 3: File > Sync Project With Gradle Files
Method 4
- Exit Android Studio and reopen it.
- Navigate to the .idea folder in your project
- Just Rename the libraries folder
- Restart Android Studio. It should now recreate the libraries folder and work again.
Method 5
If you have added AndroidX support in Gradle.properties file (that is android.useAndroidX=true and android.enableJetifier=true and if you are using gradle version greater than 3.2),the conventional Appcompat dependency (implementation ‘com.android.support:appcompat-v7:27.1.1’) Replace this dependency with: implementation ‘androidx.appcompat:appcompat:1.1.0’. Moreover, change the AppCompatActivity import in your class file from this:
import android.support.v7.app.AppCompatActivity
to this:
import androidx.appcompat.app.AppCompatActivity
Hey @Daneyl, try this method:
Go to your build.gradle file and in your dependencies find the appcompat one, it will be something like compile com.android.support:appcompat-v7:XX.X.X
Change it to compile com.android.support:appcompat-v7:XX.X.+. Then you need to sync the project with gradle.
As for your second issue of style parent setting, I want you to be more clear by giving some code example.