A How To on using Windows chkdsk utility to address storage disk corruption. The Windows DISKPART utility is also discussed here in part.
Imaging you’ve just purchased Acronis True Image. You set out to create a backup image of your Windows Operating System disk. You set up the backup task and run it … and then, trouble!
- After the task completes you discover that the size of the backup is bigger than the total amount of data on the disk. (Possible disk corruption causing Sector by Sector backup to be created)
- Your task fails to run, possibly just stopping completely or displaying an error message stating that the backup cannot complete due to corruption.
- You find that your system disk is not selectable or displays a red X next to it.
What is the cause of such behavior? These symptoms are typical when corruption exists on the selected Backup Source disk, either in the filesystem itself, or what is known as a “bad sector” (physical damage) on the disk. The same holds true for Source and Target disks during Recovery operations. How do you fix such corruption?
Windows provides a utility tool known as chkdsk that can correct most errors on a storage disk. The chkdsk utility must be run from an administrator command prompt to perform its work. In this How To article, we will learn what chkdsk does and how to use it to overcome the issues above, as well as others not listed in the intro here.
So what does chkdsk do exactly? Good question. The primary function of chkdsk is to scan the filesystem on a disk (NTFS, FAT32) and check the integrity of the filesystem including filesystem metadata, and fix any logical filesystem errors it finds. These errors might include corrupt entries in a volume’s master file table (MFT), bad security descriptors associated with files, or misaligned time stamp or file size information about individual files.
Chkdsk can also scan for bad sectors. Bad sectors come in two forms: soft bad sectors, that occur when data is written badly, and hard bad sectors that occur because of physical damage to the disk. Chkdsk attempts to fix these problems by repairing soft bad sectors and marking hard bad sectors so they won’t be used again.
How does a hard disk become corrupted? Another good question. Anytime Windows shuts down abnormally or has a system crash, it can cause corruption. Over time, you can expect that you will experience such corruption. Running chkdsk as part of a normal maintenance routine is good practice if you wish to do so.
Enough of the technical stuff, let’s see what we can do with the chkdsk utility.
First, let’s outline the tools various command line switches and their uses.
chkdsk [<Volume>[[<Path>]<FileName>]] [/f] [/v] [/r] [/x] [/i] [/c] [/l[:<Size>]] [/b]
Parameters
<Volume>
Specifies the drive letter (followed by a colon), mount point, or volume name.
[<Path>]
Use with file allocation table (FAT) and FAT32 only. Specifies the location and name of a file or set of files that you want chkdsk to check for fragmentation. You can use the ? and * wildcard characters to specify multiple files.
/f
Fixes errors on the disk. The disk must be locked. If chkdsk cannot lock the drive, a message appears that asks you if you want to check the drive the next time you restart the computer.
/v
Displays the name of each file in every directory as the disk is checked.
/r
Locates bad sectors and recovers readable information. The disk must be locked. /r includes the functionality of /f, with the additional analysis of physical disk errors.
/x
Forces the volume to dismount first, if necessary. All open handles to the drive are invalidated. /x also includes the functionality of /f.
/i
Use with NTFS only. Performs a less vigorous check of index entries, which reduces the amount of time required to run chkdsk.
/c
Use with NTFS only. Does not check cycles within the folder structure, which reduces the amount of time required to run chkdsk.
/l[:<Size>]
Use with NTFS only. Changes the log file size to the size you type. If you omit the size parameter, /l displays the current size.
/b
NTFS only: Clears the list of bad clusters on the volume and rescans all allocated and free clusters for errors. /b includes the functionality of /r. Use this parameter after imaging a volume to a new hard disk drive.
/?
Displays help at the command prompt.
As you can see there are a lot of options allowed in the chkdsk tool which can provide some advanced operations.
Primarily for this discussion we will be looking at two of the most useful and commonly used options. They are:
- chkdsk X: /f
- chkdsk X: /r
Note: Where X: is the letter of the drive partition where chkdsk is to be run.
Let’s look at some screenshots for the above commands to become more familiar with them.
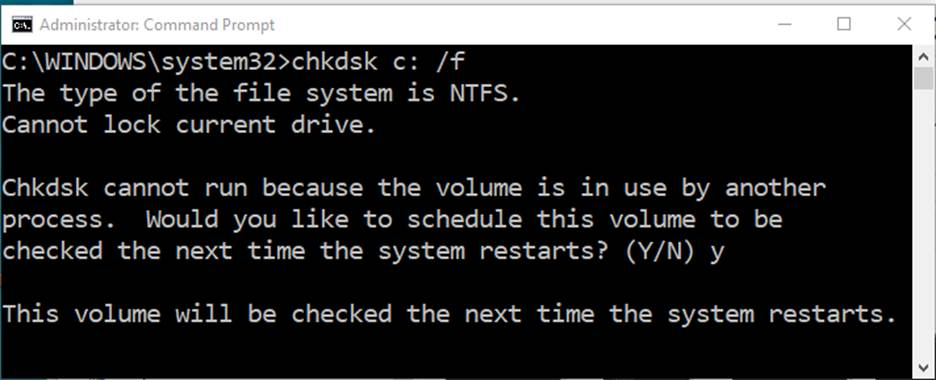
The above screenshot shows the result of chkdsk with /f option used on the C: partition. As you can see the command resulted in not being run because of the disk being used by another process. It offers to run on the next restart if desired, typing y allows for the scan to take place. This is common when running chkdsk while booted to Windows.
Another note here is that the /r option of chkdsk results in this same message as shown below:

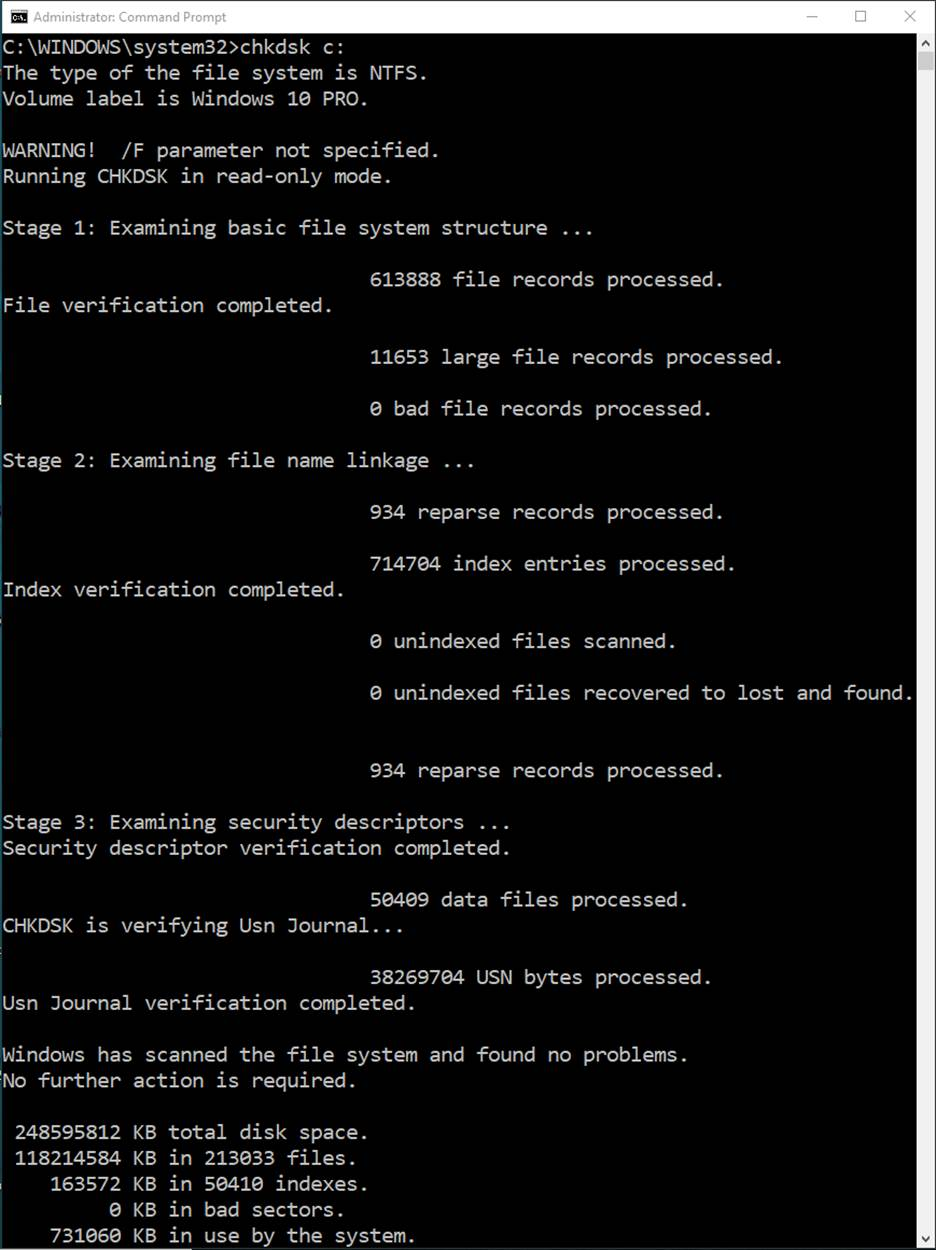
What happens if we run chkdsk on the C: partition without any options? Below is a look at one result.
When chkdsk is run without options, it runs in Read Only mode and reports on the overall health of the filesystem on the specified partition. This is a good scan to run on your disk partitions as a routine maintenance of your disks. If the scan check results in finding an issue with the filesystem, then running or scheduling a run of chkdsk /f will then attempt to fix the found error(s).
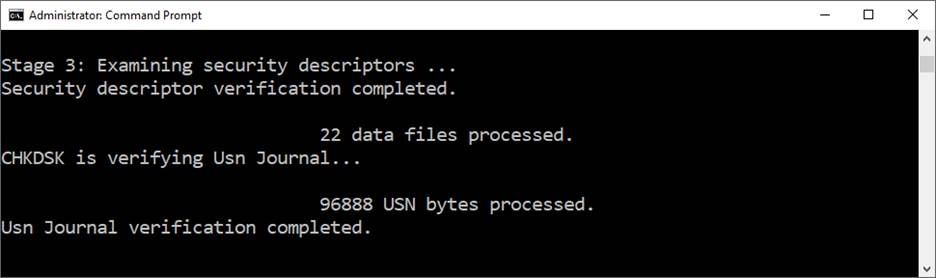
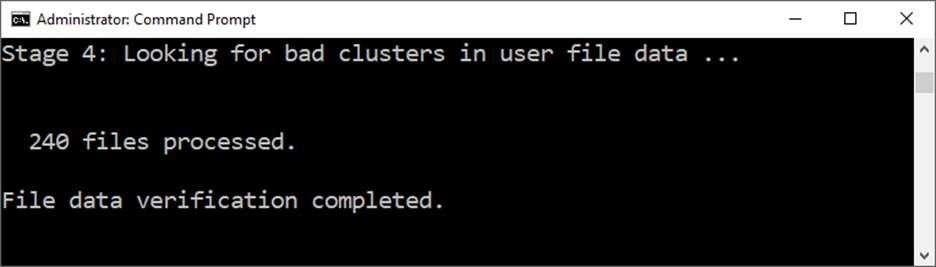
So what difference does using the /r option make in chkdsk? Chkdsk used with the /r option runs a “Stage 4:” scan of the partition and looks for bad clusters in user file data. Once that completes, the utility will display how many files were processed and the status of that scan.
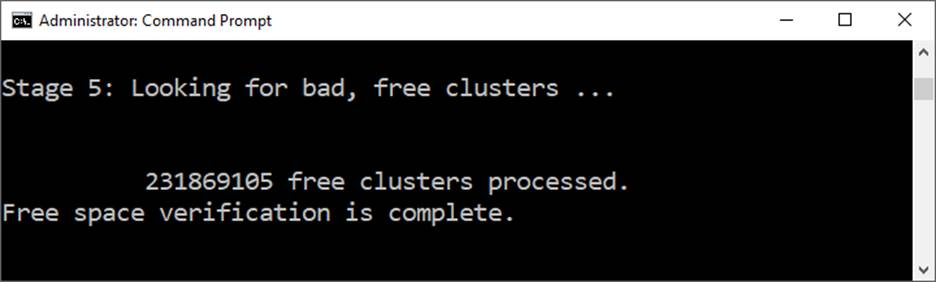
After the Stage 4 scan, the utility then runs a “Stage 5” scan of the partition and looks for bad free clusters on the disk. Once this scan completes, the utility displays how many free clusters were processed and the status of the scan.
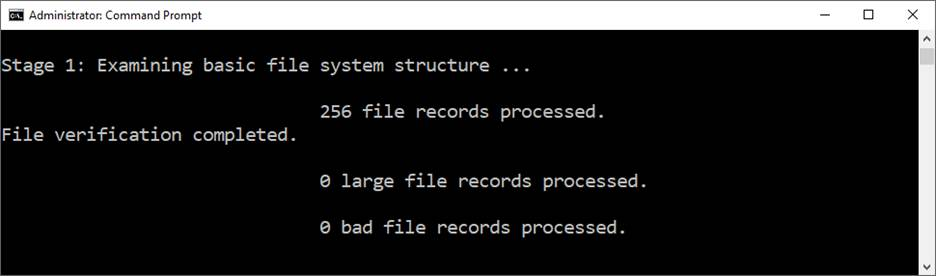
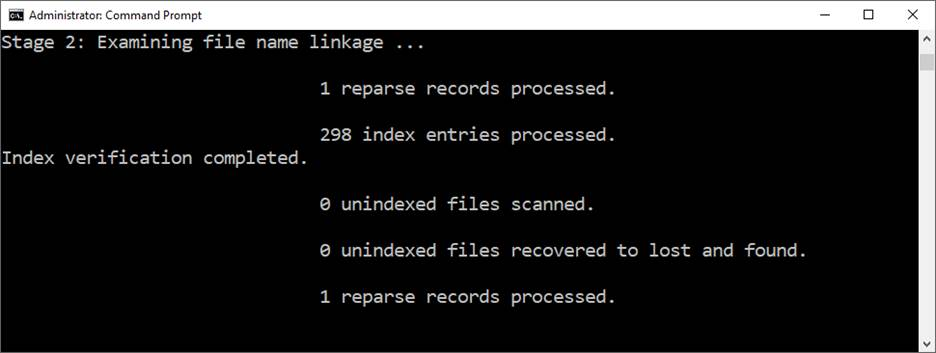
Below are screenshots of each Stage of the chkdsk /r scan once completed.
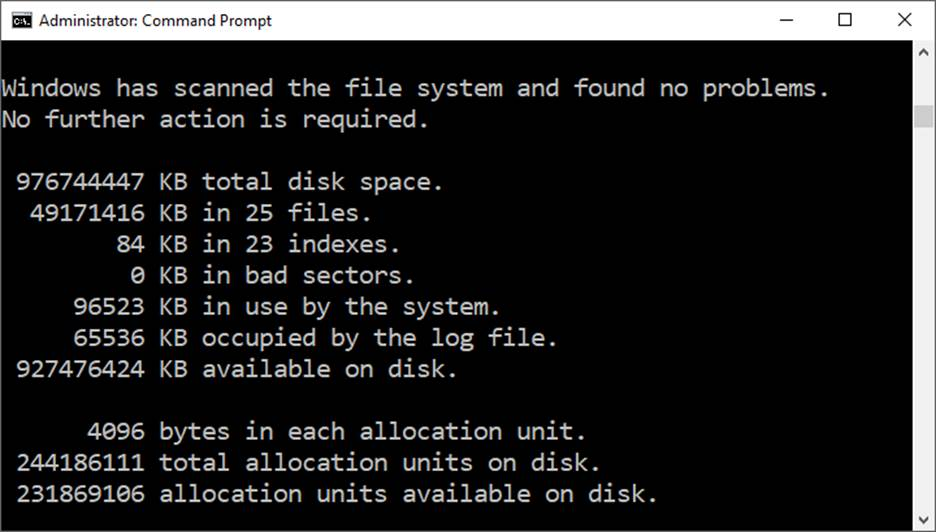
After chkdsk finishes with a scan, the utility displays a summary of what was found and a status of what if any actions were performed. Below is a summary result of a disk scan that found no errors.
Now that we have covered the primary usage of the chkdsk utility, it is time to delve into using the utility on a Windows System OS disk. We have already discovered that chkdsk will not run on a booted Windows System C: partition/volume unless/until a restart of the computer occurs. You may have noticed at this point that chkdsk works on individual partitions on a disk. A Windows System OS disk formatted as a GPT disk, as most modern Windows installs are, may have several partitions on a disk. The fact is that disk corruption may exist on any partition on a disk. Corruption may exist on more than one partition on a single disk as well. Additionally, Windows System disks will have partitions on a disk that are not assigned drive letters which makes using the chkdsk utility on them a more challenging task.
So how do you deal with the issues raised above? Good question! Let’s have a look at how to deal with these issues.
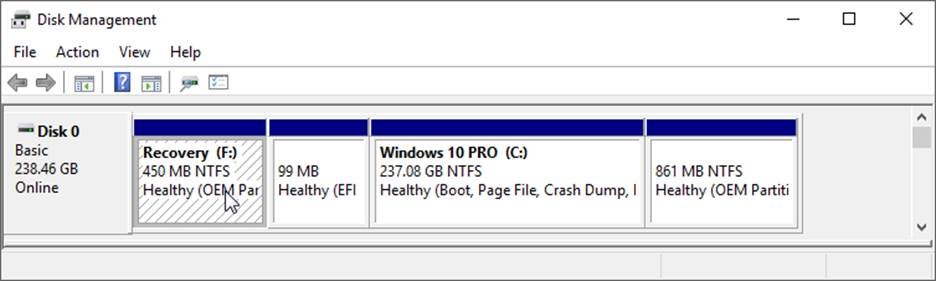
To begin, let’s have a look at a typical Windows 10 install on a GPT formatted disk by using Windows Disk Management.
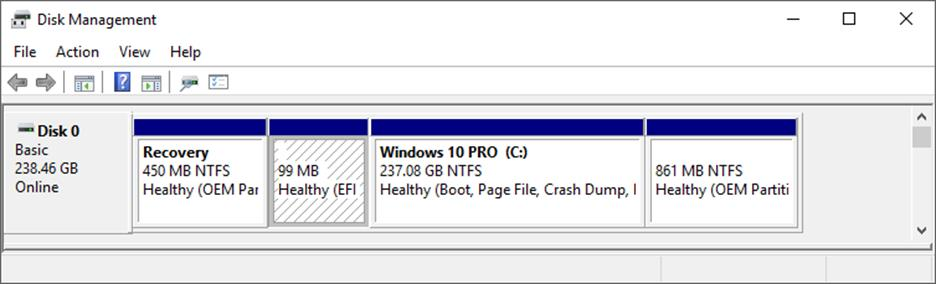
As you can see in the screenshot above, this disk has four partitions. They are a Recovery (450 MB), EFI (99 MB), Windows 10 PRO (237.08 GB), and OEM (861 MB). Take note that only one partition has a drive letter assigned, which is the Windows 10 partition having the letter (C:) assigned as you would expect. The other three partitions have no letter assignment. In order to use the chkdsk utility to look for and fix disk errors the utility must be run on each partition of the disk, one at a time. It is necessary then to temporarily assign drive letters to the partitions not having letter assignments to perform a chkdsk scan on them.
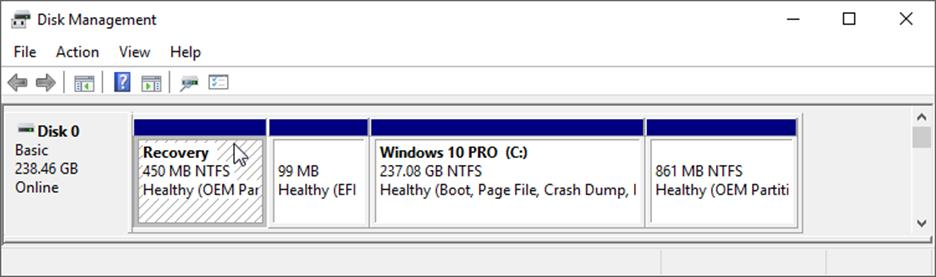
It is possible to use the Windows Disk Management tool to assign a drive letter to these partitions. To do so, place your mouse cursor inside the partition you wish to assign a letter to and left button click there. You will notice that the background of the partition takes on a hashed look as shown below.
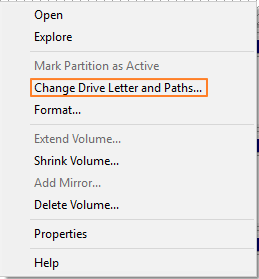
Once the partition is selected, leaving your mouse cursor inside the selected partition, click the right mouse button, a new menu will appear which will allow you assign a letter to the partition. Select Change Drive Letters and Paths as shown below.
Disk Management will automatically select the next in order available letter for this assignment as shown below. Click on OK to assign the letter.
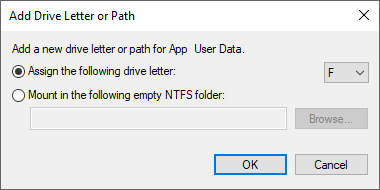
The screenshot here and below shows the partition has been assigned the letter F:, which now enables you to run a chkdsk scan on that partition.
You may find that Disk Management is unable to complete the assignment of a drive letter task. When you select a partition as outlined above and right button mouse click it you may simply see a small box with the word Help displayed. Another issue that occurs is that the option to Change drive letters and Paths is greyed and is therefore non-selectable. There can be a number of reasons for this. One of the most common reasons is that the format of the partition is not NTFS or FAT32. In this case, the only way to resolve the issue is to Delete the Volume and reformat it. This situation is usually the result of the disk itself being previously used in a MAC.
Another issue that may be in play is that the partition has a Read Only attribute set. Removing the Read Only attribute will solve that issue
In other circumstances it will be necessary to use another Windows utility to make the letter assignment to the selected partition. The utility we will use to do this is the diskpart utility and must be run from an administrator command prompt. For a How To on command prompt usage click HERE.
Following are the steps necessary to assign drive letters to Windows System disk partitions that do not have assignments using the diskpart utility. For this example, we will be assigning the drive letter X: to the Recovery partition on our example disk.
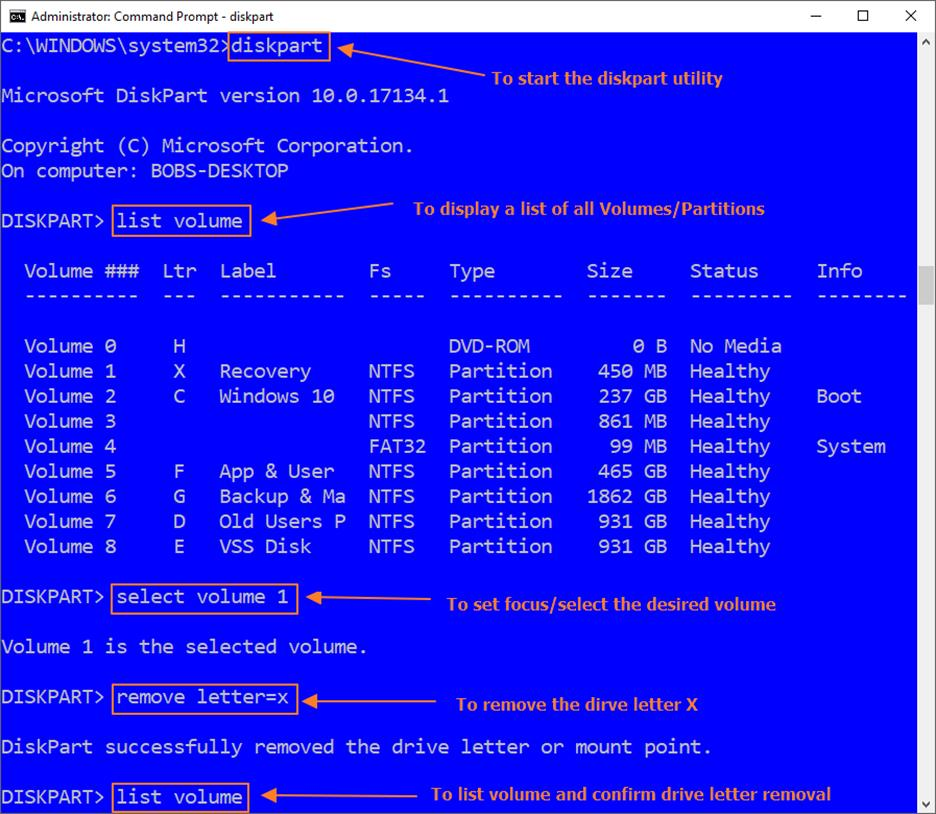
Open the Windows Command Prompt as Administrator and type diskpart to start the utility as shown below.
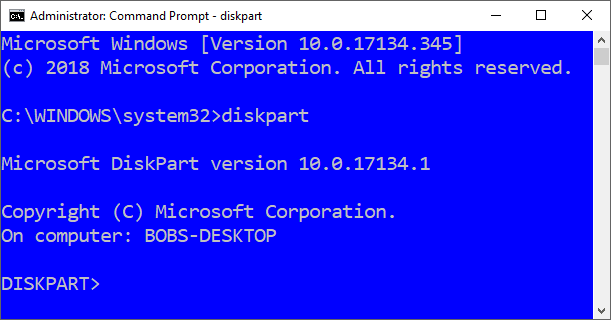
Notice the command line changes to read DISKPART.
With the utility now running type at the DISKPART prompt list volume as shown below.
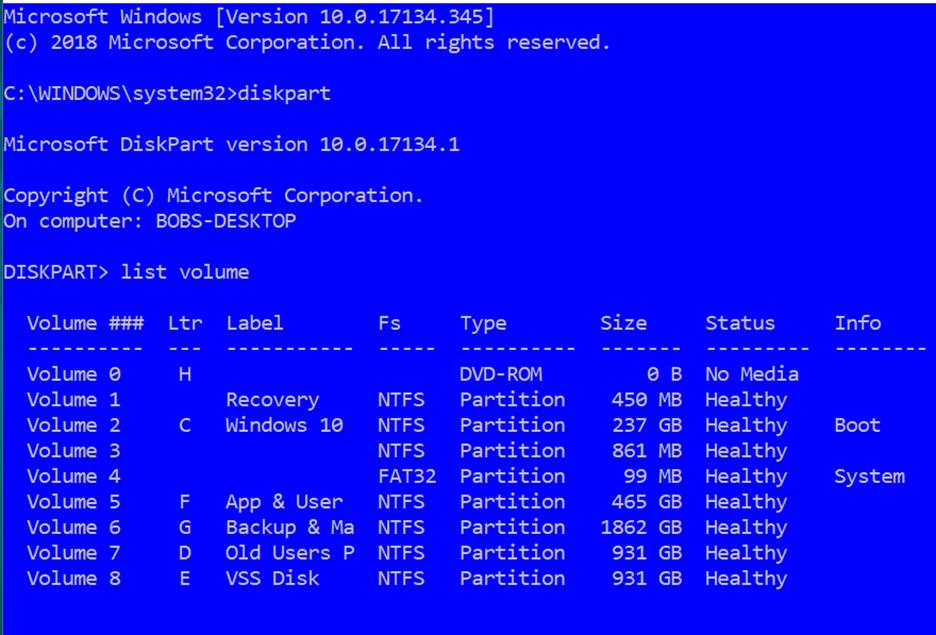
Notice that all volumes installed on the computer are displayed using this command including those on other disks. You should note here that we only need to assign letters to those partitions that do not have existing letter assignments so that chkdsk can be run on them. In the screenshot above these partitions/volumes are Volumes 1, 3, and 4.
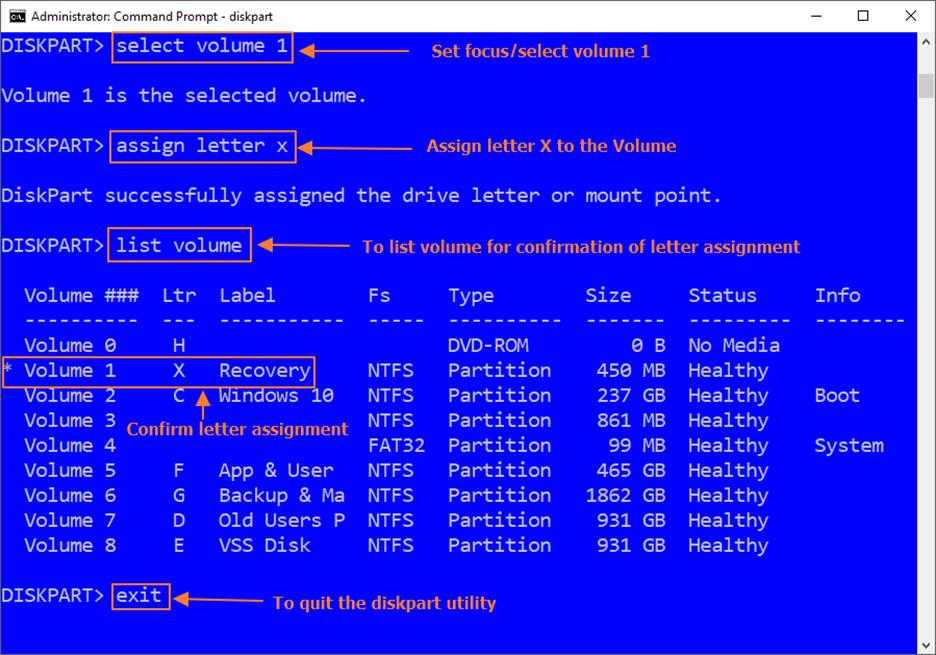
In our example here, we are going to assign drive letter X: to Volume 1, the Recovery partition. To do that we first must place focus on Volume 1.
- At the DISKPART command prompt type select volume 1 to place focus on Volume 1.
- At the command prompt type assign letter=X to assign the letter X to the volume/partition.
- At the command prompt type list volume to display the volume list and confirm that letter X has been assigned to the desired volume/partition.
Note: The asterisk to the left of Volume 1 below. This indicates that Volume 1 is the “in focus”/selected object and commands issue will take effect on that object.
Note that diskpart displays a response confirming that Volume 1 is now the selected or “in focus” object. With Volume 1 now “in focus”, you can perform your task of assigning a letter to it. (NOTE: The = sign in the previous command is not bolded. This is to signify that the = argument is not necessary for the command to work even though you will find this as part of the command in many references).
After you have run the assign letter X command note that diskpart responds with a message stating the desired assignment was completed.
Of particular note: I should point out that when assigning a letter to a GPT formatted EFI partition, using the diskpart list volume command will not work. The reason for this is because the EFI partition is actually a part of the “System” partition. In order to assign a letter to that partition, you must substitute the list volume command for the list partition command instead. Please review the screenshot below for an overview of these substitutions.

Now, to run the chkdsk command, it is necessary to leave the diskpart utility. At the prompt type exit. This will end the utility returning your command prompt to read C:WINDOWSsystem32>. At this prompt you can now run the chkdsk utility scans desired. Have a look at the screenshot below for running the command chkdsk x:/f to illustrate.
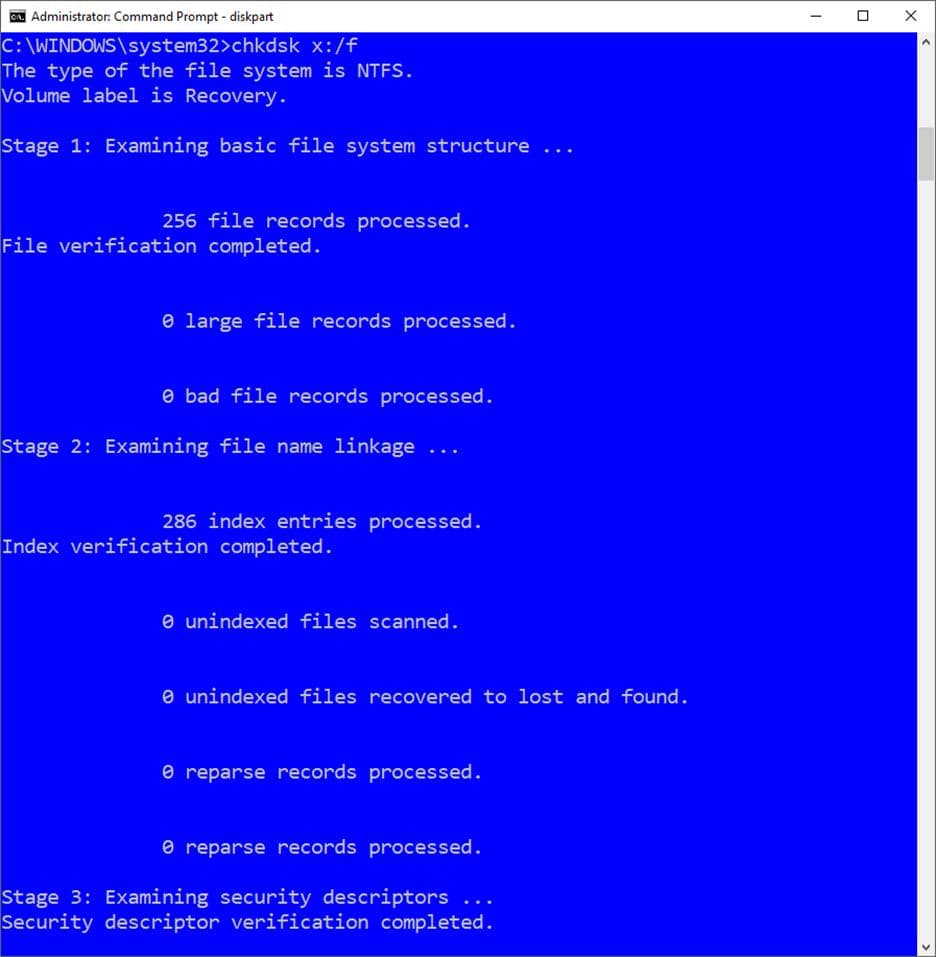
Note that three scan “Stages” of the /f option of the chkdsk command are run.
It is recommended when disk corruption is suspected that you forego use of the /f option of the chkdsk command and instead use the /r option. Using the /r option includes /f in the scan so you will be doing both using the /r option.
Once your chkdsk scan completes you can now use the diskpart utility again to remove the drive letter you assigned to the volume/partition so that all is back to normal. At the Windows command prompt type
- diskpart to start the utility.
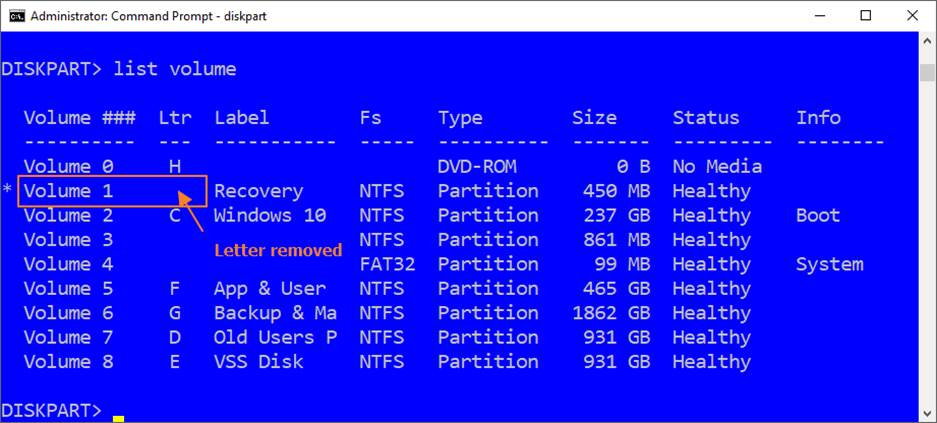
- At the DISKPART prompt type list volume to display all Volumes/Partitions.
- At the prompt type select volume 1 to select the desired partition.
- At the prompt type remove letter x to remove the previously assigned drive letter.
- At the prompt type list volume to display the volume list and confirm letter removal.
The screenshot below illustrates the above command sequences.
Note: Substitute list disk / list partition in the above example for EFI partitions.
The screenshot below shows confirmation of successful drive letter removal.
Note: The asterisk shown to the left of Volume 1 indicates the “in focus”/selected volume/partition.
You can follow these steps to assign drive letters to the other non-lettered partitions on disk so that chkdsk scans can be performed on them. Chances are that you will find errors on one or more of these partitions. Once the chkdsk scans and error corrections are applied you should then be able to backup or restore your disk.
This concludes our How To on Tackling Storage Disk Corruption using Windows’ built-in utility tools chkdsk and diskpart. With this instruction you should be able to deal with disk corruption effectively which in turn will allow backup and recovery of your system.
 В этой инструкции для начинающих по шагам показано, как проверить жесткий диск на ошибки и поврежденные сектора в Windows 7, 8.1 и Windows 10 через командную строку или в интерфейсе проводника. Также описаны дополнительные инструменты проверки HDD и SSD, присутствующие в ОС. Установка каких-либо дополнительных программ при этом не требуется.
Несмотря на то, что существуют мощные программы для проверки дисков, поиска бэд-блоков и исправления ошибок, их использование в большинстве своем, будем мало понятно обычному пользователю (и, более того, может даже навредить в некоторых случаях). Встроенная же в систему проверка с помощью ChkDsk и других системных инструментов, сравнительно проста в использовании и достаточно эффективна. См. также: Как проверить SSD на ошибки, анализ состояния SSD.
Примечание: если причиной того, что вы ищите способ проверить HDD стали непонятные звуки, издаваемые им, посмотрите статью Жесткий диск издает звуки.
Как проверить жесткий диск на ошибки через командную строку
Для проверки жесткого диска и его секторов на ошибки с использованием командной строки, ее для начала потребуется запустить, причем от имени Администратора. В Windows 8.1 и 10 вы можете сделать это, кликнув правой кнопкой мыши кнопке «Пуск» и выбрав пункт «Командная строка (администратор)». Другие способы и для других версий ОС: Как запустить командную строку от имени администратора.
В командной строке следует ввести команду chkdsk буква_диска: параметры_проверки (если ничего не понятно, читаем дальше). Примечание: Check Disk работает только с дисками, отформатированными в NTFS или FAT32.
Пример работающей команды может выглядеть следующим образом: chkdsk C: /F /R— в этой команде будет проверен на ошибки диск C, при этом ошибки будут исправляться автоматически (параметр F), будет проведена проверка поврежденных секторов и попытка восстановления информации (параметр R). Внимание: проверка с использованными параметрами может занять несколько часов и как будто «зависать» в процессе, не выполняйте её, если не готовы ждать или если у вас ноутбук не подключен к розетке.

В случае, если вы попробуете проверить жесткий диск, который в настоящее время используется системой, вы увидите сообщение об этом и предложение выполнить проверку после следующей перезагрузки компьютера (до загрузки ОС). Введите Y для того, чтобы согласиться или N, чтобы отказаться от проверки. Если при выполнении проверки вы видите сообщение о том, что CHKDSK недопустим для дисков RAW, то может помочь инструкция: Как исправить и восстановить диск RAW в Windows.
В остальных случаях сразу будет запущена проверка, по итогам которой вы получите статистику проверенных данных, найденных ошибок и поврежденных секторов (у вас она должна быть на русском языке, в отличие от моего скриншота).

Полный список доступных параметров и их описание вы можете получить, запустив chkdsk с вопросительным знаком в качестве параметра. Однако для простой проверки на ошибки, а также проверки секторов будет достаточно команды, приведенной в предыдущем абзаце.
В тех случаях, когда проверка обнаруживает ошибки на жестком диске или SSD, но не может их исправить, это может быть связано с тем, что работающая Windows или программы в настоящее время используют диск. В данной ситуации может помочь запуск оффлайн-сканирования диска: при этом диск «отключается» от системы, выполняется проверка, а затем снова монтируется в системе. Если же отключить его невозможно, то CHKDSK сможет выполнить проверку при следующей перезагрузке компьютера.
Чтобы выполнить оффлайн проверку диска и исправление ошибок на нем, в командной строке от имени администратора выполните команду: chkdsk C: /f /offlinescanandfix (где C: — буква проверяемого диска).

Если вы увидите сообщение о том, что нельзя выполнить команду CHKDSK, так как указанный том используется другим процессом, нажмите Y (да), Enter, закройте командную строку и перезагрузите компьютер. Проверка диска начнется автоматически при начале загрузки Windows 10, 8 или Windows 7.
Дополнительная информация: при желании, после проверки диска и загрузки Windows, вы можете просмотреть журнал проверки Check Disk с помощью просмотра событий (Win+R, ввести eventvwr.msc) в разделе Журналы Windows — Приложение, выполнив поиск (правый клик по «Приложение» — «Поиск») по ключевому слову Chkdsk.

Проверка жесткого диска в проводнике Windows
Самый простой способ проверки HDD в Windows — использовать проводник. В нем, кликните правой кнопкой мыши по нужному жесткому диску, выберите пункт «Свойства», а затем откройте вкладку «Сервис» и нажмите «Проверить». В Windows 8.1 и Windows 10 вы, скорее всего, увидите сообщение о том, что сейчас проверка этого диска не требуется. Однако, вы можете запустить ее принудительно.

В Windows 7 присутствует дополнительная возможность включить проверку и исправление поврежденных секторов, отметив соответствующие пункты. Отчет о проверке вы все так же можете найти в просмотре событий приложений Windows.
Проверка диска на ошибки в Windows PowerShell
Проверить жесткий диск на ошибки можно не только с помощью командной строки, но и в Windows PowerShell.
Для того, чтобы проделать эту процедуру, запустите PowerShell от имени администратора (можно начать набирать PowerShell в поиске на панели задач Windows 10 или в меню Пуск предыдущих ОС, после чего кликнуть правой кнопкой мыши по найденному элементу и выбрать пункт «Запустить от имени администратора».
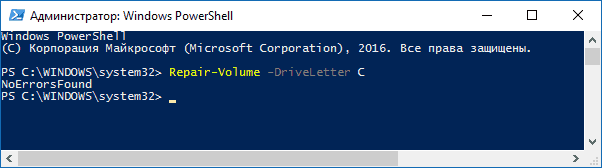
В Windows PowerShell используйте следующие варианты команды Repair-Volume для проверки раздела жесткого диска:
- Repair-Volume -DriveLetter C (где C — буква проверяемого диска, в этот раз без двоеточия после буквы диска).
- Repair-Volume -DriveLetter C -OfflineScanAndFix (аналогично первому варианту, но для выполнения оффлайн-проверки, как это описывалось в способе с chkdsk).
Если в результате выполнения команды вы увидите сообщение NoErrorsFound, это означает, что ошибки на диске найдены не были.
Дополнительные возможности проверки диска в Windows 10
Помимо перечисленных выше вариантов, вы можете использовать некоторые дополнительные встроенные в ОС средства. В Windows 10 и 8 обслуживание дисков, в том числе их проверка и дефрагментация происходят автоматически по расписанию, в то время, когда вы не пользуетесь компьютером или ноутбуком.
Чтобы просмотреть информацию о том, были ли найдены какие-либо проблемы с дисками, зайдите в «Панель управления» (сделать это можно, кликнув правой кнопкой мыши по Пуску и выбрав нужный пункт контекстного меню) — «Центр безопасности и обслуживания». Откройте раздел «Обслуживание» и в пункте «Состояние диска» вы увидите информацию, полученную в результате последней автоматической проверки.

Еще одна возможность, которая появилась в Windows 10 — утилита диагностики хранилища (Storage Diagnostic Tool). Для использования утилиты, запустите командную строку от имени администратора, затем используйте следующую команду:
stordiag.exe -collectEtw -checkfsconsistency -out путь_к_папке_сохранения_отчета
Выполнение команды займет некоторое время (может показаться, что процесс завис), при этом будут проверены все подключенные диски.

А после завершения выполнения команды, в указанном вами расположении будет сохранен отчет о выявленных проблемах.

Отчет включает в себя отдельные файлы, содержащие:
- Информацию проверки chkdsk и информацию об ошибках, собранную fsutil в текстовых файлах.
- Файлы реестра Windows 10, содержащие все текущие значения реестра, относящиеся к подключенным накопителям.
- Файлы журналов просмотра событий Windows (события собираются в течение 30 секунд при использовании ключа collectEtw в команде диагностики дисков).
Для рядового пользователя собранные данные могут не представлять интереса, однако в некоторых случаях может оказаться полезной для диагностики проблем работы накопителей системным администратором или другим специалистом.
Если при проверке у вас возникают какие-либо проблемы или требуется совет, пишите в комментариях, а я, в свою очередь, постараюсь вам помочь.
| title | description | ms.topic | ms.assetid | author | ms.author | ms.date |
|---|---|---|---|---|---|---|
|
chkdsk |
Reference article for the chkdsk command, which checks the file system and file system metadata of a volume for logical and physical errors. |
reference |
62912a3c-d2cc-4ef6-9679-43709a286035 |
jasongerend |
alalve |
11/22/2022 |
chkdsk
Checks the file system and file system metadata of a volume for logical and physical errors. If used without parameters, chkdsk displays only the status of the volume and does not fix any errors. If used with the /f, /r, /x, or /b parameters, it fixes errors on the volume.
[!IMPORTANT]
Membership in the local Administrators group, or equivalent, is the minimum required to run chkdsk. To open a command prompt window as an administrator, right-click Command prompt in the Start menu, and then click Run as administrator.
[!IMPORTANT]
Interrupting chkdsk is not recommended. However, canceling or interrupting chkdsk should not leave the volume any more corrupt than it was before chkdsk was run. Running chkdsk again checks and should repair any remaining corruption on the volume.
[!NOTE]
Chkdsk can be used only for local disks. The command cannot be used with a local drive letter that has been redirected over the network.
Syntax
chkdsk [<volume>[[<path>]<filename>]] [/f] [/v] [/r] [/x] [/i] [/c] [/l[:<size>]] [/b]
Parameters
| Parameter | Description |
|---|---|
<volume> |
Specifies the drive letter (followed by a colon), mount point, or volume name. |
[ [<path>]<filename> |
Use with file allocation table (FAT) and FAT32 only. Specifies the location and name of a file or set of files that you want chkdsk to check for fragmentation. You can use the ? and * wildcard characters to specify multiple files. |
| /f | Fixes errors on the disk. The disk must be locked. If chkdsk cannot lock the drive, a message appears that asks you if you want to check the drive the next time you restart the computer. |
| /v | Displays the name of each file in every directory as the disk is checked. |
| /r | Locates bad sectors and recovers readable information. The disk must be locked. /r includes the functionality of /f, with the additional analysis of physical disk errors. |
| /x | Forces the volume to dismount first, if necessary. All open handles to the drive are invalidated. /x also includes the functionality of /f. |
| /i | Use with NTFS only. Performs a less vigorous check of index entries, which reduces the amount of time required to run chkdsk. |
| /c | Use with NTFS only. Does not check cycles within the folder structure, which reduces the amount of time required to run chkdsk. |
/l[:<size>] |
Use with NTFS only. Changes the log file size to the size you type. If you omit the size parameter, /l displays the current size. |
| /b | Use with NTFS only. Clears the list of bad clusters on the volume and rescans all allocated and free clusters for errors. /b includes the functionality of /r. Use this parameter after imaging a volume to a new hard disk drive. |
| /scan | Use with NTFS only. Runs an online scan on the volume. |
| /forceofflinefix | Use with NTFS only (must be used with /scan). Bypass all online repair; all defects found are queued for offline repair (for example, chkdsk /spotfix). |
| /perf | Use with NTFS only (must be used with /scan). Uses more system resources to complete a scan as fast as possible. This may have a negative performance impact on other tasks running on the system. |
| /spotfix | Use with NTFS only. Runs spot fixing on the volume. |
| /sdcleanup | Use with NTFS only. Garbage collect unneeded security descriptor data (implies /f). |
| /offlinescanandfix | Runs an offline scan and fix on the volume. |
| /freeorphanedchains | Use with FAT/FAT32/exFAT only. Frees any orphaned cluster chains instead of recovering their contents. |
| /markclean | Use with FAT/FAT32/exFAT only. Marks the volume clean if no corruption was detected, even if /f was not specified. |
| /? | Displays help at the command prompt. |
Remarks
-
The /i or /c switch reduces the amount of time required to run chkdsk by skipping certain volume checks.
-
If you want chkdsk to correct disk errors, you can’t have open files on the drive. If files are open, the following error message appears:
Chkdsk cannot run because the volume is in use by another process. Would you like to schedule this volume to be checked the next time the system restarts? (Y/N) -
If you choose to check the drive the next time you restart the computer, chkdsk checks the drive and corrects errors automatically when you restart the computer. If the drive partition is a boot partition, chkdsk automatically restarts the computer after it checks the drive.
-
You can also use the
chkntfs /ccommand to schedule the volume to be checked the next time the computer is restarted. Use thefsutil dirty setcommand to set the volume’s dirty bit (indicating corruption), so that Windows runs chkdsk when the computer is restarted. -
You should use chkdsk occasionally on FAT and NTFS file systems to check for disk errors. Chkdsk examines disk space and disk use and provides a status report specific to each file system. The status report shows errors found in the file system. If you run chkdsk without the /f parameter on an active partition, it might report spurious errors because it cannot lock the drive.
-
Chkdsk corrects logical disk errors only if you specify the /f parameter. Chkdsk must be able to lock the drive to correct errors.
Because repairs on FAT file systems usually change a disk’s file allocation table and sometimes cause a loss of data, chkdsk might display a confirmation message similar to the following:
10 lost allocation units found in 3 chains. Convert lost chains to files?-
If you press Y, Windows saves each lost chain in the root directory as a file with a name in the format File
<nnnn>.chk. When chkdsk finishes, you can check these files to see if they contain any data you need. -
If you press N, Windows fixes the disk, but it does not save the contents of the lost allocation units.
-
-
If you don’t use the /f parameter, chkdsk displays a message that the file needs to be fixed, but it does not fix any errors.
-
If you use
chkdsk /f*on a very large disk or a disk with a very large number of files (for example, millions of files),chkdsk /fmight take a long time to complete. -
Use the /r parameter to find physical disk errors in the file system and attempt to recover data from any affected disk sectors.
-
If you specify the /f parameter, chkdsk displays an error message if there are open files on the disk. If you do not specify the /f parameter and open files exist, chkdsk might report lost allocation units on the disk. This could happen if open files have not yet been recorded in the file allocation table. If chkdsk reports the loss of a large number of allocation units, consider repairing the disk.
-
Because the Shadow Copies for Shared Folders source volume cannot be locked while Shadow Copies for Shared Folders is enabled, running chkdsk against the source volume might report false errors or cause chkdsk to unexpectedly quit. You can, however, check shadow copies for errors by running chkdsk in Read-only mode (without parameters) to check the Shadow Copies for Shared Folders storage volume.
-
The chkdsk command, with different parameters, is available from the Recovery Console.
-
On servers that are infrequently restarted, you may want to use the chkntfs or the
fsutil dirty querycommands to determine whether the volume’s dirty bit is already set before running chkdsk.
Understanding exit codes
The following table lists the exit codes that chkdsk reports after it has finished.
| Exit code | Description |
|---|---|
| 0 | No errors were found. |
| 1 | Errors were found and fixed. |
| 2 | Performed disk cleanup (such as garbage collection) or did not perform cleanup because /f was not specified. |
| 3 | Could not check the disk, errors could not be fixed, or errors were not fixed because /f was not specified. |
Examples
To check the disk in drive D and have Windows fix errors, type:
If it encounters errors, chkdsk pauses and displays messages. Chkdsk finishes by displaying a report that lists the status of the disk. You cannot open any files on the specified drive until chkdsk finishes.
To check all files on a FAT disk in the current directory for noncontiguous blocks, type:
Chkdsk displays a status report, and then lists the files that match the file specifications that have noncontiguous blocks.
Viewing chkdsk logs
There are two methods that can be used to retrieve chkdsk log file(s) in Windows. View the methods described below:
Event Viewer
To view logs with Event Viewer, navigate to the following:
-
Start > Control Panel > Administrative Tools > Event Viewer.
Alternatively, press Win + R keys to bring up the run dialog box, type eventvwr.msc, and select OK.
-
Expand Windows Logs > right-click on Application > select Filter Current Log.
-
Within the Filter Current Log window, navigate to Event sources drop-down menu, select Chkdsk and Wininit.
-
Click OK to finish filtering for these two sources.
PowerShell
There are two source types when retrieving logs in PowerShell, chkdsk and wininit. Run one of the two commands in PowerShell to view the most current chkdsk log:
get-winevent -FilterHashTable @{logname="Application"} | ?{$_.providername -match "chkdsk"} | fl timecreated, message
get-winevent -FilterHashTable @{logname="Application"} | ?{$_.providername -match "wininit"} | fl timecreated, message
To export the log to a specific location, the following can be added to the end of the command | out-file "$env:userprofilelocationfilename.txt". Example:
get-winevent -FilterHashTable @{logname="Application"} | ?{$_.providername -match "chkdsk"} | fl timecreated, message | out-file "C:UsersAdministratorDesktopChkdsk_Log.txt"
get-winevent -FilterHashTable @{logname="Application"} | ?{$_.providername -match "wininit"} | fl timecreated, message | out-file "C:UsersAdministratorDesktopWininit_Log.txt"
Related links
- Command-Line Syntax Key
Команда CHKDSK предназначена для проверки и устранения логических ошибок на жестком диске. Ниже мы рассмотрим особенности её работы и другие функции утилиты.
![]()
Содержание
- Проверка жесткого диска в работающей Windows
- Проверка диска из командной строки
- Команды для работы с CHKDSK в командной строке
- Восстановление информации с проблемного жесткого диска
Команда CHKDSK является встроенной утилитой, основная функция которой заключается в проверке и исправлении ошибок жесткого диска. Помимо этого, при помощи CHKDSK можно быстро находить и исправлять поврежденные сектора, а также ошибки в файловой системе накопителя.
Таким образом, CHKDSK – важная утилита, позволяющая продлить строк службы жесткого диска, а также увеличить скорость его работы, поэтому абсолютно каждый пользователь ОС Windows должен уметь пользоваться и проверять свои носители встроенными средствами. Ниже будет представлено несколько способов проверки дисков из работающей ОС и командной строки.
Проверка жесткого диска в работающей Windows
Для проверки логических разделов жесткого диска при помощи CHKDSK в работающей Windows необходимо:
Шаг 1. Открыть каталог «Этот компьютер», нажать правой кнопкой мыши по необходимому логическому разделу и выбрать пункт «Свойства».

Шаг 2. В открывшемся окне перейти во вкладку «Сервис» и выбрать пункт «Проверить».

Шаг 3. Подтверждаем проверку диска и после ее завершения нажимаем по кнопке «Показать подробности».

Шаг 4. Вся информация и результаты проверки диска будут доступны в графе «Сведения».

Проверка диска из командной строки
В некоторых ситуациях пользователю может понадобиться запуск утилиты CHKDSK из командной строки. Такая возможность позволит проверить и восстановить диск в том случае, если система не запускается и графический интерфейс Windows остается недоступным.
Чтобы запустить командную строку из среды восстановления ОС, необходимо:
Шаг 1. Воспользоваться установочным диском или загрузочной флешкой Windows и после окна выбора языка нажать по пункту «Восстановление системы». Перейдя в среду восстановления, следует нажать по пункту «Поиск и устранение неисправностей».

Шаг 2. На следующем окне следует выбрать пункт «Дополнительные параметры», после чего можно обнаружить кнопку «Командная строка».

Также всегда остается возможность запустить утилиту проверки дисков через командную строку из работающей системы. Важно! Для использования полного потенциала CHKDSK следует производить запуск командной строки только с правами администратора. В ином случае утилита CHKDSK проведет проверку без устранения выявленных неполадок.
Запустить командную строку или Windows PowerShell от имени администратора можно, нажав правой кнопкой мыши по кнопке «Пуск» и выбрав пункт «Командная строка(администратор)».

Команды для работы с CHKDSK в командной строке
Находясь в командной строке, можно провести быструю проверку жесткого диска (аналогичная проверка была описана в начале) без перезагрузки системы. Для этого достаточно ввести команду «CHKDSK» и подтвердить действие кнопкой Enter.

Для проверки диска и исправления логических ошибок на нем необходимо воспользоваться командой «chkdsk C: /F /R», где С – имя необходимого диска.

Для подтверждения проверки диска после перезагрузки необходимо нажать клавишу «Y».
Помимо полного анализа и по возможности исправления поврежденных секторов, утилита может выполнять проверку и решение ошибок только файловой системы. Для этого следует воспользоваться командой «chkdsk C: /F» и подтвердить действие «Y».

С полным списком и описанием возможностей утилиты можно ознакомится, введя команду «chkdsk /?».

Стоит отметить, что проблемы с диском могут быть вызваны не только программными ошибками, но и физическим износом, механическими повреждениями поверхности и другими факторами, которые невозможно исправить при помощи встроенной утилиты CHKDSK.
Чтобы получить полную картину о состоянии носителя, можно воспользоваться бесплатной программой для проверки дисков Victoria. Узнать о том, как пользоваться, исправлять и проводить диагностику HDD с помощью Victoria Вы сможете в статье: «Используем программу Victoria для тестирования и исправления жесткого диска»
Восстановление информации с проблемного жесткого диска
Проблемы с жестким диском – всегда большая угроза для важной информации и документов, хранящихся на компьютере. Чтобы быть готовым к любым обстоятельствам, рекомендуем всегда иметь под рукой специальную программу для эффективного восстановления файлов RS Partition Recovery. Данная утилита поможет восстановить всю утерянную информацию даже в самых сложных случаях.

При помощи RS Partition Recovery можно восстанавливать:
- Случайно удаленные файлы и документы.
- Отформатированные фотографии и медиафайлы.
- Данные, удаленные вирусами.
- Информацию, которая была утеряна при изменении файловой системы и структуры диска.
Часто задаваемые вопросы
CHKDSK это системная утилита, которая предназначена для работы с дисками. CHKDSK не имеет графического интерфейса. Все команды выполняются в командной строке или Windows PowerShell.
Запустите режим Windows Recovery и выберите «Командная строка». Затем выполните командe: «chkdsk C: /F /R». Если нужно просканировать и исправить ошибки на любом другом диске — замените букву «С» на букву вашего диска.
В таких случаях лучше сразу же использовать RS Partition Recovery. Программа создана как раз для таких ситуаций и успешно восстанавливает данные в 99% случаев.
К сожалению нет. CHKDSK занимается поиском и исправлением логических ошибок на диске, в то время как ошибка RAW – это ошибка файловой системы. В таком случае лучше всего восстановить важные данные при помощи RS Partition Recovery, а затем отформатировать диск.
В поиске Windows впишите «Windows Event Viewer» и в открывшейся программе перейдите в Windows Logs -> Application. Затем щелкните правой кнопкой мыши и выберите «Найти». Введите «chkdsk» и нажмите «Enter». В открывшихся результатах поиска найдите последнее событие с Event ID 1001 и источником Wininit. Затем откройте вкладку «General». Там вы найдете подробный лог сканирования накопителя.