Cisco Anyconnect no policy server detected is an error that occurs when the Cisco VPN client cannot find a valid VPN server.
The Cisco AnyConnect VPN is a popular VPN solution. Many companies use it for their remote employees to connect securely to their network.
To clear the “Anyconnect No Policy Server Detected” error, first check Cisco AnyConnect VPN configuration settings and ensure that it’s not misconfigured. Also, if the Anyconnect version you are using is outdated, consider upgrading it to the latest version.
When you are using Cisco Anyconnect VPN software and get an error message saying, 'No Policy Server Detected,' it just means that connection to a remote VPN gateway is not established.
This article offers troubleshooting methods to solve the Anyconnect error.
Reasons Why Cisco Policy Server Is Not Detected
There are several reasons why you can receive this error:
- Your configuration settings are incorrect
- Software conflicts with your antivirus program or with Windows Defender
- You have an outdated version of Anyconnect
- There is a problem with the network adapter
- You have a corrupt or missing file on your computer
- The user account is not configured properly
- AnyConnect is not enabled on the ASA
- The remote access server is not reachable
- Bad installation of the AnyConnect client
How to Fix the Cisco Anyconnect No Policy Server Detected Error
 2")
You can resolve this error using various fixing methods. See below;
Solution #1: Check Your Configuration Settings
Incorrect configuration settings are among the most common causes of the “Anyconnect No Policy Server Detected” error.
So first, check the posture protocol configurations and ensure the settings are correct.
Follow the steps below:
- Select ProgramData in drive C.
- Click on Cisco and select Cisco AnyConnect Secure Mobility Client.
- Go to the ISE Posture tab.
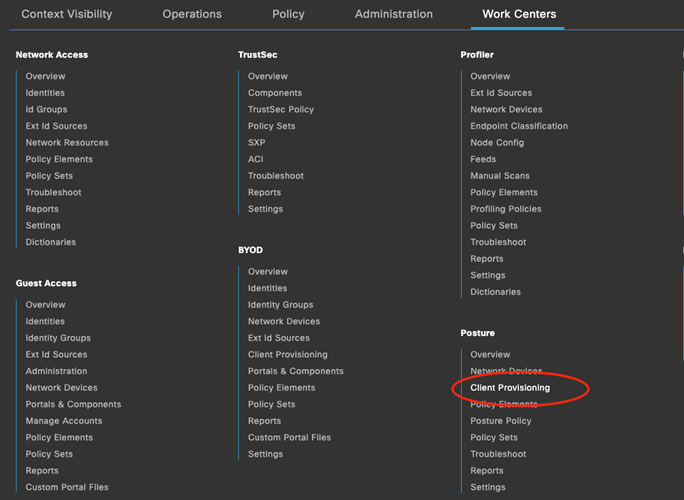
- At Work Centers, go to Posture, then Client Provisioning, select Client Provisioning Policy,
- Then check the Rule for your Wired Network, then check the Agent Result.
- From the ClientProvisioning, go to Resources tab,
- Check the Agent Result of step no. 4, give attention to the ISE Posture.
From the Resources tab, check the ISE Posture of step no. 5. Check to confirm the Call Home List and Discovery Host settings are correct.
Solution #2: Check Your Protection Settings
 3")
You may find that your antivirus or Windows defender settings are blocking the Anyconnect software.
There can also be a conflict between the software restricting the policy server from being detected.
If this is the case, ensure that Cisco VPN client is allowed in Windows Firewall Settings.
Solution #3: You Have an Outdated Version of Anyconnect
Software updates are released regularly to accommodate new technology.
If you have an obsolete version of Anyconnect, you might consider updating to the latest version.
Regular updates are essential to any software. They can help fix bugs, have new features, and enhance speed.
Solution #4: Confirm That Your Network Adapter is Working
 4")
When your network is not working, your device cannot access network resources. So, it’s good to check whether the network adapter is working.
Here are the Steps:
- Select-control panel from the Start menu
- Click “Device Manager.”
- Locate “Network adapters.” An exclamation mark shows that your adapter is not working correctly.
- Right-click on the adapter and select properties to troubleshoot
- If troubleshooting does not fix the problem, go back to the adapters list
- Right-click on the adapter, then choose to update or uninstall the reinstall
Solution #5: Confirm That the File is Not Corrupt
Having a virus in your computer can corrupt Anyconnect files. This can lead to a “Cisco Anyconnect no policy server detected error.”
So, it’s good to have your computer protected at all times, especially if you spend most of your time on the internet.
If you download software that already has a bug, it can install correctly but won’t work as expected.
So, if you recently updated or installed new anyconnect software, you can install and reinstall it and check if it fixes the problem.
Always download software from trusted sites to avoid bugs in your system.
Solution #6: Check if User Account is Correct
Use the CSCS AnyConnect Profile Editor to edit the profile.
To do this, you will need to open a command prompt, type “CSCS,” and press Enter. Then type “anyconnect” and press Enter again.
This process will open the AnyConnect Profile Editor, where you can check if the user account is still valid or not.
If it’s inaccurate, you can add the user account again and configure it properly.
Solution #7: Enable AnyConnect on the ASA
 5")
You can enable AnyConnect on the ASA using ASDM or CLI.
If you are using ASDM:
- Navigate to configuration, then select “Remote Access VPN.”
- Go to Network (Client) Access and select SSL-VPN Settings.
- Check if AnyConnect is enabled or not.
- If it’s disabled, kindly click the Enable button to enable it.
If you’re using CLI, type “configure terminal” to enter the configuration mode and then type “Anyconnect enable.”
Solution #8: Verify the Network Connectivity
Connectivity is crucial for devices on a remote network to work effectively.
So, verify your network connectivity to confirm there’s access to the remote server. You can use ping to test your device’s connectivity to the network.
These are the steps:
- Click the start menu then type CMD to open the command prompt window.
- Type ping followed by the IP address of another machine on the network
- A successful ping test will show there’s network connectivity.
- For example, it will give you the average time it took for the other device to respond.
An unsuccessful ping test shows there’s no network connectivity.
For an unsuccessful ping test, you might receive messages such as unknown host, Destination host unreachable, and Request timed out.
Note: If your ping test was unsuccessful, it might be causing the error message, so ensure that your machine is communicating with other devices on the network.
Solution #9: Run the AnyConnect Diagnostics and Reporting Tool (DART)
This tool can generate and troubleshoot DART bundles such as logs and status information.
Step #1: Start the Cisco AnyConnect Secure Mobility Client window
Step #2: Select Diagnostics on the Statistics tab
Step #3: Choose Custom or Default bundle creation.
#Default:
Includes standard log files and diagnostic information, such as AnyConnect log files, computer information, and a description of what DART did and didn’t do.
DARTBundle.zip is the default name for the bundle, and it is stored on the local desktop.
#Custom:
This allows you to select which files should be included in the bundle (or which files should be added by Default) and where the bundle should be stored.
DART
DART begins building the bundle if you select Default. Follow the wizard prompts to specify logs, preference files, diagnostic information, and any other customizations if you choose Custom.
You can cancel DART if you notice that it’s taking too long to gather the data. You can reduce the selected files for it to run effectively.
Remember to analyze the generated information and debug any errors in the files.
Solution #10: Uninstall and Reinstall
If you still receive this error after trying all the above solutions, it’s time to uninstall your Anyconnect software.
If any bug restricts the software from working correctly, it will be erased after installing it.
After installing the software, scan your device for any viruses. Then, reinstall the Anyconnect software and check if the error has cleared.
Solution #11: Contact Cisco Customer Support
 6")
If you’re still receiving “Cisco anyconnect system scan no policy server detected,” try contacting the Cisco customer service.
Cisco has a platform for posting issues that their customers encounter when using their product.
So, it’s good to post on the forum first before calling or emailing their office.
Devices on a network can have many errors such as this. But they are easy to fix without the need for consulting experts.
Check the ISE posturing configuration settings to clear the “Cisco Anyconnect no policy server detected” error message. Also, ensure that your security settings are not limiting the Anyconnect software from functioning. Updating your software can also clear the error.
Read Next: Can you Have More than One Build on Kodi?
Bottom Line
Cisco anyconnect no policy server detected error can occur due to many reasons.
These include firewall or antivirus settings, misconfigured VPN servers, and servers that are incompatible with the new version of Cisco Anyconnect.
We hope this piece helps you solve this error.
 7")
Kevin has over five years of experience working in various Tech startups and providing Technical solutions. He has contributed to many Tech publications and websites.
While testing different Posture scenarios with the Cisco Anyconnect VPN client (version 4.10.05085) I came across an interesting issue. I was using the same PC and was switching test accounts back and forth. I needed to enforce a Posture policy on User1 while letting User2 login without deploying the Anyconnect Posture module. Once I successfully tested User1, I was testing User2 and uninstalled just Anyconnect Posture module to save time and confirm it would not be redeployed (posture module deployment was controlled through the Group Policy assignment).
Next, I decided to test User1 again. After the initial connection Anyconnect Posture module was redeployed but I received “Service is unavailable” error.

This was because the service for some unknown reason did not start. I resolved it by starting the service manually. Next, I disconnected/reconnected and this time I got “No policy server

Since it was all working prior, I started looking. This error usually indicates an issue with ISEPostureCFG.xml file and Call Home settings. I’ve checked for the file and did not find the file present. Even so, the Anyconnect Posture module was deployed and running, it would not pull the ISEPostureCFG.xml from ISE.
It turned out ISEPostureCFG.xml is only downloaded on the initial Anyconnect Posture module install and since the service would not start automatically profile never got deployed.
I had to completely remove Anyconnect client and reinstall it. Only then Anyconnect Posture module service got started automatically and pulled ISEPostureCFG.xml profile from the ISE node then continuing to Compliance module installation.
AnyConnect — «No policy server detected» despite having ran full Windows Defender scan
I’m trying to use company’s Cisco AnyConnect on personal laptop to VPN to work. I’ve already ran full virus scans (Defender, McAfee) just 2 days ago. I’m able to connect (we use an an RSA) so I get an X time remaining. However, system scan does not show Compliant which I believe is needed. I get a «no policy server detected» and it shows that no system scans were ever detected, despite having already ran 2 full scans. So I’m unable to remote desktop with this. After some research, I’ve come across this known Cisco bug which would make sense since my AnyConnect also updated from 4.3 to 4.4 but it also does not, since my coworker friends successfully got this working a couple days before me. Any help appreciated, kinda urgent since I told lead I’d be working 3 hrs tomorrow morning…welp
In the last entry of this series, we looked at the high-level mechanics involved in using AnyConnect with the ISE Posture module to perform endpoint host inspection (posture) when connecting to an AnyConnect VPN head-end (ASA/FTD). If you haven’t read that one yet, you can find it here!
In this entry, we will be narrowly focused on provisioning the ISE posture module. Enjoy!
Setting the Stage!
We must start somewhere, so let’s make sure we understand where that is! In the scenario covered here, we are going to assume that AnyConnect core VPN client is already installed. But wait, there is more! We are also going to assume that the AnyConnect client was installed via head-end deployment by a Cisco Firepower Threat Defense VPN head-end. But wait, there is more! We are also going to take for granted that the FTD is already configured to process user authentications and/or authorizations using RADIUS to Cisco ISE! That makes our next necessary step to get the ISE Posture module added into the existing AnyConnect client. I know you are as pumped as I am! Let’s get it!
P.S. Pre-deploy options exist as well, but I’ll leave you to DYOR (do your own research) on that approach. Additionally, other “head end” deployment options (Umbrella for example) exist that are not covered here.
A Brief Q/A Monologue
There are multiple hands in the cookie jar when it comes to the client provisioning responsibilities. Not only that, but there are also options too! Options can be great, but when it comes to provisioning ISE Posture, it is the humble opinion of this keyboard that the following questions are answered correctly.
|
Question 1 |
Who deploys/upgrades the AnyConnect VPN Client and the ISE Posture Module? |
|
Answer 1 |
The VPN head-end (so the FTD/ASA)! |
|
Question 2 |
Do the versions of AnyConnect need to match on the ISE Client Provisioning Policy and the VPN head-end? |
|
Answer 2 |
You bet they do! |
|
Question 3 |
Do the AnyConnect versions automatically stay in sync between ISE and ASA/FTD? |
|
Answer 3 |
No, no they do not. Dear Cisco, please make this happen in future land. |
|
Question 4 |
Okay…so what does ISE provision then? |
|
Answer 4 |
The ISE Posture profile and the ISE Posture compliance module (this is different from the ISE Posture module itself…. I know, totally NOT confusing!) |
FMC Provisioning of Posture Module Deployment
The following procedure can be followed to add the ISE Posture module deployment to an AnyConnect Group Policy on a Cisco FMC managed FTD.
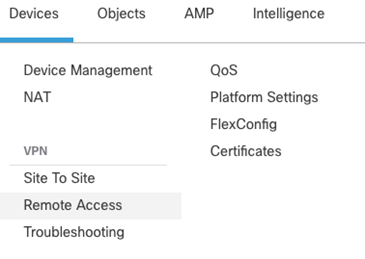
Navigate to FMC > Devices > Remote Access
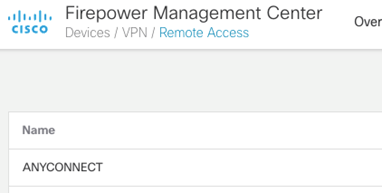
Click on the Name of the Remote Access configuration you wish to modify
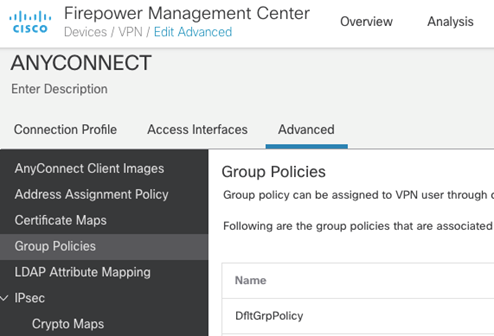
Click on Advanced > Group Policies and edit the group policy you wish to add the ISE Posture module deployment to.
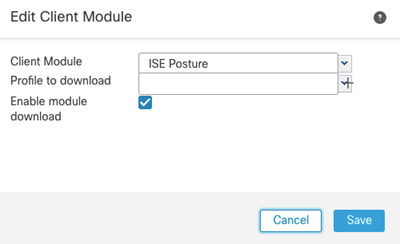
Click that little + icon on the AnyConnect > Client Modules menu.
Click that little + icon on the AnyConnect > Client Modules menu.
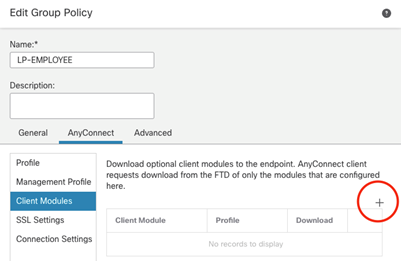
Select the ISE Posture Client Module and check the box to Enable module download. Save, save, and deploy!
Before the next connection attempt, you can see there is only the VPN module installed on our test AnyConnect client.
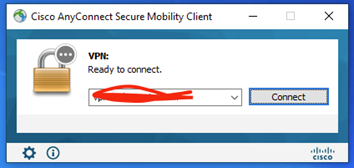
During the next connection attempt, the client is instructed to download the ISE Posture module.
Cisco Identity Services Engine: Provisioning AnyConnect for ISE Posture
Alright! Now we have the ISE Posture Module deployed to our AnyConnect client (System Scan tile). Notice how we have “No policy server detected.” Great segue to the next section!
How Does the Posture Module Discover ISE?
Our ISE Posture module is now deployed to our test AnyConnect client. The next step is to put the necessary configuration in play to allow a new ISE Posture module to locate its master (ISE). There are a couple ways to go about this depending upon what your goals are for user experience. Both methods involve instructing the ASA/FTD (in this case) to redirect certain HTTP traffic to the ISE Client Provisioning Portal. If you are familiar with Monitor Mode, Low Impact Mode, and Closed Mode when it comes to deploying 802.1x authentication on the wired access network, you have similar options/strategies available to you when deploying posture checking with ISE.
In the initial phase of any posture deployment, my preference is to simply monitor the posture status of the endpoints connecting to the network. Therefore, I don’t want users to see any intervention to their network access after completing authentication to the VPN. Saying this another way, we don’t want the user to see this HTTP redirection to the ISE Client Provisioning Portal. We only want the AnyConnect ISE Posture module to see this. To accomplish this goal, the kind folks at Cisco provided the capability to define “Discovery Hosts” to the ISE Posture module. The ISE Posture module sends an HTTP GET request to the discovery host[s], expecting that they will get redirected to the ISE Client Provisioning Portal. The beautiful thing about this discovery host-based discovery process is that the user doesn’t have to see the HTTP redirection occur in their browser. Just what we are after! While we can provision custom discovery hosts, Cisco provides for a default discovery host; enroll.cisco.com. Cisco maintains a public DNS record for enroll.cisco.com which always resolves to the same IP address. Cisco has done their part by programming the ISE Posture module to send an HTTP GET to enroll.cisco.com. Now for our part.
Create a Redirect ACL on the FTD
Back to the FMC, we will provision an ACL object that simply permits HTTP traffic destined to the IP address that enroll.cisco.com resolves to. A quick nslookup tells us that enroll.cisco.com resolves to 72.163.1.80.
Here is our ACL object 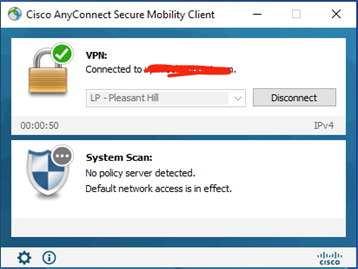
Here we associate this ACL object to
our CoA enabled RADIUS/ISE servers 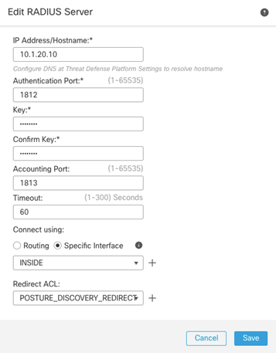
Note: If you are split-tunneling, be sure to split-include the enroll.cisco.com IP address! IMPORTANT!
Now The ISE Configuration
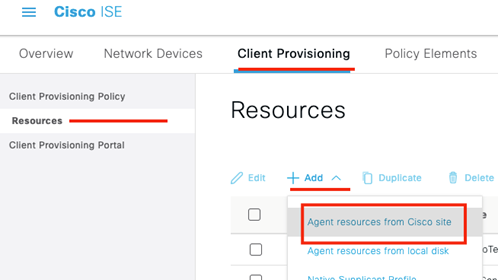
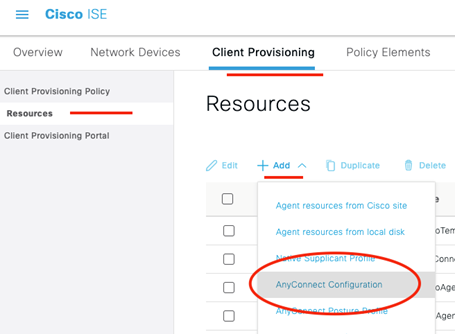
The moment you’ve all been waiting for, the ISE configuration! Our goal here for this blog post is to get the ISE Posture module provisioned. So, surprisingly we will navigate to Work Centers > Posture > Client Provisioning to begin our ISE work.
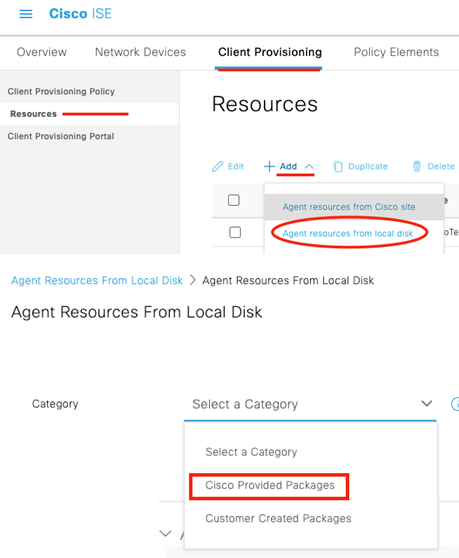
First, we need to add the AnyConnect web deploy package to ISE. This should match the web deploy package installed on the ASA/FTD!
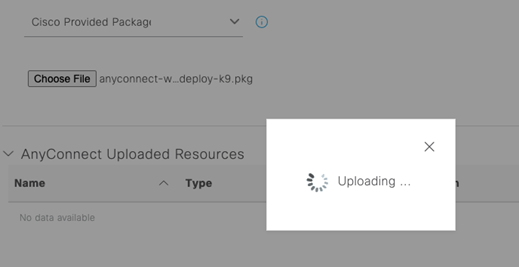
Once is has finished uploading, click Submit!
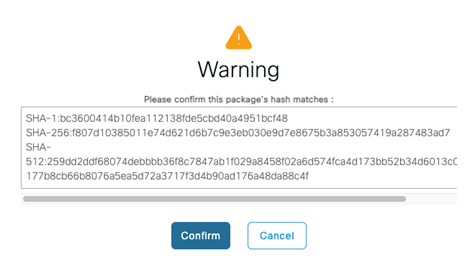
Confirm the hashes match (or just click Confirm ;))!
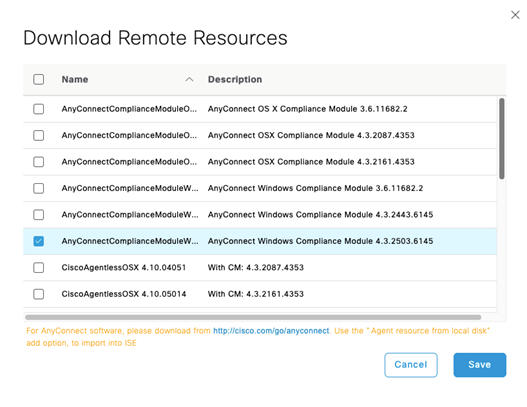
Next, we are going to add the latest compliance module from Cisco’s site
Select the latest compliance module for your operating system and click Save!
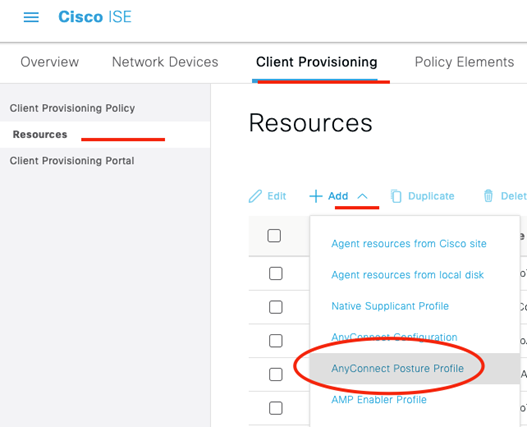
Now we create the Posture Profile!
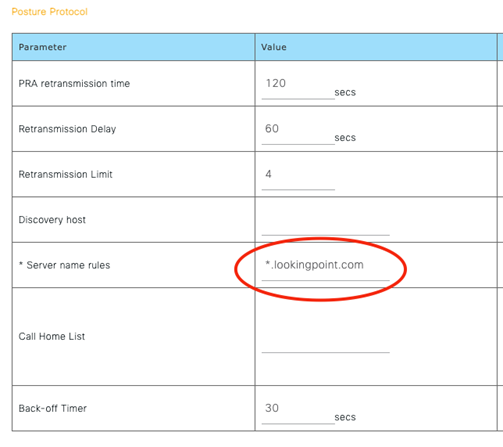
The only thing we MUST fill out on the posture profile are the Server name rules. This defines the ISE server names that the Posture module is allowed to communicate with. This is a security measure to prevent your posture modules installed on corporate owned assets from communicating with an ISE server from another organization, potentially leaking information from your hosts to third parties. For a contractor profile, you could input just a “*”. Save! Almost there!
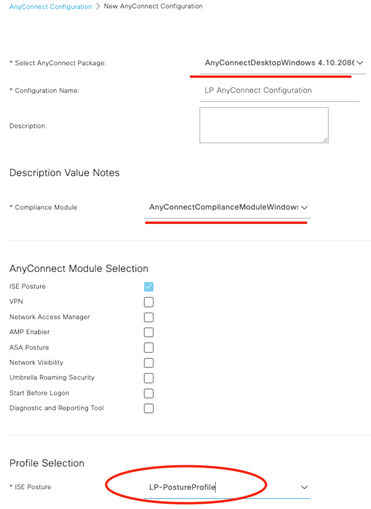
Now we add the AnyConnect Configuration, which ties all the previous configuration together!
Select the AnyConnect package we uploaded previously. Select the Compliance Module we uploaded previously and leave ISE Posture as the only module selected (it cannot be deselected). Lastly select that ISE Posture profile we created in the previous step. Save! We are so close, hang in there!
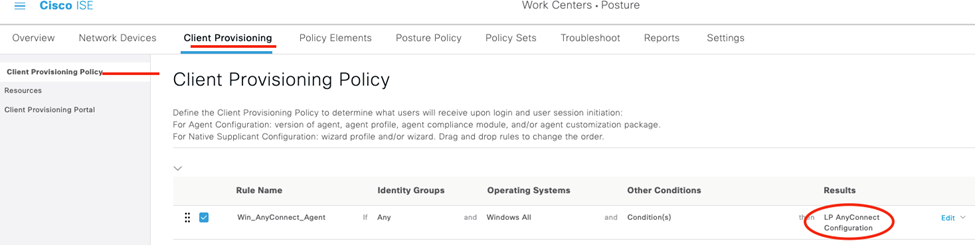
For our last act in ISE provisioning for the posture module, we will assign that AnyConnect Configuration to our Client Provisioning Policy. This policy is used to determine how to provision a client who is redirected to the ISE Client Provisioning Portal.
For our last act in ISE, we are going to configure our authorization policy to redirect AnyConnect VPN clients who successfully authenticated to the ISE Client Provisioning Portal.
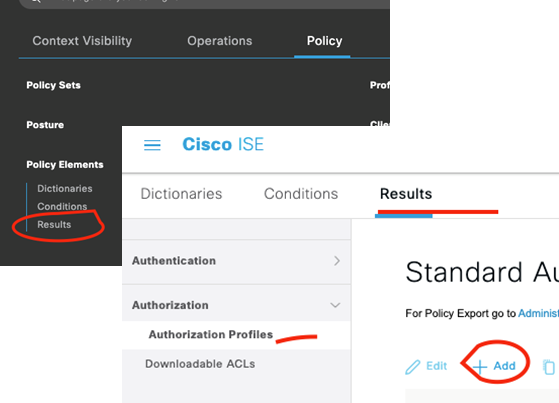
We want to enable Web Redirection on the Authorization Profile and reference the name of the ACL we created previously on the ASA/FTD. Save!
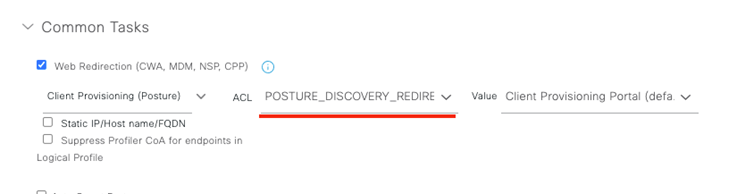
Make sure you update the appropriate Policy Set authorization rule with this Authorization Profile! Now we test!
As always if you have any questions on getting Cisco’s ISE set up for you and your business and would like to schedule a free consultation with us, please reach out to us at sales@lookingpoint.com and we’ll be happy to help!

Want the answers to the most asked questions about ISE? Check out our video below!
Обновлено май 2023: перестаньте получать сообщения об ошибках и замедлите работу вашей системы с помощью нашего инструмента оптимизации. Получить сейчас в эту ссылку
- Скачайте и установите инструмент для ремонта здесь.
- Пусть он просканирует ваш компьютер.
- Затем инструмент почини свой компьютер.
Сообщение об ошибке «AnyConnect не смог установить соединение с указанным безопасным шлюзом» появляется, когда пользователи пытаются подключиться к VPN с помощью клиента AnyConnect. Эта проблема возникает из-за того, что клиент AnyConnect VPN CISCO не может подключиться к удаленному серверу и блокировки происходят. Сегодня мы обсудим приведенное выше сообщение об ошибке, в том числе причины появления сообщения об ошибке и различные решения, которые вы можете применить для его устранения.

Как исправить AnyConnect не смог подключиться к указанной ошибке Secure Gateway:
Проверьте, работает ли ICS (Internet Connection Sharing).
- Нажмите кнопку Пуск, затем Панель управления.
- В категории «Сеть и Интернет» выберите «Центр управления сетями и общим доступом».
- На левой панели выберите «Изменить настройки адаптера».
- Щелкните правой кнопкой мыши подключение к общей сети (сначала попробуйте использовать проводное подключение / адаптер Ethernet, затем проверьте другие адаптеры) и выберите «Свойства».
- Выберите вкладку «Общий доступ».
- Снимите флажок, чтобы разрешить другим пользователям сети подключаться через соединение на этом компьютере.
- Нажмите кнопку ОК.
Также убедитесь, что служба ICS не работает.
Обновление за май 2023 года:
Теперь вы можете предотвратить проблемы с ПК с помощью этого инструмента, например, защитить вас от потери файлов и вредоносных программ. Кроме того, это отличный способ оптимизировать ваш компьютер для достижения максимальной производительности. Программа с легкостью исправляет типичные ошибки, которые могут возникнуть в системах Windows — нет необходимости часами искать и устранять неполадки, если у вас под рукой есть идеальное решение:
- Шаг 1: Скачать PC Repair & Optimizer Tool (Windows 10, 8, 7, XP, Vista — Microsoft Gold Certified).
- Шаг 2: Нажмите «Начать сканирование”, Чтобы найти проблемы реестра Windows, которые могут вызывать проблемы с ПК.
- Шаг 3: Нажмите «Починить все», Чтобы исправить все проблемы.

- Нажмите кнопку «Пуск» и выберите «Выполнить».
- Введите: services.msc и нажмите клавишу ВВОД на клавиатуре.
- Выполните поиск общего доступа к подключению к Интернету (ICS), затем остановите службу.
- Измените тип загрузки на Отключено и перезагрузите компьютер.
Обновить настройки реестра
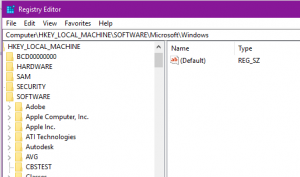
Другой, как вы говорите, меняет реестр, но это очень медленный процесс. Под Windows 8 Pro откройте regedit с командой execute и:
1) Перейдите в [HKEY_LOCAL_MACHINE SYSTEM CurrentControlSet Services vpnva].
2) Измените значение в поле DisplayName на «Cisco AnyConnect VPN Virtual Miniport Adapter для Windows x64».
3) Попробуйте установить соединение.
Проверьте проблему в среде чистой загрузки.
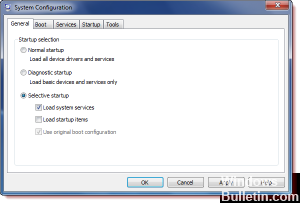
Если ваша проблема не возникает, когда компьютер находится в чистой загрузочной среде, вы можете определить, какое загрузочное приложение или служба вызывает проблему, путем систематического включения или выключения и перезагрузки компьютера. Если вы активируете один сервис или загрузочный элемент и перезапускаетесь каждый раз, когда сервис или приложение проблематично, самый эффективный способ сделать это — протестировать половину из них за раз и устранить половину из них как возможную причину каждый раз при перезагрузке компьютера , Затем вы можете повторить этот процесс, пока не изолируете проблему.
https://community.cisco.com/t5/vpn-and-anyconnect/anyconnect-vpn-client-version-2-5-0217-not-able-to-establish/td-p/1529524
Совет экспертов: Этот инструмент восстановления сканирует репозитории и заменяет поврежденные или отсутствующие файлы, если ни один из этих методов не сработал. Это хорошо работает в большинстве случаев, когда проблема связана с повреждением системы. Этот инструмент также оптимизирует вашу систему, чтобы максимизировать производительность. Его можно скачать по Щелчок Здесь

CCNA, веб-разработчик, ПК для устранения неполадок
Я компьютерный энтузиаст и практикующий ИТ-специалист. У меня за плечами многолетний опыт работы в области компьютерного программирования, устранения неисправностей и ремонта оборудования. Я специализируюсь на веб-разработке и дизайне баз данных. У меня также есть сертификат CCNA для проектирования сетей и устранения неполадок.
Сообщение Просмотров: 1,521