EXE проблемы с asus taichi display control.exe чаще всего связаны с повреждением или отсутствием исполняемого файла, и зачастую возникают во время запуска Third-Party Application. Возникновение подобных проблем является раздражающим фактором, однако их легко устранить, заменив файл EXE, из-за которого возникает проблема. В качестве дополнительного шага по устранению неполадок мы настоятельно рекомендуем очистить все пути к неверным файлам и ссылки на расширения файлов EXE, которые могут способствовать возникновению такого рода ошибок, связанных с asus taichi display control.exe.
Формат Windows Executable File с расширением файла EXE классифицируют в качестве Исполнимые файлы. Ниже представлен список самых последних версий файлов практически для всех версий Windows (а также для некоторых %%os%%), которые вы также можете скачать. В настоящее время в нашей безе отсутствуют некоторые файлы asus taichi display control.exe, однако вы можете получить их по запросу, нажав на кнопку Request (Запрос) рядом с соответствующей версией файла. Если ниже отсутствует необходимая версия файла, мы рекомендуем вам связаться непосредственно с Windows Software Developer.
Поместите новый файл asus taichi display control.exe на место предыдущего (перезаписав предыдущий). Проблема больше не должна возникать, однако, чтобы убедиться в этом окончательно, следует выполнить проверку. Вы можете проверить результат, запустив приложение Third-Party Application и проверить, появляется ли проблема.
| asus taichi display control.exe Описание файла | |
|---|---|
| Формат файла: | EXE |
| Тип приложения: | |
| App: | Third-Party Application |
| Версия: | 1.0 |
| Автор: | Windows Software Developer |
| File: | asus taichi display control.exe |
| Размер: | 53760 |
| SHA-1: | 8477d3689d2708181c312146a47f82c7e7725be9 |
| MD5: | 738e3da69579f7d2694e94aedd9d39ef |
| CRC32: |
Продукт Solvusoft
Загрузка
WinThruster 2023 — Сканировать ваш компьютер на наличие ошибок реестра в asus taichi display control.exe
Windows
11/10/8/7/Vista/XP
Установить необязательные продукты — WinThruster (Solvusoft) | Лицензия | Политика защиты личных сведений | Условия | Удаление
EXE
asus taichi display control.exe
Идентификатор статьи: 1107577
Asus taichi display control.exe
1
2
Выберите программное обеспечение
| Имя | MD5 | KB | Загрузить | |||||||||||||||||
|---|---|---|---|---|---|---|---|---|---|---|---|---|---|---|---|---|---|---|---|---|
| + asus taichi display control.exe | 738e3da69579f7d2694e94aedd9d39ef | 52.50 KB | ||||||||||||||||||
|
Распространенные сообщения об ошибках в Asus taichi display control.exe
Частичный список ошибок asus taichi display control.exe Third-Party Application:
- «Ошибка приложения Asus taichi display control.exe.»
- «Ошибка программного обеспечения Win32: asus taichi display control.exe»
- «Извините за неудобства — asus taichi display control.exe имеет проблему. «
- «Файл asus taichi display control.exe не найден.»
- «Asus taichi display control.exe не может быть найден. «
- «Проблема при запуске приложения: asus taichi display control.exe. «
- «Файл Asus taichi display control.exe не запущен.»
- «Asus taichi display control.exe остановлен. «
- «Ошибка пути программного обеспечения: asus taichi display control.exe. «
Проблемы Third-Party Application asus taichi display control.exe возникают при установке, во время работы программного обеспечения, связанного с asus taichi display control.exe, во время завершения работы или запуска или менее вероятно во время обновления операционной системы. Документирование проблем asus taichi display control.exe в Third-Party Application является ключевым для определения причины проблем с электронной и сообщения о них в Windows Software Developer.
Причины проблем Asus taichi display control.exe
DEBUG NO TRANSLATION
В первую очередь, проблемы asus taichi display control.exe создаются:
- Поврежденная или недопустимая запись реестра asus taichi display control.exe.
- Вредоносные программы заразили asus taichi display control.exe, создавая повреждение.
- Asus taichi display control.exe злонамеренно или ошибочно удален другим программным обеспечением (кроме Third-Party Application).
- Другое программное приложение, конфликтующее с asus taichi display control.exe.
- Поврежденная установка или загрузка Third-Party Application (asus taichi display control.exe).
by Milan Stanojevic
Milan has been enthusiastic about technology ever since his childhood days, and this led him to take interest in all PC-related technologies. He’s a PC enthusiast and he… read more
Updated on February 10, 2022
- It’s unfortunate when users can’t install the Asus Smart Gesture driver on their Windows 10 PC.
- Assuming that you’re one of them too, try resetting Smart Gesture or loading BIOS Defaults.
- Do you second-guess your decision of using this brand? Just visit our Buying Guides section.
- Always be prepared to solve similar issues by bookmarking this Laptop & Computer Issues Hub.
XINSTALL BY CLICKING THE DOWNLOAD FILE
This software will repair common computer errors, protect you from file loss, malware, hardware failure and optimize your PC for maximum performance. Fix PC issues and remove viruses now in 3 easy steps:
- Download Restoro PC Repair Tool that comes with Patented Technologies (patent available here).
- Click Start Scan to find Windows issues that could be causing PC problems.
- Click Repair All to fix issues affecting your computer’s security and performance
- Restoro has been downloaded by 0 readers this month.
If you want your laptop or computer to work properly, you need to have the appropriate software installed. Speaking of software, Asus users reported a similar situation.
It seems that they can’t install the Asus Smart Gesture driver on Windows 10, so let’s see how to fix this issue.
What can I do if I can’t install the Asus Smart Gesture driver?
- Remove Asus Smart Gesture and reinstall the driver
- Run the driver setup file as an administrator
- Download Touchpad Synaptics instead
- Repair the driver and install the newer version
- Reset Asus Smart Gesture settings
- Load BIOS Defaults
- Update BIOS
- Reset Windows
1. Remove Asus Smart Gesture and reinstall the driver
According to users, in order to fix this problem, you need to manually remove the Asus Smart Gesture driver.
To do that, simply search your computer for Asus Smart Gesture and delete all files related to it. Then, to make sure that you delete all related files, you may want to use an uninstaller.
Check out this list with the best uninstallers available right now. Bear in mind that those files won’t disappear until you restart your PC.
After restarting your PC go to the Asus website and download the touchpad driver for your computer.
After downloading the file, click the Disable3fun.exe and extract all folders. Once you’re done, run the SetupTPdriver.msi and install a new driver.
Restart your PC once again. Now you just need to open Device Manager and locate your touchpad, right-click it, and choose the option to Update the driver.
Windows 10 should download the latest version of the driver for you. If updating the driver manually from Windows doesn’t work, do it automatically by using DriverFix.
There are some good reasons to update drivers and you already experience some unfortunate repercussions of not considering this rule. This tool can correct all driver-related issues with ease.

Updating them takes no more than a few clicks (how great can that be?) and you don’t even have to worry about looking for the right versions or identifying the culprit.

DriverFix
Users often report that installing the Asus Smart Gesture driver becomes possible after updating the drivers. Let DriverFix handle the task for you!
2. Run the driver setup file as an administrator
Users reported that they are unable to install the Asus Smart Gesture driver on Windows 10, but you can easily fix this issue by running the setup file as an administrator.
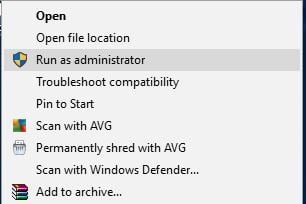
To do that, locate the setup file, right-click it and choose Run as administrator from the menu.
3. Download Touchpad Synaptics instead
If you can’t install the Asus Smart Gesture driver on Windows 10, users are suggesting installing Synaptics Touchpad driver instead.
According to them, Touchpad Synaptics for Windows 8.1 works perfectly on Windows 10, but be sure to download the Windows 10 version if it’s available.
Alternatively, some users are suggesting installing Sentelic drivers instead.
4. Repair the driver and install the newer version
- Go to the Asus website and download the same version of the Smart Gesture driver that you have installed. After you download the driver, run it, and extract the setup files.
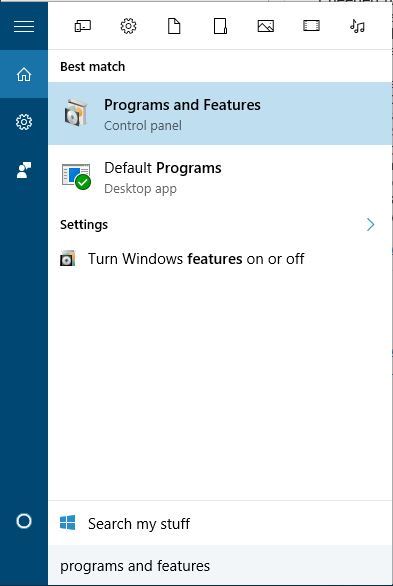
- Now open Programs and Features. To do that press Windows Key + S shortcut, enter programs and features, and select Programs and Features from the list.
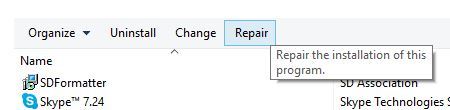
- A list of installed software will appear. Select Asus Smart Gesture driver and click Repair or Change.
- Locate the driver setup file and select it.
Some PC issues are hard to tackle, especially when it comes to corrupted repositories or missing Windows files. If you are having troubles fixing an error, your system may be partially broken.
We recommend installing Restoro, a tool that will scan your machine and identify what the fault is.
Click here to download and start repairing.
To fix this problem you need to repair the Smart Gesture driver that you have installed on your PC. To do that follow the above procedure.
After repairing the driver, you should be able to uninstall it and install the version for Windows 10.
5. Reset Asus Smart Gesture settings
- Go to Control Panel.
- Find Asus Smart Gesture, and open it.
- Click Set all to default.
- Restart your computer.
There’s a chance you’re not able to update because something’s wrong with Asus Smart Gesture settings. So, we’re going to reset the settings and try to install updates once again.
6. Load BIOS Defaults
Now, let’s move on to BIOS-related solutions. Although it’s not quite often the case, your BIOS settings may actually block certain updates from installing.
So, the first thing we’re going to do now is load BIOS defaults. Since this process isn’t identical on all computers, I can’t exactly tell you how exactly how to perform it.
All in all, the point is to enter BIOS (probably by pressing DEL on the boot) and go to the option for loading BIOS defaults.
If you don’t know how to do this, google your motherboard for a more detailed explanation or check the link below.
If Windows skips BIOS, take a look at this useful guide to solve the problem quickly.
We have additional guides on what to do if Windows skips BIOS and how to access the BIOS.
7. Update BIOS
If resetting your BIOS settings didn’t get the job done, we’ll try a more serious measure – updating your BIOS. There’s a good chance you’ve never done this in your life before.
And that’s fine, updating BIOS isn’t something you do every day. And it should be like that. Because updating BIOS is quite risky.
One mistake can render your BIOS, and therefore your computer useless. So, you should really approach the whole process with extra care.
8. Reset Windows
If none of the solutions from above managed to solve the problem, the only thing left to do is reset your Windows operating system.
There are multiple ways to reset Windows 10, but if you’re not sure how to perform any, everything is explained in the link below.
Here are some more examples of this problem:
- Asus Smart Gesture there is a problem with this Windows installer package – This issue appears when you’re not able to install Asus Smart Gesture drivers using the official installer.
- Asus Smart Gesture another installation is in progress – This error prevents you to install the drivers, even if another installation is not in progress.
- Asus Smart Gesture source file not found – Another driver installation issue, that appears when the installer is unable to locate the source of the driver file.
- Asus Smart Gesture not working / Can’t uninstall Asus Smart Gesture – Besides the driver installation problem, Asus Smart Gesture can also cause uninstallation issues to some users.
- Asus Smart Gesture problem with Windows installer – Another issue that affects the Asus Smart Gesture driver installer.
- Asus Smart Gesture the specified account already exists – Although this issue tells you that something’s wrong with your user account, it can be resolved with a simple update.
- Asus touchpad driver – That’s another problem that users complain of. If you’re one of them, DriverFix can help you out.
Installing Asus Smart Gesture driver on Windows 10 can sometimes be problematic but, hopefully, you managed to install it after using one of our solutions.
If you have any other suggestions or questions, leave them in the comments section below and we’ll be sure to take a look.
![]()
Newsletter
by Milan Stanojevic
Milan has been enthusiastic about technology ever since his childhood days, and this led him to take interest in all PC-related technologies. He’s a PC enthusiast and he… read more
Updated on February 10, 2022
- It’s unfortunate when users can’t install the Asus Smart Gesture driver on their Windows 10 PC.
- Assuming that you’re one of them too, try resetting Smart Gesture or loading BIOS Defaults.
- Do you second-guess your decision of using this brand? Just visit our Buying Guides section.
- Always be prepared to solve similar issues by bookmarking this Laptop & Computer Issues Hub.
XINSTALL BY CLICKING THE DOWNLOAD FILE
This software will repair common computer errors, protect you from file loss, malware, hardware failure and optimize your PC for maximum performance. Fix PC issues and remove viruses now in 3 easy steps:
- Download Restoro PC Repair Tool that comes with Patented Technologies (patent available here).
- Click Start Scan to find Windows issues that could be causing PC problems.
- Click Repair All to fix issues affecting your computer’s security and performance
- Restoro has been downloaded by 0 readers this month.
If you want your laptop or computer to work properly, you need to have the appropriate software installed. Speaking of software, Asus users reported a similar situation.
It seems that they can’t install the Asus Smart Gesture driver on Windows 10, so let’s see how to fix this issue.
What can I do if I can’t install the Asus Smart Gesture driver?
- Remove Asus Smart Gesture and reinstall the driver
- Run the driver setup file as an administrator
- Download Touchpad Synaptics instead
- Repair the driver and install the newer version
- Reset Asus Smart Gesture settings
- Load BIOS Defaults
- Update BIOS
- Reset Windows
1. Remove Asus Smart Gesture and reinstall the driver
According to users, in order to fix this problem, you need to manually remove the Asus Smart Gesture driver.
To do that, simply search your computer for Asus Smart Gesture and delete all files related to it. Then, to make sure that you delete all related files, you may want to use an uninstaller.
Check out this list with the best uninstallers available right now. Bear in mind that those files won’t disappear until you restart your PC.
After restarting your PC go to the Asus website and download the touchpad driver for your computer.
After downloading the file, click the Disable3fun.exe and extract all folders. Once you’re done, run the SetupTPdriver.msi and install a new driver.
Restart your PC once again. Now you just need to open Device Manager and locate your touchpad, right-click it, and choose the option to Update the driver.
Windows 10 should download the latest version of the driver for you. If updating the driver manually from Windows doesn’t work, do it automatically by using DriverFix.
There are some good reasons to update drivers and you already experience some unfortunate repercussions of not considering this rule. This tool can correct all driver-related issues with ease.
Updating them takes no more than a few clicks (how great can that be?) and you don’t even have to worry about looking for the right versions or identifying the culprit.
DriverFix
Users often report that installing the Asus Smart Gesture driver becomes possible after updating the drivers. Let DriverFix handle the task for you!
2. Run the driver setup file as an administrator
Users reported that they are unable to install the Asus Smart Gesture driver on Windows 10, but you can easily fix this issue by running the setup file as an administrator.
To do that, locate the setup file, right-click it and choose Run as administrator from the menu.
3. Download Touchpad Synaptics instead
If you can’t install the Asus Smart Gesture driver on Windows 10, users are suggesting installing Synaptics Touchpad driver instead.
According to them, Touchpad Synaptics for Windows 8.1 works perfectly on Windows 10, but be sure to download the Windows 10 version if it’s available.
Alternatively, some users are suggesting installing Sentelic drivers instead.
4. Repair the driver and install the newer version
- Go to the Asus website and download the same version of the Smart Gesture driver that you have installed. After you download the driver, run it, and extract the setup files.
- Now open Programs and Features. To do that press Windows Key + S shortcut, enter programs and features, and select Programs and Features from the list.
- A list of installed software will appear. Select Asus Smart Gesture driver and click Repair or Change.
- Locate the driver setup file and select it.
Some PC issues are hard to tackle, especially when it comes to corrupted repositories or missing Windows files. If you are having troubles fixing an error, your system may be partially broken.
We recommend installing Restoro, a tool that will scan your machine and identify what the fault is.
Click here to download and start repairing.
To fix this problem you need to repair the Smart Gesture driver that you have installed on your PC. To do that follow the above procedure.
After repairing the driver, you should be able to uninstall it and install the version for Windows 10.
5. Reset Asus Smart Gesture settings
- Go to Control Panel.
- Find Asus Smart Gesture, and open it.
- Click Set all to default.
- Restart your computer.
There’s a chance you’re not able to update because something’s wrong with Asus Smart Gesture settings. So, we’re going to reset the settings and try to install updates once again.
6. Load BIOS Defaults
Now, let’s move on to BIOS-related solutions. Although it’s not quite often the case, your BIOS settings may actually block certain updates from installing.
So, the first thing we’re going to do now is load BIOS defaults. Since this process isn’t identical on all computers, I can’t exactly tell you how exactly how to perform it.
All in all, the point is to enter BIOS (probably by pressing DEL on the boot) and go to the option for loading BIOS defaults.
If you don’t know how to do this, google your motherboard for a more detailed explanation or check the link below.
If Windows skips BIOS, take a look at this useful guide to solve the problem quickly.
We have additional guides on what to do if Windows skips BIOS and how to access the BIOS.
7. Update BIOS
If resetting your BIOS settings didn’t get the job done, we’ll try a more serious measure – updating your BIOS. There’s a good chance you’ve never done this in your life before.
And that’s fine, updating BIOS isn’t something you do every day. And it should be like that. Because updating BIOS is quite risky.
One mistake can render your BIOS, and therefore your computer useless. So, you should really approach the whole process with extra care.
8. Reset Windows
If none of the solutions from above managed to solve the problem, the only thing left to do is reset your Windows operating system.
There are multiple ways to reset Windows 10, but if you’re not sure how to perform any, everything is explained in the link below.
Here are some more examples of this problem:
- Asus Smart Gesture there is a problem with this Windows installer package – This issue appears when you’re not able to install Asus Smart Gesture drivers using the official installer.
- Asus Smart Gesture another installation is in progress – This error prevents you to install the drivers, even if another installation is not in progress.
- Asus Smart Gesture source file not found – Another driver installation issue, that appears when the installer is unable to locate the source of the driver file.
- Asus Smart Gesture not working / Can’t uninstall Asus Smart Gesture – Besides the driver installation problem, Asus Smart Gesture can also cause uninstallation issues to some users.
- Asus Smart Gesture problem with Windows installer – Another issue that affects the Asus Smart Gesture driver installer.
- Asus Smart Gesture the specified account already exists – Although this issue tells you that something’s wrong with your user account, it can be resolved with a simple update.
- Asus touchpad driver – That’s another problem that users complain of. If you’re one of them, DriverFix can help you out.
Installing Asus Smart Gesture driver on Windows 10 can sometimes be problematic but, hopefully, you managed to install it after using one of our solutions.
If you have any other suggestions or questions, leave them in the comments section below and we’ll be sure to take a look.
![]()
Newsletter
ASUSSmartDisplayControl.exe is part of ASUS Smart Display Control and developed by ASUSTeK Computer Inc. according to the ASUSSmartDisplayControl.exe version information.
ASUSSmartDisplayControl.exe’s description is «ASUS Smart Display Control«
ASUSSmartDisplayControl.exe is digitally signed by ASUSTEK COMPUTER INCORPORATION.
ASUSSmartDisplayControl.exe is usually located in the ‘C:Program Files (x86)ASUSASUS Smart Display Control’ folder.
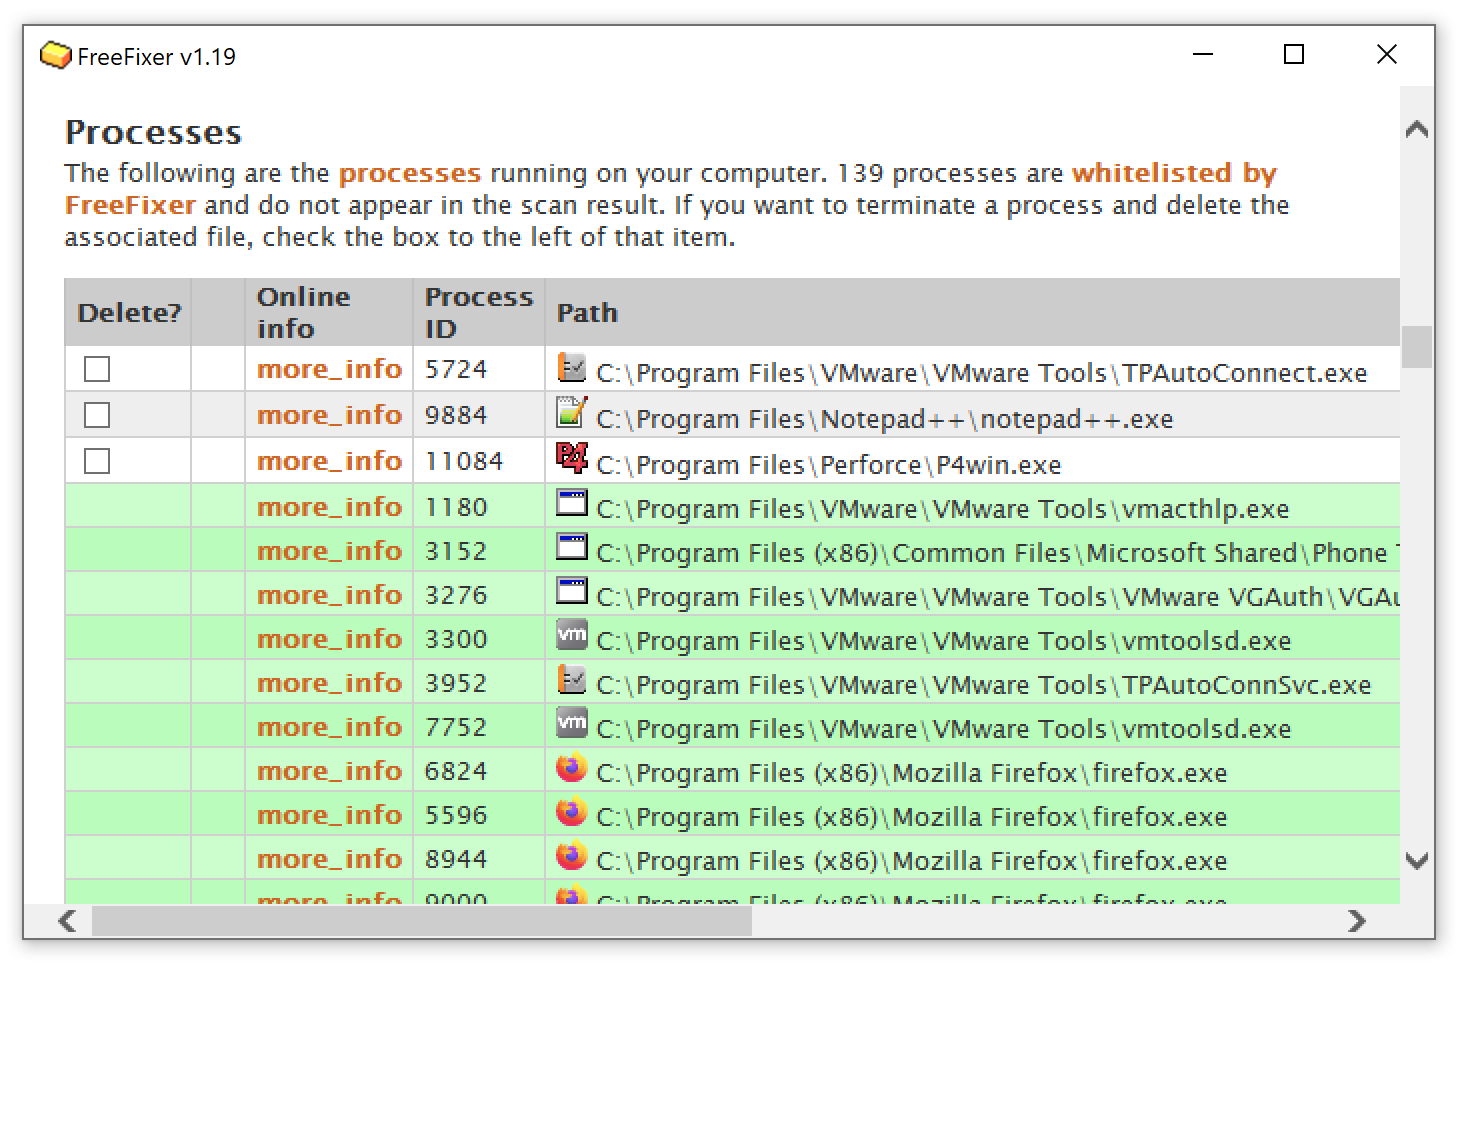
None of the anti-virus scanners at VirusTotal reports anything malicious about ASUSSmartDisplayControl.exe.
If you have additional information about the file, please share it with the FreeFixer users by posting a comment at the bottom of this page.
Vendor and version information [?]
The following is the available information on ASUSSmartDisplayControl.exe:
| Property | Value |
|---|---|
| Product name | ASUS Smart Display Control |
| Company name | ASUSTeK Computer Inc. |
| File description | ASUS Smart Display Control |
| Internal name | ASUSSmartDisplayControl.exe |
| Original filename | ASUSSmartDisplayControl.exe |
| Legal copyright | Copyright (C) 2018 ASUSTeK Computer Inc. |
| Product version | 1.0.0.0 |
| File version | 1.0.0.0 |
Here’s a screenshot of the file properties when displayed by Windows Explorer:
| Product name | ASUS Smart Display Control |
| Company name | ASUSTeK Computer Inc. |
| File description | ASUS Smart Display Control |
| Internal name | ASUSSmartDisplayControl.exe |
| Original filename | ASUSSmartDisplayControl.exe |
| Legal copyright | Copyright (C) 2018 ASUSTeK Computer .. |
| Product version | 1.0.0.0 |
| File version | 1.0.0.0 |
Digital signatures [?]
ASUSSmartDisplayControl.exe has a valid digital signature.
| Property | Value |
|---|---|
| Signer name | ASUSTEK COMPUTER INCORPORATION |
| Certificate issuer name | GlobalSign Extended Validation CodeSigning CA — SHA256 — G3 |
| Certificate serial number | 32b5c7f8c18a7a2bfbb52746 |
VirusTotal report
None of the 68 anti-virus programs at VirusTotal detected the ASUSSmartDisplayControl.exe file.
Hashes [?]
| Property | Value |
|---|---|
| MD5 | 2ffaf5a2830fb91027fff69e87f7e168 |
| SHA256 | be1c98760466401facdb1660705806337f7e575cf0a4a8e6bf064a00632822b6 |
Error Messages
These are some of the error messages that can appear related to asussmartdisplaycontrol.exe:
asussmartdisplaycontrol.exe has encountered a problem and needs to close. We are sorry for the inconvenience.
asussmartdisplaycontrol.exe — Application Error. The instruction at «0xXXXXXXXX» referenced memory at «0xXXXXXXXX». The memory could not be «read/written». Click on OK to terminate the program.
ASUS Smart Display Control has stopped working.
End Program — asussmartdisplaycontrol.exe. This program is not responding.
asussmartdisplaycontrol.exe is not a valid Win32 application.
asussmartdisplaycontrol.exe — Application Error. The application failed to initialize properly (0xXXXXXXXX). Click OK to terminate the application.
What will you do with the file?
To help other users, please let us know what you will do with the file:
What did other users do?
The poll result listed below shows what users chose to do with the file. 39% have voted for removal. Based on votes from 103 users.

NOTE: Please do not use this poll as the only source of input to determine what you will do with the file.
Malware or legitimate?
If you feel that you need more information to determine if your should keep this file or remove it, please read this guide.
And now some shameless self promotion ![;)]()
 Hi, my name is Roger Karlsson. I’ve been running this website since 2006. I want to let you know about the FreeFixer program. FreeFixer is a freeware tool that analyzes your system and let you manually identify unwanted programs. Once you’ve identified some malware files, FreeFixer is pretty good at removing them. You can download FreeFixer here. It runs on Windows 2000/XP/2003/2008/2016/2019/Vista/7/8/8.1/10. Supports both 32- and 64-bit Windows.
If you have questions, feedback on FreeFixer or the freefixer.com website, need help analyzing FreeFixer’s scan result or just want to say hello, please contact me. You can find my email address at the contact page.
Как использовать консоль Smart Control?
*Консоль Smart control доступна только для платы PRIME X299 EDITION 30.
Обзор
Интеллектуальная консоль управления (Smart Control) — это устройство, позволяющее пользователям управлять системой жестами и голосом. Она может даже настроить жесты и голосовые команды для запуска состояния оборудования через Armoury Crate.
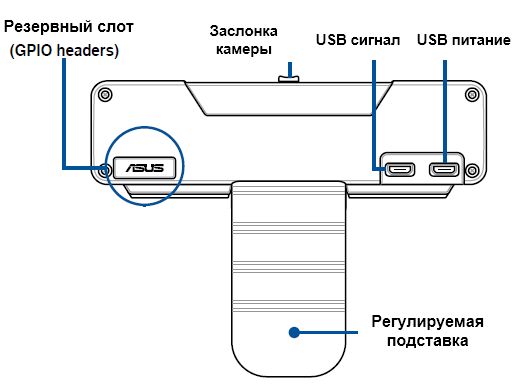
Вид спереди

Вид сзади
Системные требования
Интеллектуальная консоль управления нуждается в операционной системе, графической карте и других аппаратных требованиях, чтобы начать использование. Пожалуйста, обратитесь к таблице ниже для более подробной информации.
|
Операционная система |
Windows 10 (Выпуск 1809 и позднее) |
|
CPU |
Intel Core i7-7800X или выше |
|
Память |
8GB и больше |
|
Хранилище |
240GB или больше |
|
Графические карты |
GeForce GTX 1070 или выше с технологией NVIDIA CUDA 10.0 или выше. * ASUS GT470-2GD5 и ASUS 710-1-SL не поддерживаются. * Видеокарты AMD не поддерживаются . |
|
Armoury Crate |
Armoury Crate версии 2.4.0 и новее *Скачать Armoury Crate с сайта https://www.asus.com/ru/support. |
Как установить консоль Smart Control
1. Подключите кабель питания USB и USB сигнал порт к плате PRIME X299 EDITION 30.

2. Следуйте инструкциям по установке Armoury Crate, когда устройство подключено к сети Интернет.
3. Откройте заслонку камеры.
4. Откройте Armoury Crate, выберите устройство SMART CONTROL CONSOLE.

5. Установка ПО и библиотеки CUDA займет примерно 5-7 минут. После этого можно начать использовать консоль.
Обзор функций консоли Smart Control
Управление жестами
Вы можете следовать инструкциям для настройки жестов для управления консолью или настроить ваши функции в Armoury Crate.
Управление жестами — Пресеты жестов

1. Включите/Отключите управление жестами.
2. Выберите R, если вы правша или L , если левша.
3. Кликните на картинку для проверки значения жеста в разных сценариях.
|
Изображение |
|
|
|
Фото |
Предыдущее |
Следующее |
|
Видео |
Отмотать назад на 10 сек |
Отмотать вперед на 10 сек. |
|
Слайдшоу |
Предыдущее |
Следующее |
|
Музыка |
Предыдущий |
Следующий |


|
Изображение |
|
|
|
Окна |
Увеличить окна |
Уменьшить окна |
|
Фото |
Приблизить |
Отдалить |
|
Видео |
Полный экран |
Выход из полного экрана |
|
Слайдшоу |
Режим презентации |
Выход из презентации |


|
Изображение |
|
|
|
Функция |
Увеличить звук |
Уменьшить звук |


|
Изображения |
|
|
|
|
|
|
|
Функции |
Курсор |
Прокрутка наверх |
Прокрутка вниз |
Перетаскивание |
Левый клик |
Двойной левый клик |


Управление жестами — Настройка

1. Включите/Отключите управление жестами.
2. Выберите R, если вы правша или L , если левша.
3. Выберите изображение.
4. Выберите функцию из выпадающего меню.
5. Укажите вольтаж — CPU вольтаж, например, при выполнении «одного” жеста, консоль smart control отобразит CPU вольтаж на дисплее.

Управление жестами — Инструкции
Пожалуйста, следуйте инструкциям для выполнения жестов.
*Оптимальное расстояние от экрана составляет 80-100 см.

Управление голосом
Вы можете следовать инструкциям, чтобы использовать функцию голосового управления или настроить свою собственную функцию с помощью Armory Crate.
Управление голосом — Функциональные модули.

1. Скажите: “Привет, ASUS PRIME” или “Hi, ASUS PRIME” или запишите вашу команду приветствия.
*В качестве собственного приветствия произнесите одну и ту же голосовую команду три раза, чтобы установить наилучшую модель распознавания речи.
*Устройство распознает речь только того пользователя, который записал это приветствие, другие не смогут разбудить консоль с тем же словом.
2. Затем скажите команду из списка
|
Переключить жесты |
Отключить Aura Lighting |
|
Переключить Control Center |
Перевести в спящий режим |
|
Переключить Аудио |
Выключить ПК |
|
Следующий Aura эффект |
Перезагрузить ПК |
|
Включить подсветку Aura |
Разбудить ПК |
Управление голосом — Настройка

1. Включить/Отключить функцию управления голосом.
2. Выбрать профиль
3. Выбрать функциональные модули.
4. Записать голосовые команды горячих клавиш. Пожалуйста, следуйте инструкциям на экране, чтобы записать свою собственную команду.
*Устройство распознает речь только того пользователя, который записал это приветствие, другие не смогут разбудить консоль с тем же словом.
Управление голосом – Инструкция
Пожалуйста, следуйте шагам для настройки.
*Голосовые горячие клавиши должны быть записаны три раза.

OLED
OLED — мониторинг аппаратной части
Выберите из выпадающего меню панель OLED на вашем многофункциональном кулере для мониторинга системной информации.

OLED — Изображение или анимация
Загрузите пользовательское изображение / анимацию или выберите один из вариантов ниже. Изображение отобразится на панели OLED-дисплея.

OLED — Поьзовательский баннер
Выберите изображение и введите текст на английском языке, чтобы отобразить собственные строки на панели дисплея OLED.

Настройки
Настройте интеллектуальную консоль управления, чтобы включить систему, настроить яркость экрана автоматически и показать эффект выключения, нажав на поле.

Обновление ПО
Проверьте текущую версию вашей интеллектуальной панели управления.

FAQ
Вопрос: Какой гарантийный срок у интеллектуальной консоли управления?
Ответ: Гарантийный срок интеллектуальной консоли управления такой же, как у PRIME X299 EDITION 30. Этот период может составлять от 12 месяцев до 60 месяцев * («Гарантийный срок») с даты, когда продукт был впервые приобретен конечным покупателем.
*Пожалуйста, воспользуйтесь сайтом поддержки https://www.asus.com/support для изучения.
Вопрос: Я могу купить интеллектуальную консоль управления на сайте ASUS?
Ответ: нет, консоль не продается отдельно.
Вопрос: Я не могу найти интеллектуальное консольное устройство в Armory Crate. Что делать?
Ответ: Проверьте, правильно ли установлен Amoury Crate, а затем снова подключите консоль интеллектуального управления к материнской плате.
Вопрос: Как понять, что следует заменить или починить интеллектуальную консоль управления?
Ответ: Проверьте, открыта ли интеллектуальная консоль управления из Armory Crate, а затем убедитесь, что сигнал на интеллектуальной панели управления включен. Если нет, пожалуйста, свяжитесь с ASUS.
Вопрос: Некоторые функции не работают, что мне делать?
Ответ: Пожалуйста, обновите микропрограмму до последней версии, прежде чем использовать интеллектуальную консоль управления. Проверьте версию прошивки в DEVICE — Обновление прошивки.

- 32bit
64bitWindows 7 - 32bit
64bitWindows 8 - 32bit
64bitWindows 8.1 - 32bit
64bitWindows 10, Windows 11
DriverHub 1.0 Driver Utility Установите программу DriverHub и исправьте все проблемы с драйверами. Скачать
20.53 MB
- 64bitWindows 10, Windows 11
- Microsoft
- NVidia
30.0.14.9649
2021-10-20
- Display adapters
- Mice and other pointing devices
- NvModuleTracker
И еще 4
NVIDIA Graphic
NVIDIA Graphic Driver Скачать
854.65 MB
- 64bitWindows 10, Windows 11
- AMD
6.0.0.14
2021-07-13
- Display adapters
- Extension
- SoftwareComponent
И еще 2
AMD Graphic
AMD Graphics Driver for AMD processor in modern, mainstream laptops…
больше Скачать
401.23 MB
- 64bitWindows 10, Windows 11
- AMD
6.0.0.5
2021-05-12
- Display adapters
- Extension
- SoftwareComponent
И еще 2
AMD Graphic
AMD Graphics Driver for AMD processor in modern, mainstream laptops…
больше Скачать
401.03 MB
- 64bitWindows 10, Windows 11
- Microsoft
- NVidia
27.21.14.6235
2021-04-14
- Display adapters
- Mice and other pointing devices
- NvModuleTracker
И еще 4
NVIDIA Graphic
NVIDIA Graphic Driver Скачать
789.92 MB
- 64bitWindows 10, Windows 11
- RealTek
6.0.9132.1
2021-03-16
- Extension
- SoftwareComponent
- Sound, video and game controllers
Realtek Audio
Realtek Audio Driver, provide audio jack adjust to correct type th…
больше Скачать
15.84 MB
- 64bitWindows 10, Windows 11
- Intel
22.40.0.7
2021-03-03
- Extension
- Network adapters
- SoftwareComponent
Intel Wireless LAN
Intel Wireless LAN Driver
[Device list]
AX200 Скачать
12.35 MB
- 64bitWindows 10, Windows 11
- Microsoft
- NVidia
27.21.14.6173
2021-02-24
- Display adapters
- Mice and other pointing devices
- NvModuleTracker
И еще 4
NVIDIA Graphic Driver Скачать
646.37 MB
- 64bitWindows 10, Windows 11
- Intel
22.40.0.2
2021-02-16
- Bluetooth devices
Intel Bluetooth
Intel Bluetooth Driver
[Device list]
AX200 Скачать
21.27 MB
- 64bitWindows 10, Windows 11
- RealTek
6.0.9079.1
2020-12-08
- Extension
- SoftwareComponent
- Sound, video and game controllers
Realtek Audio
Realtek Audio Driver, provide audio jack adjust to correct type th…
больше Скачать
16.06 MB
- 64bitWindows 10, Windows 11
- AMD
1.2.0.117
2020-11-23
- SecurityDevices
- System devices
AMD Chipset
AMD Chipset Driver for AMD processor in modern, mainstream laptops d…
больше Скачать
7.32 MB
- 64bitWindows 10, Windows 11
- Intel
22.0.0.6
2020-09-17
- Extension
- Network adapters
- SoftwareComponent
Intel Wireless LAN
Intel Wireless LAN Driver Скачать
26.45 MB
- 64bitWindows 10, Windows 11
н/д н/д Другое ASUS NumberPad driver Скачать
2.23 MB
- 64bitWindows 10, Windows 11
н/д н/д Другое ASUS NumberPad driver Скачать
2.5 MB
- 64bitWindows 10, Windows 11
н/д н/д Другое ASUS Precision TouchPad Driver
ASUS Precision TouchPad Driver Скачать
3 MB
- 64bitWindows 10, Windows 11
н/д н/д Другое Realtek LAN Driver Скачать
4.39 MB
- 64bitWindows 10, Windows 11
н/д н/д Другое Wireless radio control driver
Provide airplane mode switch via hotkey. Скачать
2.37 MB
- 64bitWindows 10, Windows 11
н/д н/д Другое AMD Control Panel
This package includes the application for AMD Graphic Control…
больше Скачать
165.08 MB
- 64bitWindows 10, Windows 11
н/д н/д Другое MediaTek WLAN Driver
This package includes the MediaTek Wi-Fi Controller Driver,…
больше Скачать
4.12 MB
- 64bitWindows 10, Windows 11
н/д н/д Другое AMD Chipset
AMD Chipset Driver for AMD processor in modern, mainstream laptops d…
больше Скачать
4.05 MB
- 64bitWindows 10, Windows 11
н/д н/д Другое ROG Keyboard Firmware Update tool
«This app updated keyboard’s firmware to fix L…
больше Скачать
3.34 MB
- 64bitWindows 10, Windows 11
н/д н/д Другое AMD Raid Driver
This package include the AMD Raid Driver, to accelerate your dev…
больше Скачать
3.22 MB
- 64bitWindows 10, Windows 11
н/д н/д Другое NXP NFC Driver
This package includes the NXP Near Field Communication (NFC) Driv…
больше Скачать
2.5 MB
- 64bitWindows 10, Windows 11
н/д н/д Другое Realtek LAN Driver Скачать
3.61 MB
- 64bitWindows 10, Windows 11
н/д н/д Другое AMD Control Panel
This package includes the application for AMD Graphic Control…
больше Скачать
165.08 MB
- 64bitWindows 10, Windows 11
н/д н/д Другое MediaTek Bluetooth Driver
This package includes the MediaTek Bluetooth Driver, t…
больше Скачать
3.51 MB
- 64bitWindows 10, Windows 11
н/д н/д Другое AMD Raid Driver
This package include the AMD Raid Driver, to accelerate your dev…
больше Скачать
3.22 MB
- 64bitWindows 10, Windows 11
н/д н/д Другое ASUS Smart Display Control
Switch to a lower refresh rate to save power when you…
больше Скачать
27.83 MB
- 64bitWindows 10, Windows 11
н/д н/д Другое MediaTek WLAN Driver
This package includes the MediaTek Wi-Fi Controller Driver,…
больше Скачать
5.33 MB
Go to ASUSROG
r/ASUSROG
r/ASUSROG
ASUS Republic of Gamers
Members
Online
•
by
teenaxta
Asus Smart display control not working on windows 11 Asus G513 QR (refresh rate wont change automatically)
On windows 10, the refresh rate would change automatically when I would unplug by laptop, it would drop from 300hz to 60hz. And when I plugged it back in, it would jump to 300hz automatically, however on windows 11 its not switching the refresh rate. any idea on how to fix it?
[Notebook/Desktop/AIO] Troubleshooting — How to fix Display problem on External monitors
If you experience the problem of external monitors, such as abnormal display or audio is not working, please refer to the troubleshooting in this article.
Before troubleshooting, please make sure you have set up your external monitors properly. Here you can learn more about How to connect your PC to one or more external monitors with different connectors.
Note: Press the function key Windows key + P to make sure that you have selected the option you want.
Please go to the corresponding instruction based on the current Windows operating system on your computer:
- Windows 11
- Windows 10
Windows 11 operating system
Update and confirm BIOS / Windows packages / drivers with the latest version on your laptop
Updating software usually helps the system stability and optimization, so we recommend you check and often update to the latest version in your laptop. Here you can learn more about How to update BIOS:
How to use Winflash to update the BIOS version in Windows system
How to use EZ Flash to update the Notebook BIOS version
For executing Windows update and drivers update, here you can learn more about:
How to execute Windows Update
How to update drivers via customer support in MyASUS
If the problem persists after you have updated BIOS/Windows packages/drivers to the date, please continue to the next chapter for troubleshooting.
Check the hardware devices of your external monitors and cables
- Sometimes, the external devices connected to your computer can be the cause of external monitor problems, so please try to remove them, such as external hard drives, printers, memory cards, external ODD (if your computer is with internal ODD, please remove CD/DVDs), dongles, etc. After that, restart your computer.
If you don’t experience the issue after restarting your computer, the external device may be the cause of the problem. We recommend that you do not use this device and contact your device manufacturer for support. - Make sure the cable connecting your PC to your external monitor is secure. Try changing the cable connecting the external monitor. If the new one works, you know the previous cable was faulty.
- Make sure the input resource on the external monitor is the same as your using connector/cable. Such as the input resource is HDMI.
- Try using the external monitor with a different computer. This can help to isolate whether the issue is with the monitor or the computer.
If the problem persists after checking the basic hardware, please continue to the next chapter for troubleshooting.
Reset the display settings
Try using the following Microsoft hotkeys: Windows key + Ctrl + Shift + B to reset the display settings.
If the problem persists, please continue to the next chapter for troubleshooting.
Hard reset (EC reset)
- Please remove all external peripherals, such as external hard drives, printers, memory cards, external ODD (if your computer is with internal ODD, please remove CD/DVDs), dongles, etc.
- Power off the computer.
- Remove the AC adapter.
Note: Please don’t remove the AC adapter for ASUS laptop TP420IA and UX425IA model. (These models need to plug in the AC adapter to do the Hard reset process.) - Remove the battery (some model may not remove the battery, please continue to the next step).
- Press and hold Power Button for 40 seconds to do Hard reset.
- Re-install the AC adapter and battery, then power on the computer and check whether the problem is resolved or not. If the problem persists, please continue to the next chapter for troubleshooting.
Check the audio settings for the external monitor
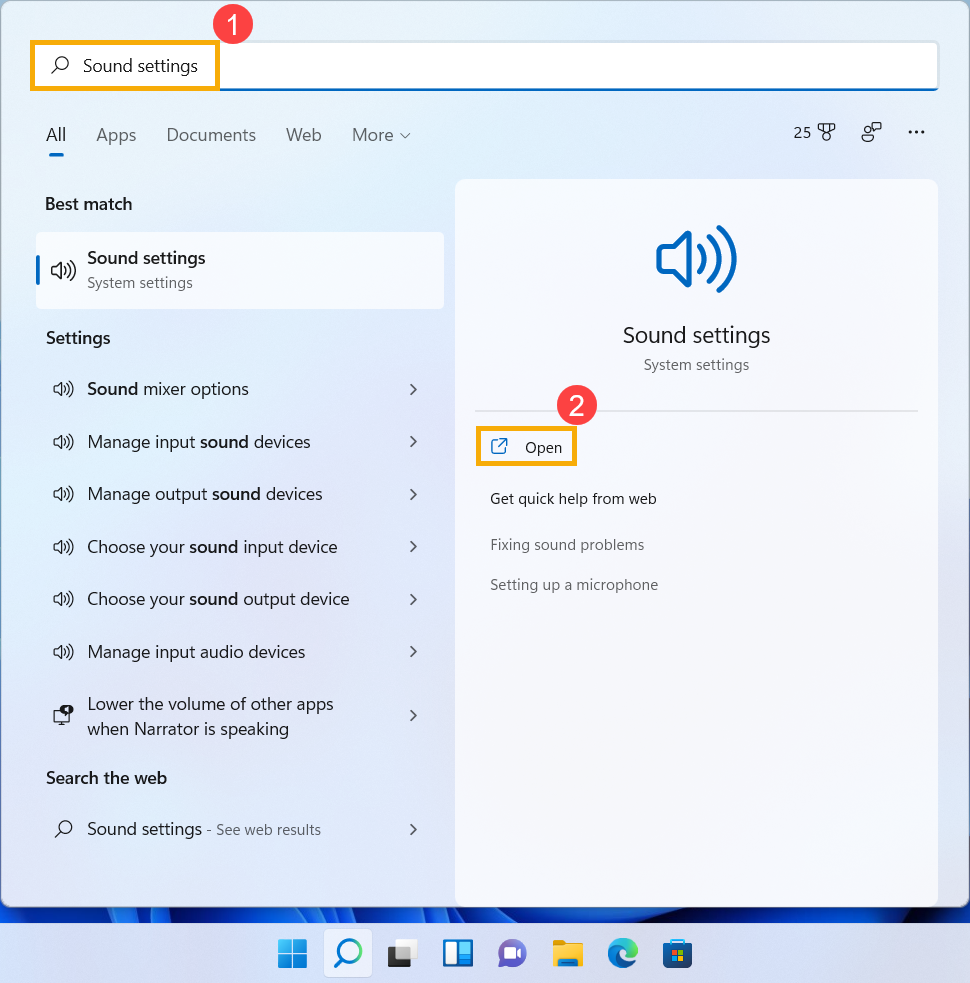
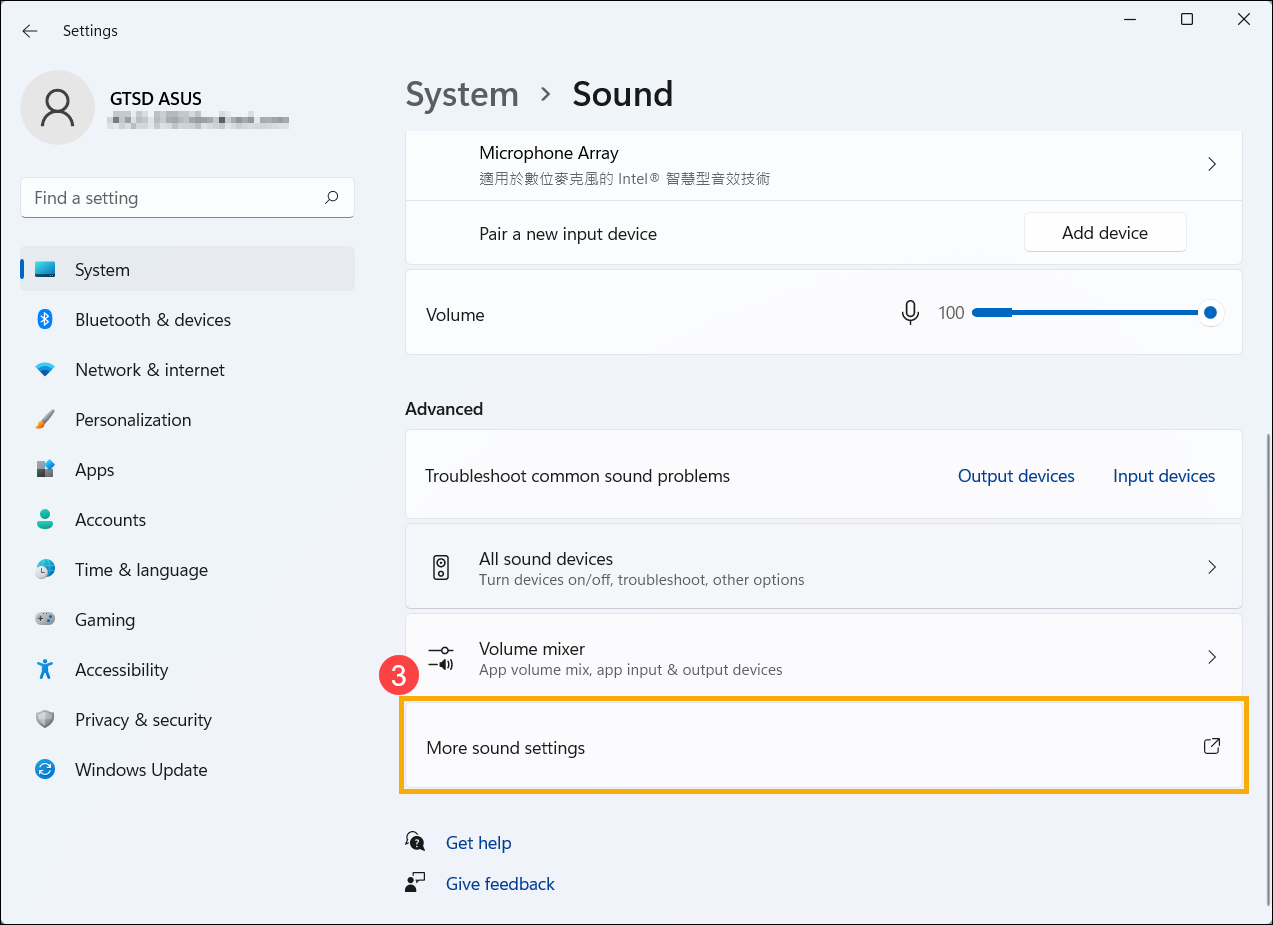
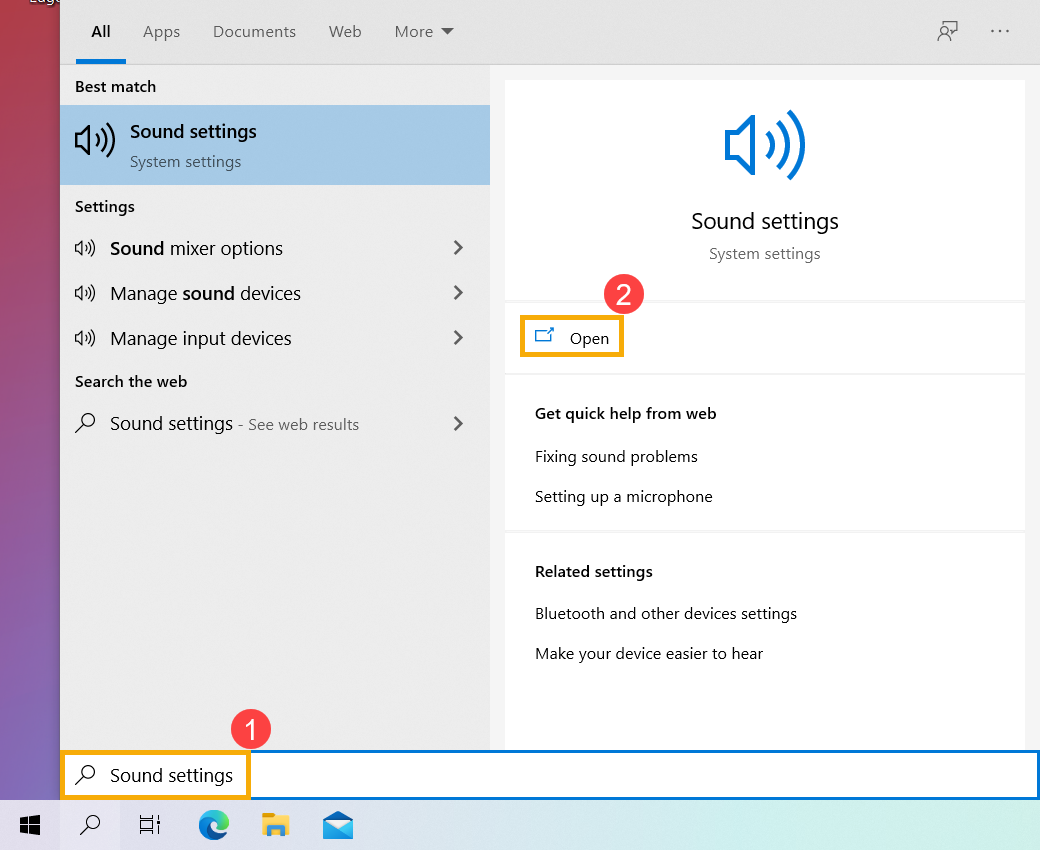
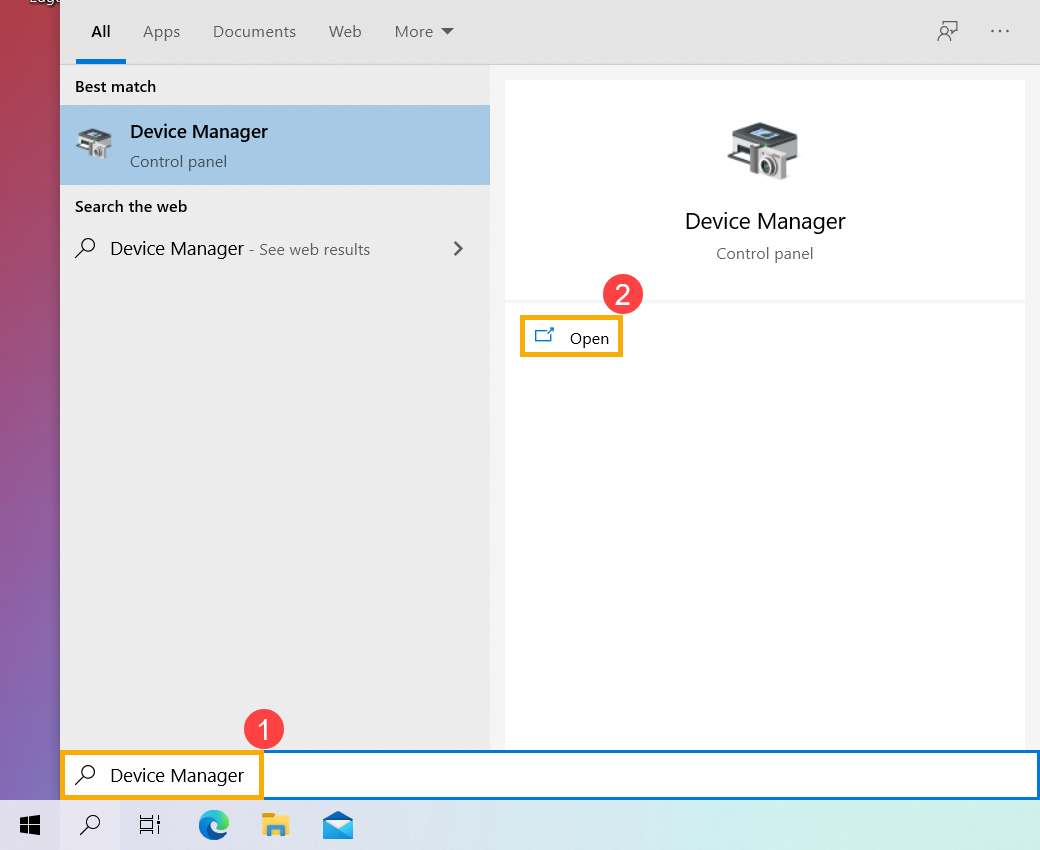
- Type and search [Sound settings] in the Windows search bar①, then click [Open]②.
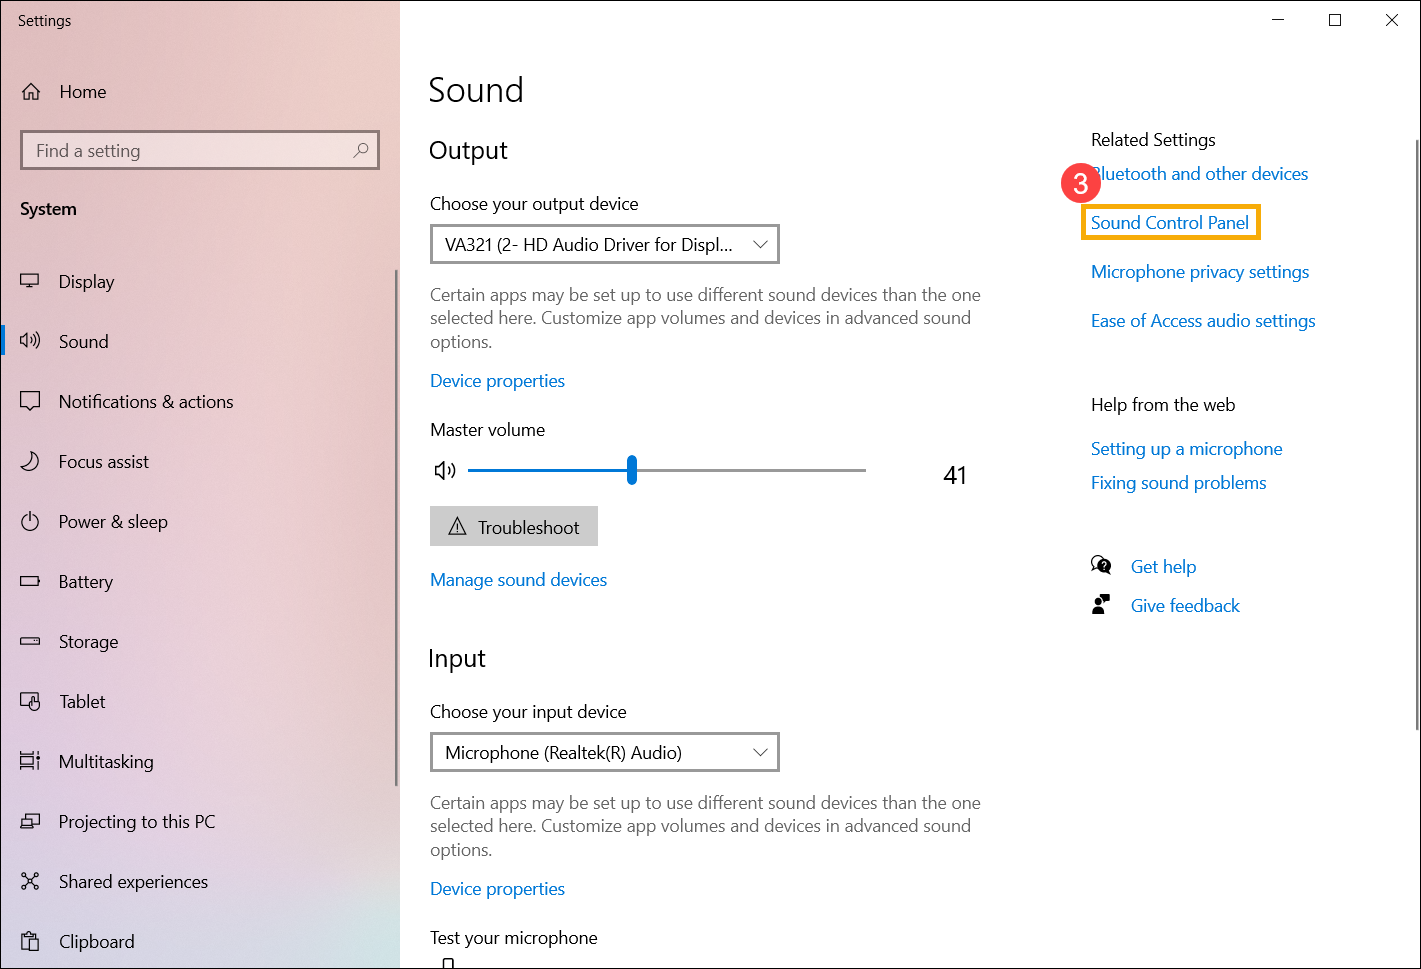
- Scroll down to the bottom of this page, then select [More sound settings]③.
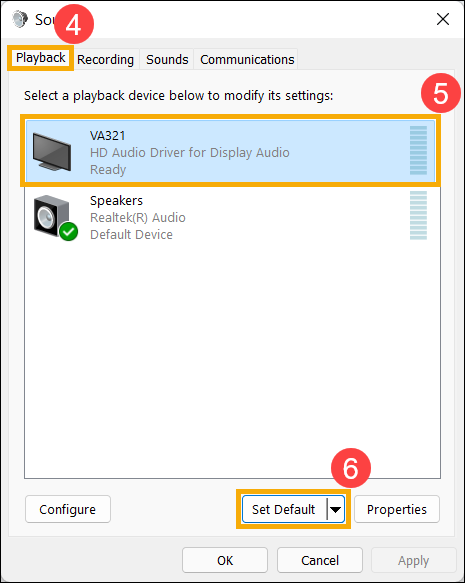
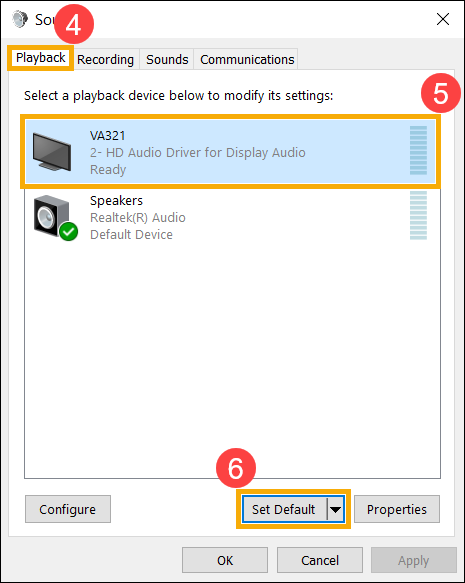
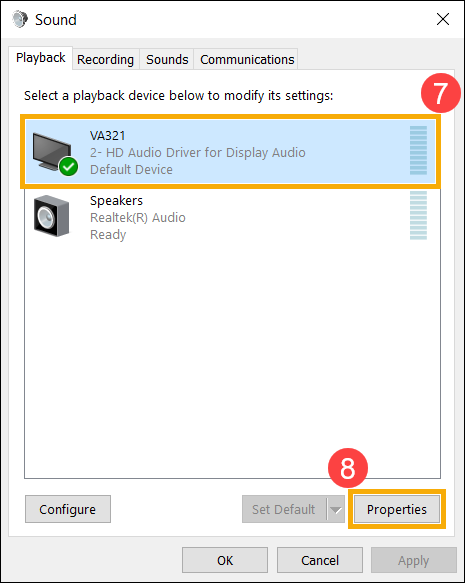
- Select [Playback] tab④, choose the external monitor you connected⑤, then select [Set Default]⑥.
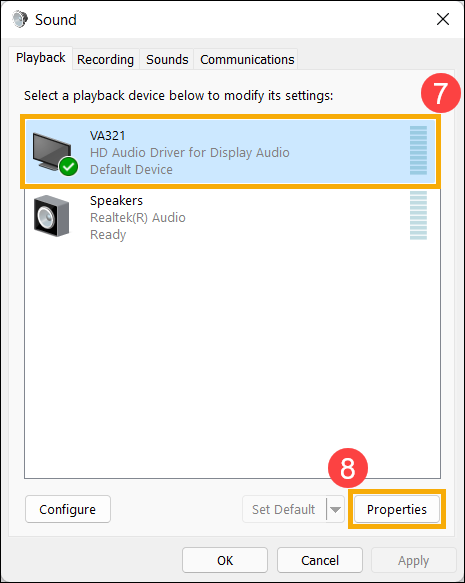
- Choose the external monitor you connected⑦, then select [Properties]⑧.
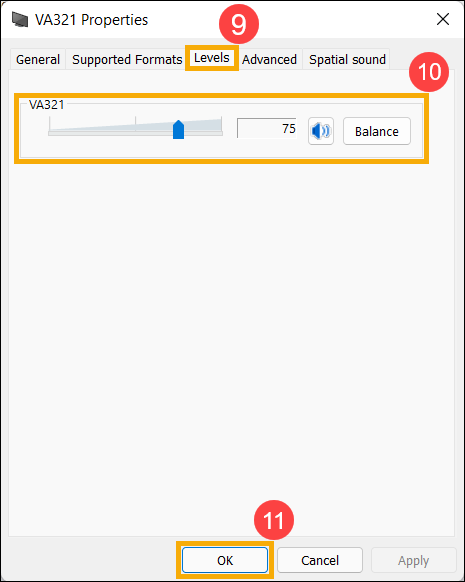
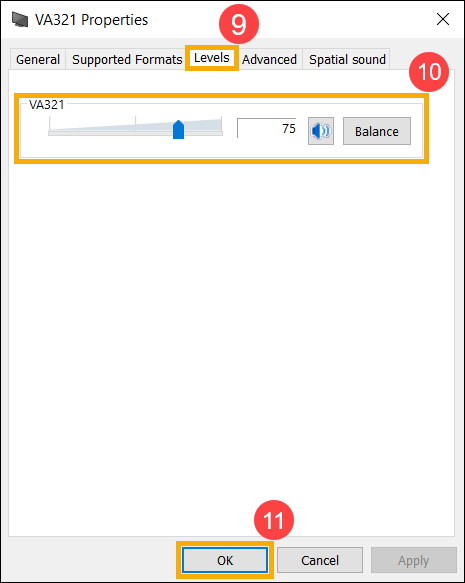
- Select [Levels]⑨, make sure the volume levels of the external monitor meet your expectation⑩, then select [OK]⑪.
Run Windows Troubleshooter
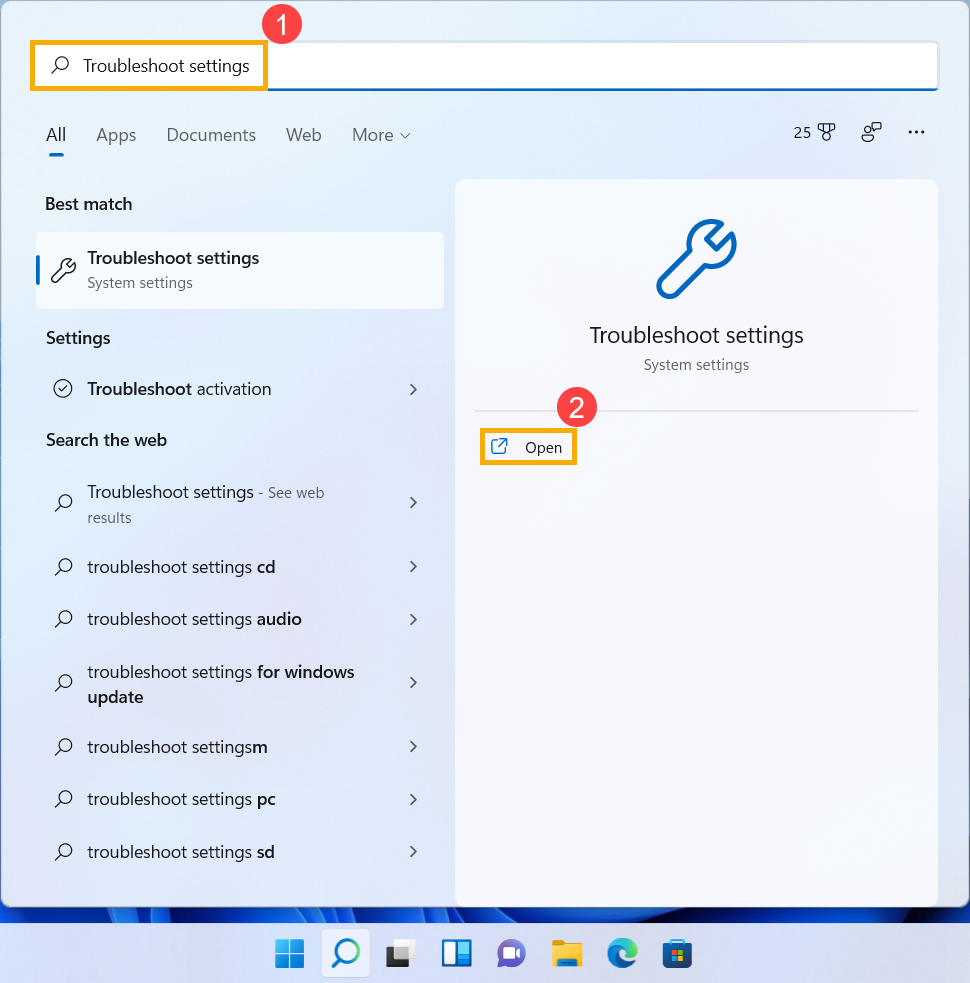
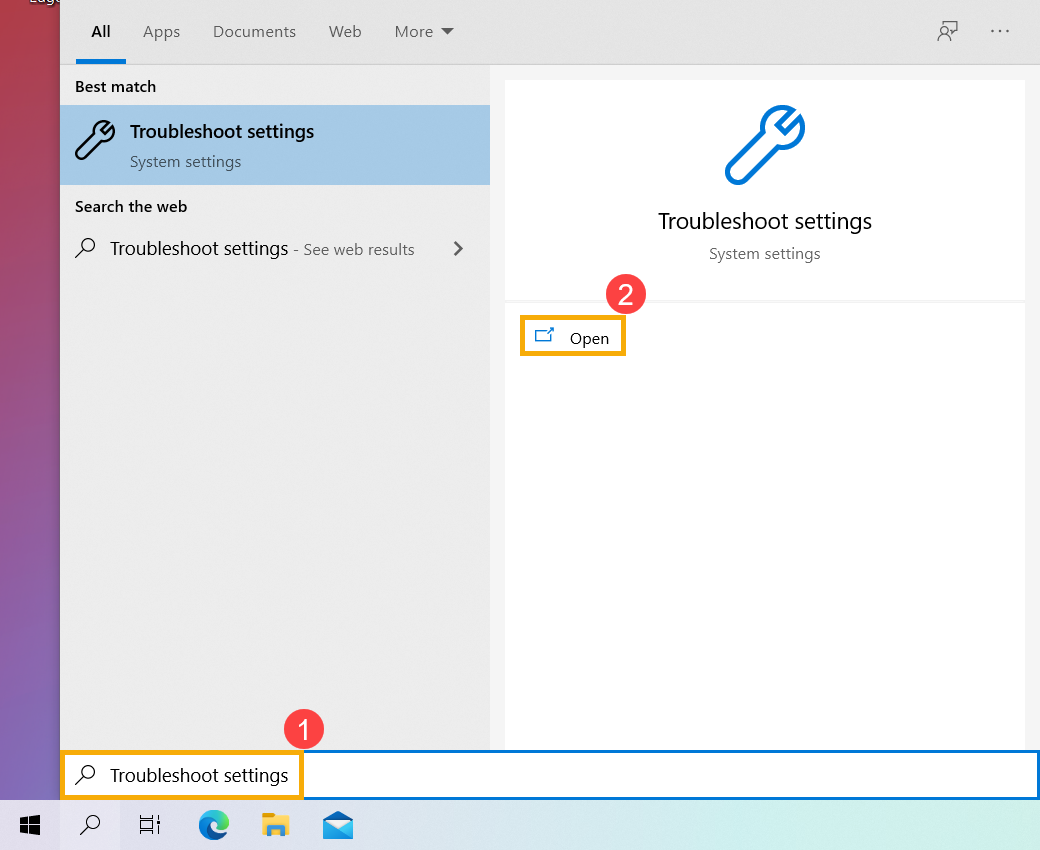
- Type and search [Troubleshoot settings] in the Windows search bar①, then click [Open]②.
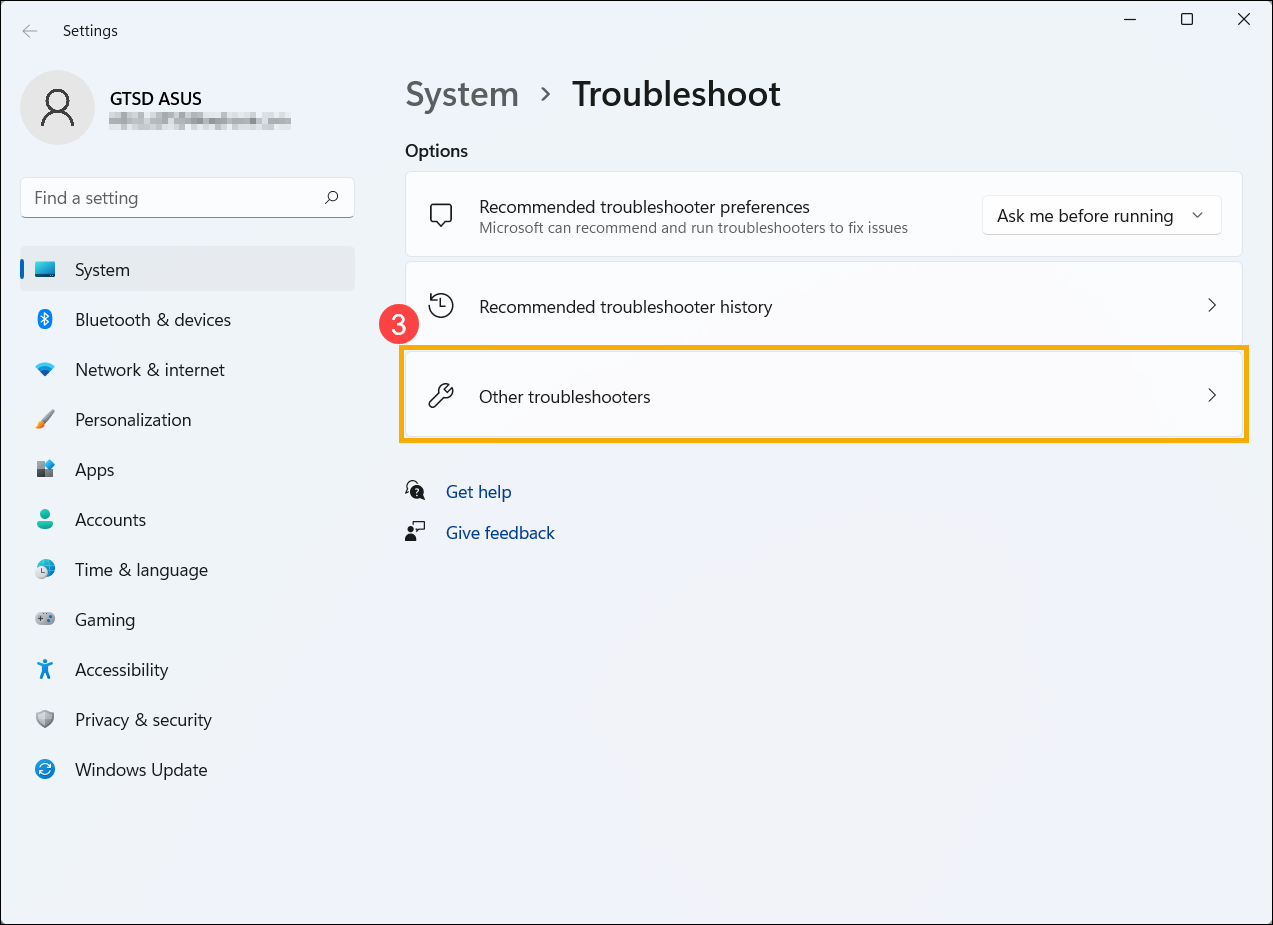
- Select [Other troubleshooters]③.
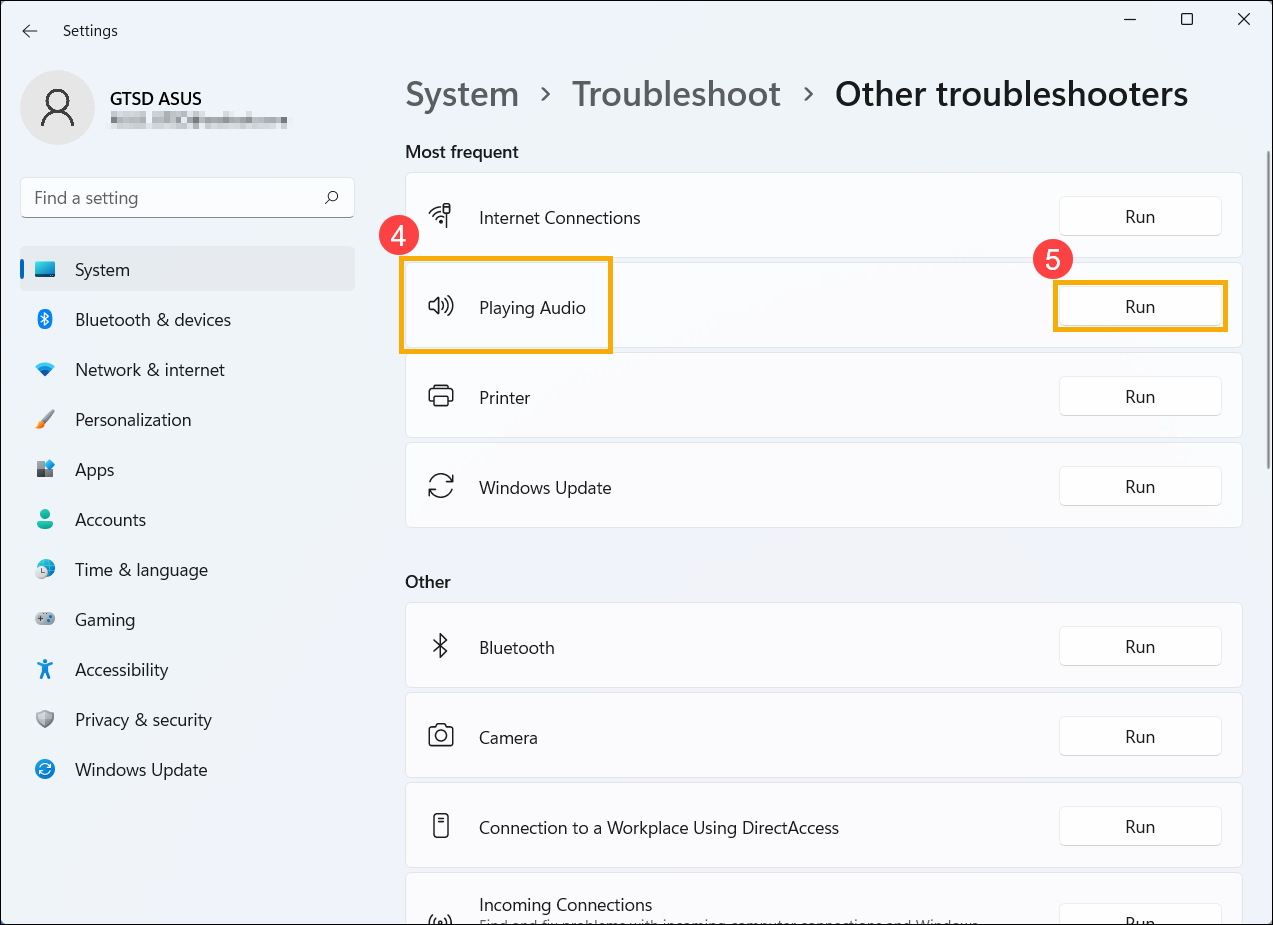
- Select [Playing Audio]④, then click [Run]⑤.
- Choose the external monitor you want to troubleshoot⑥, then select [Next]⑦.
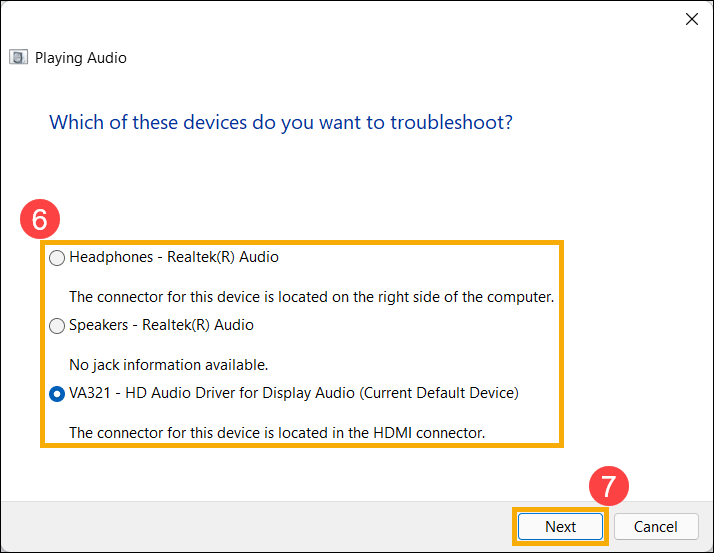
- Please read and follow the on-screen prompts to troubleshoot the connection problem of the external monitor.
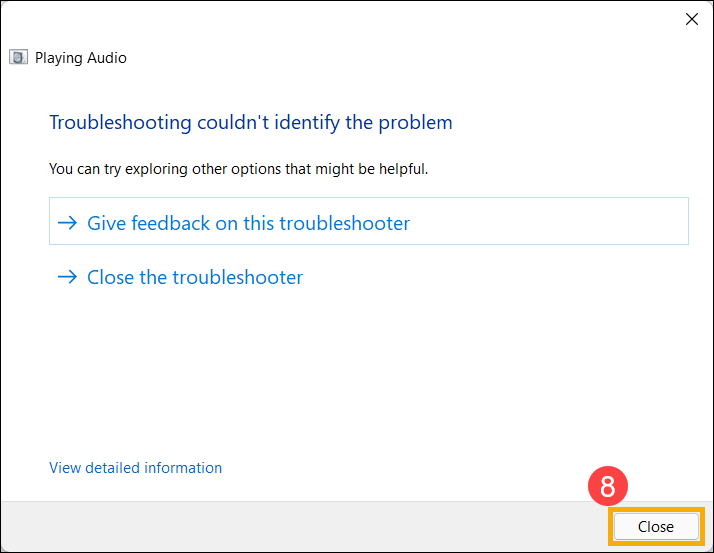
- If the problem persists after following the troubleshooter, please select [Close]⑧ and then continue to the next chapter for troubleshooting.
Reinstall graphics driver
Note: If your laptop is AMD platform of graphics, please refer to How to uninstall AMD chipset driver, otherwise, please refer to the following steps.
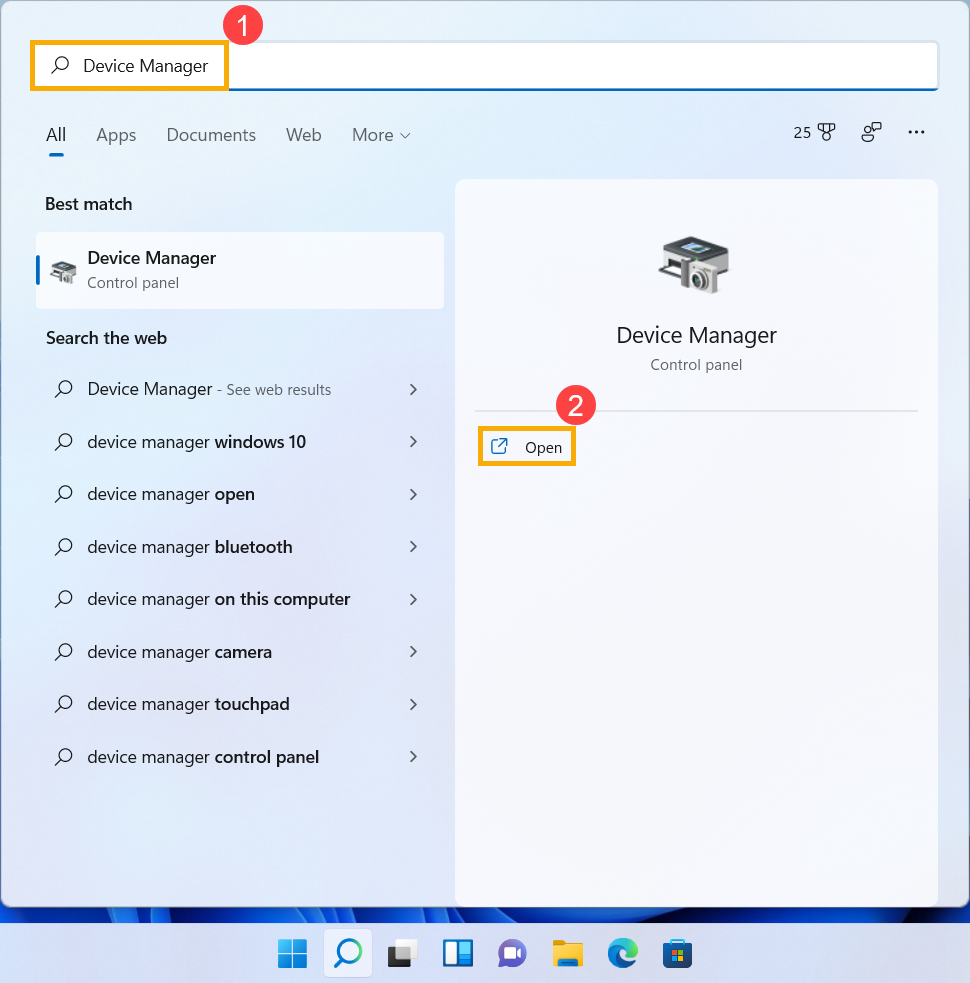
- Type and search [Device Manager] in the Windows search bar①, then click [Open]②.
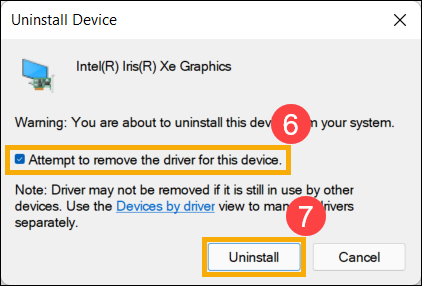
- Click the arrow next to [Display adapters]③, then right-click [your graphics]④ and select [Uninstall device]⑤.
Note: Some models possess both two graphics (so-called integrated & dedicated graphics, such as Intel & NVIDIA) and both can be seen in Device Manager. We suggest that you can follow step 2 and 3 to uninstall each graphics driver.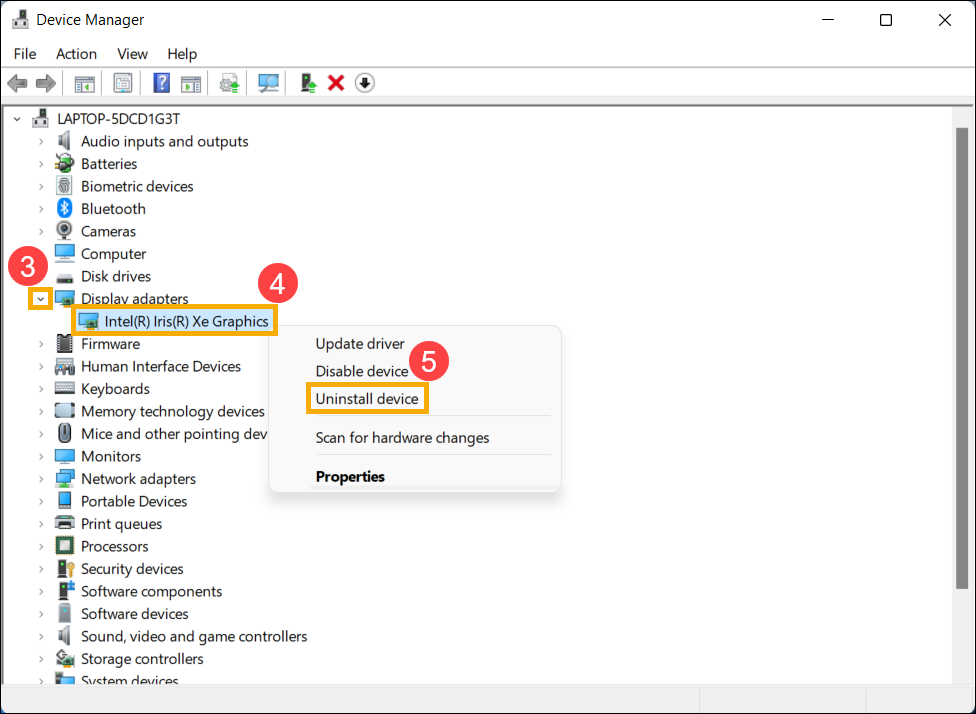
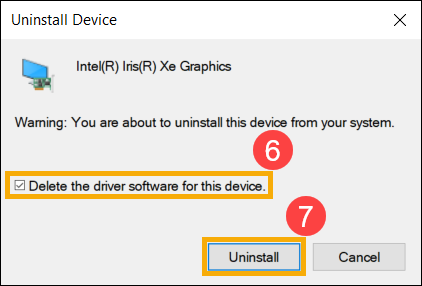
- Select [Attempt to remove the driver for this device]⑥, then select [Uninstall]⑦.
- After the graphics driver is uninstalled, please go to the ASUS support site to download and install the Fingerprint driver. Here you can learn more about How to search and download drivers.
Note: The following pictures are the current version as a reference, and please download the latest version from the ASUS Support Site.
Note: If your computer is with two graphics, please reinstall both drivers.
- If the problem persists after reinstalling the graphics driver, please continue to the next chapter for troubleshooting.
Restore the system from restore point
If the external monitor problem happens recently, and if you have ever created a restore point or there is an automatic system restore existed, try to restore the computer to a point before the problem began to resolve the problem. Here you can learn more about How to use restore point to restore the system.
If the problem persists, please continue to the next chapter for troubleshooting.
Reset your PC
If the problem persists after all troubleshooting steps are completed. Please backup your personal files, then reset the PC to back to its original configuration. Here you can learn more about:
How to reset the system and remove all of my personal files
How to reset the system and keep my personal files
If your problem is not worked out with above solution and information, please contact ASUS customer service center for further information.
Windows 10 operating system
Update and confirm BIOS / Windows packages / drivers with the latest version on your laptop
Updating software usually helps the system stability and optimization, so we recommend you check and often update to the latest version in your laptop. Here you can learn more about How to update BIOS:
How to use Winflash to update the BIOS version in Windows system
How to use EZ Flash to update the Notebook BIOS version
For executing Windows update and drivers update, here you can learn more about:
How to execute Windows Update
How to update drivers via customer support in MyASUS
If the problem persists after you have updated BIOS/Windows packages/drivers to the date, please continue to the next chapter for troubleshooting.
Check the hardware devices of your external monitors and cables
- Sometimes, the external devices connected to your computer can be the cause of external monitor problems, so please try to remove them, such as external hard drives, printers, memory cards, external ODD (if your computer is with internal ODD, please remove CD/DVDs), dongles, etc. After that, restart your computer.
If you don’t experience the issue after restarting your computer, the external device may be the cause of the problem. We recommend that you do not use this device and contact your device manufacturer for support. - Make sure the cable connecting your PC to your external monitor is secure. Try changing the cable connecting the external monitor. If the new one works, you know the previous cable was faulty.
- Make sure the input resource on the external monitor is the same as your using connector/cable. Such as the input resource is HDMI.
- Try using the external monitor with a different computer. This can help to isolate whether the issue is with the monitor or the computer.
If the problem persists after checking the basic hardware, please continue to the next chapter for troubleshooting.
Reset the display settings
Try using the following Microsoft hotkeys: Windows key + Ctrl + Shift + B to reset the display settings.
If the problem persists, please continue to the next chapter for troubleshooting.
Hard reset (EC reset)
- Please remove all external peripherals, such as external hard drives, printers, memory cards, external ODD (if your computer is with internal ODD, please remove CD/DVDs), dongles, etc.
- Power off the computer.
- Remove the AC adapter.
Note: Please don’t remove the AC adapter for ASUS laptop TP420IA and UX425IA model. (These models need to plug in the AC adapter to do the Hard reset process.) - Remove the battery (some model may not remove the battery, please continue to the next step).
- Press and hold Power Button for 40 seconds to do Hard reset.
- Re-install the AC adapter and battery, then power on the computer and check whether the problem is resolved or not. If the problem persists, please continue to the next chapter for troubleshooting.
Check the audio settings for the external monitor
- Type and search [Sound settings] in the Windows search bar①, then click [Open]②.
- Select [Sound Control Panel]③.
- Select [Playback] tab④, choose the external monitor you connected⑤, then select [Set Default]⑥.
- Choose the external monitor you connected⑦, then select [Properties]⑧.
- Select [Levels]⑨, make sure the volume levels of the external monitor meet your expectation⑩, then select [OK]⑪.
Run Windows Troubleshooter
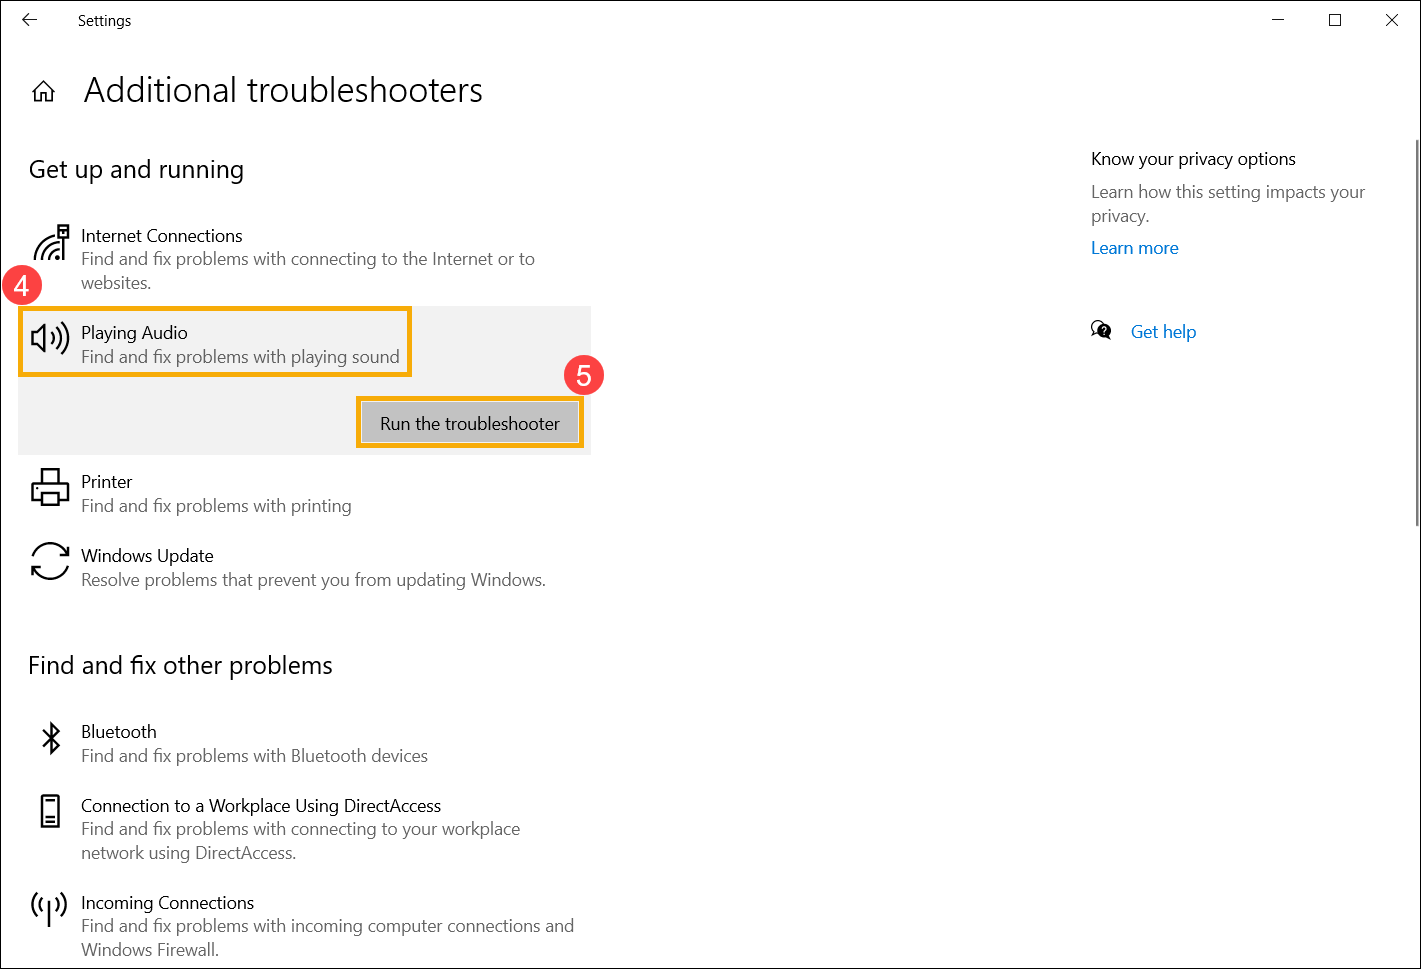
- Type and search [Troubleshoot settings] in the Windows search bar①, then click [Open]②.
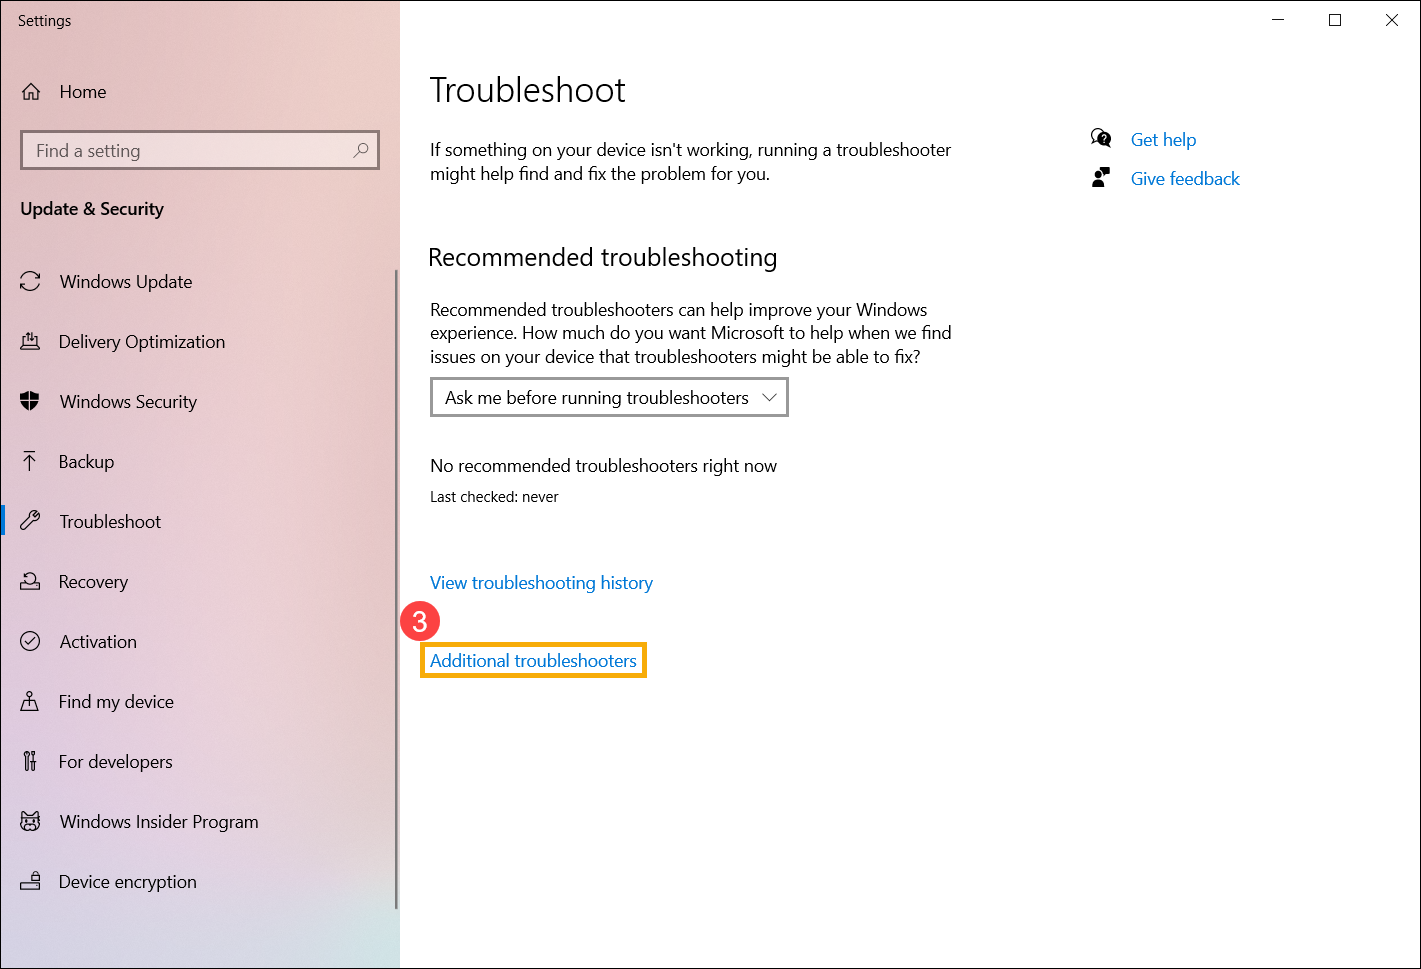
- Select [Additional troubleshooters]③.
- Select [Playing Audio]④, then click [Run the troubleshooter]⑤.
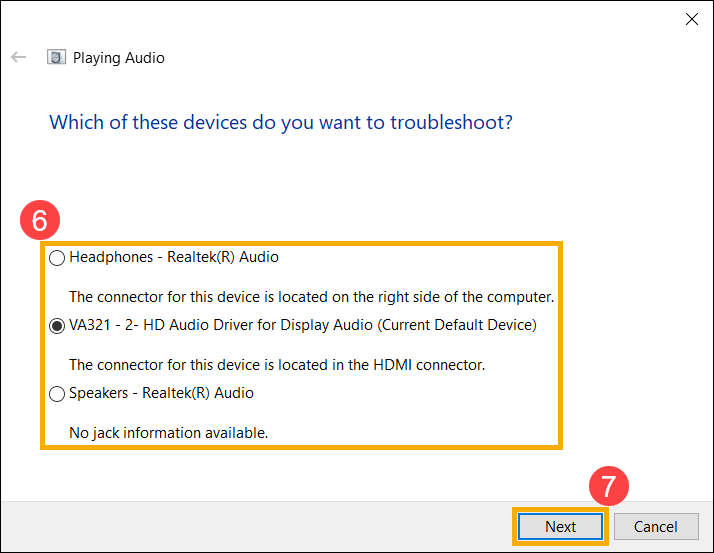
- Choose the external monitor you want to troubleshoot⑥, then select [Next]⑦.
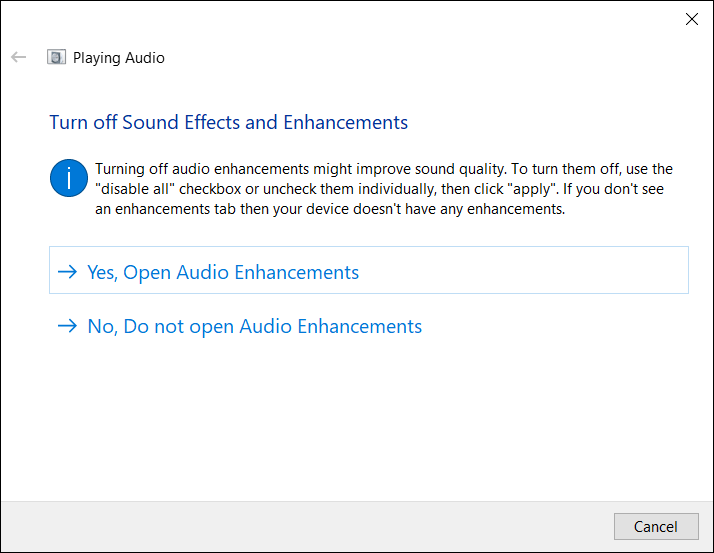
- Please read and follow the on-screen prompts to troubleshoot the connection problem of the external monitor.
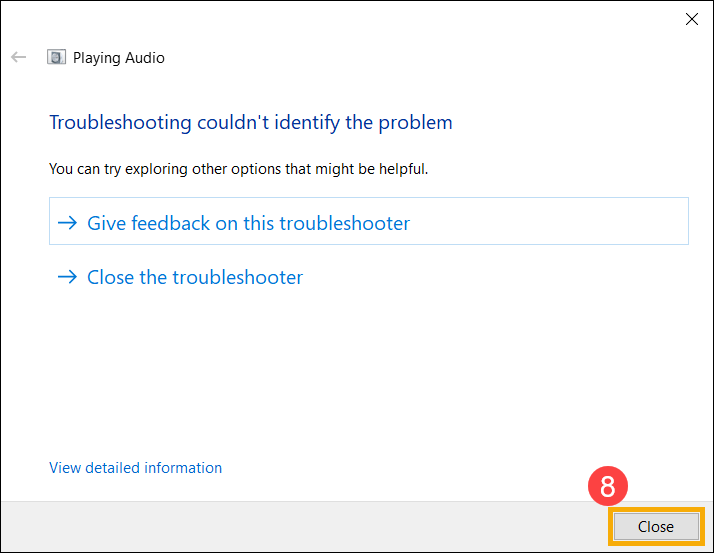
- If the problem persists after following the troubleshooter, please select [Close]⑧ and then continue to the next chapter for troubleshooting.
Reinstall graphics driver
Note: If your laptop is AMD platform of graphics, please refer to How to uninstall AMD chipset driver, otherwise, please refer to the following steps.
- Type and search [Device Manager] in the Windows search bar①, then click [Open]②.
- Click the arrow next to [Display adapters]③, then right-click [your graphics]④ and select [Uninstall device]⑤.
Note: Some models possess both two graphics (so-called integrated & dedicated graphics, such as Intel & NVIDIA) and both can be seen in Device Manager. We suggest that you can follow step 2 and 3 to uninstall each graphics driver.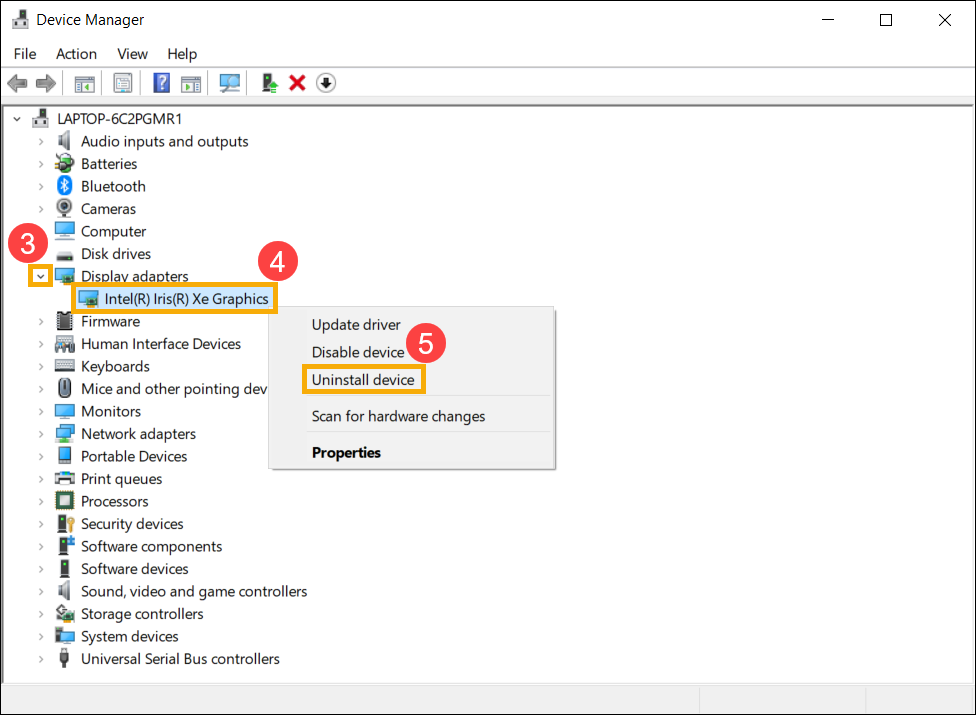
- Select [Delete the driver software for this device]⑥, then select [Uninstall]⑦.
- After the graphics driver is uninstalled, please go to the ASUS support site to download and install the Fingerprint driver. Here you can learn more about How to search and download drivers.
Note: The following pictures are the current version as a reference, and please download the latest version from the ASUS Support Site.
Note: If your computer is with two graphics, please reinstall both drivers.
- If the problem persists after reinstalling the graphics driver, please continue to the next chapter for troubleshooting.
Restore the system from restore point
If the external monitor problem happens recently, and if you have ever created a restore point or there is an automatic system restore existed, try to restore the computer to a point before the problem began to resolve the problem. Here you can learn more about How to use restore point to restore the system.
If the problem persists, please continue to the next chapter for troubleshooting.
Reset your PC
If the problem persists after all troubleshooting steps are completed. Please backup your personal files, then reset the PC to back to its original configuration. Here you can learn more about:
How to reset the system and remove all of my personal files
How to reset the system and keep my personal files
If your problem is not worked out with above solution and information, please contact ASUS customer service center for further information.
Process Detail
What is ASUSSmartDisplayControl.exe ?
ASUSSmartDisplayControl.exe is known as ASUS Smart Display Control and it is developed by ASUSTeK Computer INC. , it is also developed by . We have seen about 17 different instances of ASUSSmartDisplayControl.exe in different location. So far we haven’t seen any alert about this product. If you think there is a virus or malware with this product, please submit your feedback at the bottom.
ASUSSmartDisplayControl.exe
Something wrong with ASUSSmartDisplayControl.exe ?
Is ASUSSmartDisplayControl.exe using too much CPU or memory ? It’s probably your file has been infected with a virus. Let try the program named DriverIdentifier to see if it helps.
How to remove ASUSSmartDisplayControl.exe
If you encounter difficulties with ASUSSmartDisplayControl.exe , you can uninstall the associated program (Start > Control Panel > Add/Remove programs
What can you do to fix ASUSSmartDisplayControl.exe ?
Let try to run a system scan with Speed Up My PC to see any error, then you can do some other troubleshooting steps.
If you think this is a driver issue, please try DriverDouble.com
Where do we see ASUSSmartDisplayControl.exe ?
Here is the list of instances that we see for the process: ASUSSmartDisplayControl.exe
| Path | Product Name | Vendor | Version | Size | MD5 | |
| 1 | C:Program Files (x86)ASUSASUS Smart Display ControlASUSSmartDisplayControl.exe | ASUS Smart Display Control | ASUSTeK Computer INC. | 1.0.0.0 | 143840 | 2FFAF5A2830FB91027FFF69E87F7E168 |
| 2 | C:Program Files (x86)ASUSASUS Smart Display ControlASUSSmartDisplayControl.exe | ASUS Smart Display Control | ASUSTeK Computer INC. | 1.0.0.0 | 143960 | 151206581F852A8AF9303A449B2ACF45 |
| 3 | C:Program Files (x86)ASUSASUS Smart Display ControlASUSSmartDisplayControl.exe | ASUS Smart Display Control | ASUSTeK Computer INC. | 1.0.0.0 | 145120 | 5D2F29C5CE8BF0A256E619BA08B355BB |
| 4 | C:Program Files (x86)ASUSASUS Smart Display ControlASUSSmartDisplayControl.exe | ASUS Smart Display Control | ASUSTeK Computer INC. | 1.0.0.0 | 147632 | 849DF573217285ED2F9E3498B8E04868 |
| 5 | C:Program Files (x86)ASUSASUS Smart Display ControlASUSSmartDisplayControl.exe | ASUS Smart Display Control | ASUSTeK Computer INC. | 1.2.0.0 | 178864 | C1D65326C21E417CF1722CC70460352A |
| 6 | C:Program Files (x86)ASUSASUS Smart Display ControlASUSSmartDisplayControl.exe | ASUS Smart Display Control | ASUSTeK Computer INC. | 1.2.0.0 | 175792 | 96D7DC90AD2788287B68703A5F82394A |
| 7 | C:Program Files (x86)ASUSASUS Smart Display ControlASUSSmartDisplayControl.exe | ASUS Smart Display Control | ASUSTeK Computer INC. | 1.0.0.0 | 149680 | 3E170E682050110294ABE5F65ED30E54 |
| 8 | C:Program Files (x86)ASUSASUS Smart Display ControlASUSSmartDisplayControl.exe | ASUS Smart Display Control | ASUSTeK Computer INC. | 1.0.0.0 | 145128 | FDC6CBF7410E2089D6C43AE65023E265 |
| 9 | C:Program Files (x86)ASUSASUS Smart Display ControlASUSSmartDisplayControl.exe | ASUS Smart Display Control | ASUSTeK Computer INC. | 1.2.0.0 | 752640 | 2A371CA1C5E9B3D12038ED707764C103 |
| 10 | C:Program Files (x86)ASUSASUS Smart Display ControlASUSSmartDisplayControl.exe | ASUS Smart Display Control | ASUSTeK Computer INC. | 1.0.0.0 | 72089 | 188E3C73B0CB4D008584B702A100137C |
| 11 | C:Program Files (x86)ASUSASUS Smart Display ControlASUSSmartDisplayControl.exe | ASUS Smart Display Control | ASUSTeK Computer INC. | 1.0.0.0 | 71628 | D1A6A1014CB034E834389979EB300909 |
| 12 | C:Program Files (x86)ASUSASUS Smart Display ControlASUSSmartDisplayControl.exe | ASUS Smart Display Control | ASUSTeK Computer INC. | 1.0.0.0 | 718848 | 1137C6B5125EF800B4092AC72A67678E |
| 13 | C:Program Files (x86)ASUSASUS Smart Display ControlASUSSmartDisplayControl.exe | ASUS Smart Display Control | ASUSTeK Computer INC. | 1.0.0.0 | 150760 | F40F052DF1BC478B97DCAA33652699BB |
| 14 | C:Program Files (x86)ASUSASUS Smart Display ControlASUSSmartDisplayControl.exe | ASUS Smart Display Control | ASUSTeK Computer INC. | 1.2.0.0 | 179944 | B947250598852D88F61BB0E53B3870DD |
| 15 | C:Program Files (x86)ASUSASUS Smart Display ControlASUSSmartDisplayControl.exe | ASUS Smart Display Control | ASUSTeK Computer INC. | 1.0.0.0 | 71884 | D6FA02B8970B3CCA1124BE38D41A3961 |
| 16 | C:Program Files (x86)ASUSASUS Smart Display ControlASUSSmartDisplayControl.exe | ASUS Smart Display Control | ASUSTeK Computer INC. | 1.0.0.0 | 152216 | 889CCA4DE7CA95FA3560FF5DB4A0DC62 |
| 17 | C:Program Files (x86)ASUSASUS Smart Display ControlASUSSmartDisplayControl.exe | 14384 | ||||
 Comments about this process:
Sharing your feedback about this process or ask for help
Содержание
- Краткое описание Asus Smart Display Control
- Что такое Asus Smart Display Control
- Преимущества использования Asus Smart Display Control
- Доступность функций через голосовой помощник
- Контроль работы умного дома в одном приложении
- Как использовать Asus Smart Display Control
- Подключение устройства к голосовому помощнику
- Настройка связей с другими устройствами умного дома
- Выводы о использовании Asus Smart Display Control
- Вопрос-ответ
- Что такое Asus Smart Display Control?
- Какой нужен гаджет для работы с Asus Smart Display Control?
- Как подключить монитор к Asus Smart Display Control?
- Какие функции можно управлять через Asus Smart Display Control?
- Могу ли я использовать Asus Smart Display Control с не Asus монитором?
Asus Smart Display Control – это удобный и функциональный инструмент, который предназначен для управления экранами на устройствах компании Asus. Это приложение дает возможность управлять настройками монитора, проводить калибровку цветовой гаммы и настраивать параметры изображения.
Благодаря Asus Smart Display Control, пользователи могут получить максимально качественное изображение на своем экране. Настройки приложения позволяют создавать индивидуальные профили, устанавливать параметры изображения для работы, игр или просмотра фильмов и сериалов.
Интерфейс Asus Smart Display Control легок в использовании и интуитивно понятен. В приложении есть возможность быстро переключаться между профилями настроек, что оказывается особенно удобным при работе с многочисленными приложениями. К тому же, настройки Asus Smart Display Control можно синхронизировать между несколькими устройствами, что позволит сохранить одинаковые настройки для всех экранов, используемых пользователем.
Краткое описание Asus Smart Display Control
Asus Smart Display Control (ASDC) — это приложение для управления устройством Asus Smart Display. Оно позволяет пользователям настроить экран и функциональность устройства через свои смартфоны или планшеты.
Приложение ASDC предоставляет ряд функций, таких как настройка яркости экрана, выбор температуры цвета экрана и установка различных режимов экономии энергии. Оно также дает возможность настроить желаемые опции управления голосом, сторонними приложениями и многими другими функциями.
ASDC поддерживает более 13000 устройств с функцией голосового управления. Оно также позволяет настроить и использовать Siri, Google Assistant и Amazon Alexa для контроля устройства. Кроме того, с помощью ASDC вы можете настроить свой собственный голосовой ассистент и настраивать его функциональность на свое усмотрение.
Все эти функции делают ASDC не только удобным, но и мощным инструментом для управления устройством Asus Smart Display и его функциональностью.
Что такое Asus Smart Display Control
Asus Smart Display Control — это программа, которая позволяет управлять смарт-дисплеем Asus с компьютера, смартфона или планшета.
С помощью Asus Smart Display Control можно отображать на смарт-дисплее фотографии, видео, музыку, а также различный контент из Интернета, такой как погоду, новости и другое. Кроме того, программа позволяет управлять настройками смарт-дисплея, такими как яркость, звук и другие параметры.
Asus Smart Display Control поддерживает несколько языков и может работать с различными моделями смарт-дисплеев Asus, такими как Asus MB16AC или Asus ZenScreen.
Для использования Asus Smart Display Control необходимо установить программу на устройство, подключенное к смарт-дисплею, а также на сам смарт-дисплей. После этого можно начать использовать различные функции и настройки программы, чтобы получить оптимальный опыт использования смарт-дисплея Asus.
Преимущества использования Asus Smart Display Control
Asus Smart Display Control — это инновационная технология, которая помогает управлять мультимедийным устройством, находясь в любой точке дома.
Одним из преимуществ этой технологии является возможность управлять мультимедийным центром или телевизором не только с пульта, который может потеряться или сломаться, но и с вашего смартфона на базе Android.
Все, что вам нужно сделать, это скачать приложение Asus Smart Display Control на свой смартфон и подключить его к мультимедийному устройству. После этого вы сможете управлять функциями устройства с помощью своего смартфона.
Asus Smart Display Control также имеет удобный интерфейс, который позволяет легко настроить параметры устройства, включая яркость, контрастность и т. д.
Кроме того, управление мультимедийным устройством с помощью Asus Smart Display Control является более удобным, чем использование пульта, особенно если вы смотрите телевизор в полной темноте или находитесь далеко от устройства.
Доступность функций через голосовой помощник
Asus Smart Display Control – это устройство, которое позволяет управлять умным дисплеем Asus с помощью голосовых команд. Теперь вы можете наслаждаться всеми возможностями своего дисплея, не используя руки!
Голосовой помощник – это одна из самых удобных функций устройства. С его помощью вы можете выполнять все основные задачи, такие как настройка будильника, переключение между приложениями, включение и выключение устройства и многое другое. Для этого вам нужно просто произнести «Ok Google» и вы сможете начать голосовой диалог с умным дисплеем.
Голосовой помощник также позволяет вам управлять другими устройствами, которые подключены к вашему умному дисплею. Например, вы можете попросить устройство включить свет или телевизор, если они подключены к этому дисплею.
Возможности голосового помощника Asus Smart Display Control не ограничиваются только этими функциями. С его помощью вы можете управлять вашим дисплеем настолько детально, насколько вам это нужно. Достаточно лишь произнести команду, и вы сможете наслаждаться всеми удобствами умного дисплея Asus.
Контроль работы умного дома в одном приложении
С помощью приложения Asus Smart Display Control вы можете легко управлять умным домом в одном месте. Это приложение предоставляет доступ к различным устройствам: от умных колонок и экранов до умных розеток и светильников.
Одним из преимуществ этого приложения является возможность управления устройствами через голосовые команды. Вы можете контролировать все устройства с помощью голоса, без необходимости касаться экрана или нажимать на кнопки. Это очень удобно, особенно когда вы заняты чем-то еще, например готовкой или работой.
Asus Smart Display Control также позволяет создавать автоматические действия, называемые «сценарии». Например, вы можете создать сценарий «Уход из дома», который выключит все устройства, кроме камер видеонаблюдения. Этот сценарий можно выполнить с помощью голосовой команды.
Кроме того, приложение позволяет настраивать расписание для каждого устройства. Вы можете выбрать время, когда устройство будет автоматически включаться или выключаться. Например, вы можете настроить свет в гостиной таким образом, чтобы он автоматически выключался в определенное время вечером, экономя электроэнергию.
Вывод: Asus Smart Display Control — это отличное приложение для управления умным домом. Оно обеспечивает легкий и удобный контроль над различными устройствами, позволяет создавать сценарии и настраивать расписание для каждого устройства. К тому же, возможность управления голосом делает его еще более удобным для использования.
Как использовать Asus Smart Display Control
Asus Smart Display Control – это удобный инструмент, который позволяет управлять обзорной панелью настройки мониторов, на которых работают ПК и ноутбуки Asus. В этой статье мы расскажем, как использовать данную функцию и какие возможности она предоставляет.
Шаг 1: Установите приложение
Первым шагом необходимо установить приложение Asus Smart Display Control на свое устройство с операционной системой Windows 10. Программа доступна бесплатно в магазине Microsoft Store. После установки и запуска приложения, на рабочем столе появится ярлык Asus Smart Display Control.
Шаг 2: Подключите устройство
Для начала использования Asus Smart Display Control необходимо подключить устройство, на котором будет управлять монитором, к монитору. Это может быть ПК или ноутбук Asus с разъемом HDMI. При подключении устройства к монитору, на экране монитора появится уведомление о подключении нового устройства. Необходимо дать согласие на управление монитором через устройство.
Шаг 3: Откройте приложение
После подключения устройства к монитору откройте приложение Asus Smart Display Control на своем ПК или ноутбуке. Приложение автоматически определит все доступные устройства и выведет их на экран в виде списка.
Шаг 4: Настройка монитора
Для настройки монитора необходимо выбрать устройство, с которым вы хотите работать, и нажать на кнопку «Управление настройками». В открывшемся окне вы сможете настроить яркость, контрастность, цветовую гамму и другие параметры монитора. Также вы можете установить монитор в режим общего доступа для всех устройств в сети.
В заключении, Asus Smart Display Control – удобный инструмент, который поможет вам управлять настройками монитора и получить лучшее качество изображения. Просто следуйте инструкциям и настройте монитор в соответствии с вашими потребностями!
Подключение устройства к голосовому помощнику
Для использования функций голосового помощника на вашем Asus Smart Display Control, вам потребуется подключить устройство к одной из поддерживаемых платформ голосового управления.
Некоторые из самых популярных голосовых помощников, поддерживаемых на Asus Smart Display Control, включают в себя Google Assistant, Amazon Alexa и Microsoft Cortana.
Для подключения вашего устройства к голосовому помощнику, необходимо выполнить следующие шаги:
- Откройте приложение голосового помощника на вашем мобильном устройстве или компьютере.
- Перейдите в настройки подключенных устройств и выберите опцию «Добавить устройство».
- Выберите Asus Smart Display Control из списка поддерживаемых устройств.
- Следуйте дальнейшим инструкциям по настройке вашего устройства.
После успешного подключения ваш Asus Smart Display Control будет готов к использованию функций голосового помощника. Вы можете использовать голосовые команды для управления устройством и выполнения различных задач, включая поиск в Интернете, настройку напоминаний и смарт-дом устройств.
Настройка связей с другими устройствами умного дома
Asus Smart Display Control может быть полезен не только для управления устройствами Asus, но и для связи с другими умными устройствами для дома. Для этого необходимо выполнить следующие действия:
- Убедиться, что устройства, с которыми необходимо установить связь, поддерживают один из протоколов Smart Home, таких как Z-Wave или ZigBee.
- Запустить приложение Asus Smart Display Control и открыть раздел «Устройства».
- Выбрать «Добавить устройство» и выбрать нужный тип устройства из списка.
- Следовать инструкциям на экране для подключения устройства к приложению.
После установления связи можно использовать Asus Smart Display Control для управления устройствами других производителей, таких как умные лампы или термостаты. Также можно создавать автоматические сценарии для выполнения определенных задач, например, включить освещение и термостат при определенном времени или температуре.
Выводы о использовании Asus Smart Display Control
Asus Smart Display Control – отличный инструмент для управления умным дисплеем Asus. Он позволяет быстро и удобно настраивать настройки дисплея, добавлять новые виджеты и приложения, а также управлять ими.
С помощью Asus Smart Display Control можно настроить показ времени, просматривать новости, проверять погоду, запускать музыку и многое другое. Он предоставляет возможность контролировать умный дисплей из любой точки комнаты, а также автоматически настраиваться в соответствии с потребностями пользователя.
Важно отметить, что Asus Smart Display Control легко настраивается, а интерфейс приятный в использовании. Он предоставляет быстрый доступ к всем основным функциям умного дисплея, что значительно облегчает управление им.
В целом, использование Asus Smart Display Control позитивно сказывается на опыте владения умным дисплеем Asus. Он предоставляет все необходимые функции для быстрого и удобного управления устройством.
Вопрос-ответ
Что такое Asus Smart Display Control?
Asus Smart Display Control — это приложение для смартфонов и планшетов, которое позволяет управлять функциями и настройками мониторов и проекторов Asus посредством Bluetooth.
Какой нужен гаджет для работы с Asus Smart Display Control?
Для работы с приложением Asus Smart Display Control вам понадобится смартфон или планшет на ОС Android или iOS.
Как подключить монитор к Asus Smart Display Control?
Для подключения монитора к приложению Asus Smart Display Control необходимо активировать Bluetooth на мониторе и на вашем устройстве, затем найти монитор в списке доступных устройств Bluetooth и подключиться.
Какие функции можно управлять через Asus Smart Display Control?
С помощью Asus Smart Display Control можно управлять яркостью, контрастностью, температурой цвета, установить режим экономии энергии, а также переключаться между входами и подключенными устройствами.
Могу ли я использовать Asus Smart Display Control с не Asus монитором?
Нет, приложение Asus Smart Display Control подходит только для управления мониторами и проекторами Asus, несовместимое с другими марками.