“The driver can’t release to failure” – это сообщение об ошибке, которое проявляется у пользователей материнских плат от Gigabyte. Сообщение само по себе не говорит с каким драйвером произошли проблемы, но оно тесно связано с материнками от Gigabyte, особенно с теми у которых нет беспроводных возможностей.
Проблема проявляется при использовании вами программного обеспечения Gigabyte. Наиболее проблемной утилитой является “Cloud Station Server” и так как она полагается на возможность использования WiFi, то на ПК без этих технологий и возникает ошибка.

Метод №1 Отключение Home Cloud, GIGABYTE Remote и Remote OC в App Center
- Для начала откройте App Center.
- Затем откройте Cloud Station Server.
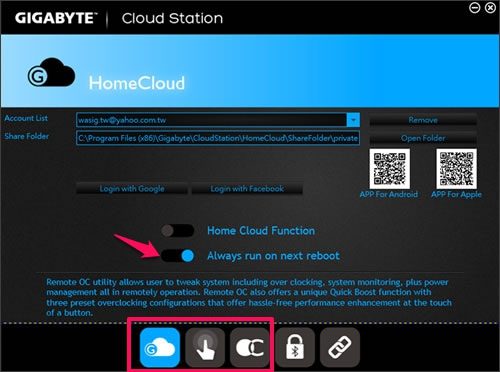
- Вы увидите окошко с пятью вкладками находящиеся внизу. Первые три(Home Cloud, GIGABYTE Remote и Remote) как раз и являются функциями из-за которых возникает проблема. На всех них стоит отметка “Всегда запускать при следующей загрузке”.
- Выключите эту опцию для всей тройки и перезапустите свой компьютер.
После этого ошибка “The driver can’t release to failure” должна исчезнуть.
Метод №2 Полная переустановка ПО
Процесс Cloud Station Server который работает на заднем фоне во время появления ошибки называется ubssrv. Переустановка ПО предотвратит работу этого процесса, что и решает проблему с ошибкой “The driver can’t release to failure”.
- Зайдите в “Панель управления”. Для этого нажмите правой кнопкой мыши на “Пуск” и выберите соответствующий пункт
- Далее пройдите в “Программы и компоненты”.
- В списке утилит найдите Gigabyte. У вас есть выбор перед удалением только Cloud Station Server или всего App Center.
- Выберите нужное ПО, нажмите на него правой кнопкой мыши и кликните “Удалить”.
- Далее следуйте инструкциям мастера установки. После этого процесса, перезагрузите ваш компьютер.
Не совсем понятно почему Gigabyte еще не исправили эту проблему, так как ошибка “The driver can’t release to failure” возникает у достаточно большого количества пользователей с различным набором их материнок и операционных систем.
This guide covers different workaround you can try if the GIGABYTE app center utility throws This Driver can’t release to failure error. If your Windows PC features GIGABYTE motherboards, you must have encountered the mentioned error at least once. The worst thing about this error message is that it doesn’t specify which driver is the main culprit behind the issue. But as reported by users, the error mainly originates on a system featuring GIGABYTE motherboards that don’t support wireless capabilities. So, if you are also facing the same error message, continue with this troubleshooting guide to get rid of the problem.

What causes the GIGABYTE error message?
As mentioned, the problem mainly originates in a system that features GIGABYTE motherboards without wireless capabilities. As it turns out, GIGABYTE App Centre Utility requires access to onboard Wi-Fi. But in case it doesn’t find it installed on the system, the component fails and throws the mentioned error. By “components,” we mean Cloud Service station, Remote OC, and GIGABYTE Remote.
So, now that you have a prior piece of knowledge about what causes the “This Driver can’t release to failure” error let’s check out different workaround you can try to get rid of the issue.
Here are different solutions to get rid of The Driver can’t release to failure GIGABYTE error.
- Turn Off Cloud Service station, Remote OC, and GIGABYTE Remote
- Download the latest GIGABYTE App Centre update
- Reinstall GIGABYTE using Command Prompt
- Uninstall the GIGABYTE App
Now, let’s take out all these solutions in detail.
1] Turn Off Cloud Service station, Remote OC, and GIGABYTE Remote
Here’s how to turn off Cloud Service station, Remote OC, and Gigabyte Remote in the GIGABYTE App Centre Utility.
- Launch the GIGABYTE App Centre Utility on your system.
- Click on the Cloud Service station present at the bottom of the screen.
- In the following window, toggle off the Always run on next reboot option.
- Come back to the home window again, and turn off the Remote OC and GIGABYTE Remote in the same way.
That’s it. Now you start your PC, and check if the problem is fixed or not.
Read: Chipsets and Motherboards that support Windows 11 operating system
2] Download the latest GIGABYTE App Centre update
If you haven’t downloaded the latest GIGABYTE app center update for a long time, then also you are prone to face the mentioned error code. As it turns out, many users have reported that the GIGABYTE App Centre is not compatible with the latest Windows 10 patch update. Thus, update the utility app by visiting the GIGABYTE official download page to get rid of the issue.
Once you have downloaded the app’s latest update, install it on your system. Check if the problem is fixed or not.
3] Reinstall GIGABYTE using Command Prompt
If you are still facing the problem even after downloading the latest update, the next thing you can try is to reinstall the GIGABYTE services via command prompt or Windows PowerShell. To do so, follow the below steps.
To begin with, press the Windows key to open the start menu.
In the search bar, type Command Prompt and from the results choose, the Run as administrator option.
Now, copy-paste the below-mentioned commands one after the other and press Enter.
sc delete gdrv
sc create gdrv binPath= "C:Windowsgdrv.sys" type= "kernel" DisplayName= "gdrv"
The first command line will uninstall the GIGABYTE services from your Windows PC. The second line of code will reinstall the services automatically all over again.
Once the command prompt has executed the code, restart your system and check if the problem is fixed or not. If not, continue with the following workaround.
4] Uninstall the GIGABYTE App
The Cloud Station servers of the GIGABYTE app run in the background by the name ubssrv. This software offers advanced functionalities in the GIGABYTE app, but at the same time, it can also cause the mentioned issue. So, uninstalling the app is the bet you can go for. To do so, follow the below steps.
- Press the Windows + I shortcut key to open the Settings menu.
- Click on the Apps option present at the left panel of the screen.
- Choose Apps & features from the following window.
- Here you will find all the installed applications on your system.
- Locate the GIGABYTE app and click on the three-dots present next to the name.
- Choose Uninstall from the context menu.
- In the GIGABYTE uninstallation page, checkmark only the Cloud Station Server option.
- Click on Uninstall to begin the uninstallation process.
That’s it. Now restart your system and check if the problem is fixed or not.
Read: How to download & install MSI Motherboard drivers for Windows 11/10
What is GIGABYTE app?
The GIGABYTE app center is a one-place destination for a long list of GIGABYTE apps. These apps bring you closer to the wealth of the installed GIGABYTE motherboard. The app is also the place to check for the latest driver and BIOS update.
How do I check my motherboard drivers?
It’s very easy to remove the app center from the computer. Just visit the control panel, and navigate to Program > Uninstall a program. From the list of all the installed applications, right-click on the app center and choose the Uninstall option. Follow the on-screen instructions to complete the uninstallation process.
Read Next: What is Windows WHQL setting in the BIOS?
The Gigabyte App Center may not work due to outdated drivers, incompatible software, or corrupt files. To fix the issue, try updating drivers and software to their latest versions, reinstalling the App Center, or running a system file checker.
Additionally, make sure your operating system is up to date and that your computer meets the minimum system requirements for the App Center.
Perhaps none of the gigabyte apps would open on your motherboard, including the AppCenter in the BIOS or EasyTune.
You’d be surprised at the number of other users who run into the problem as well, so you are not alone.
In many situations, the solution to the Gigabyte app center not working runs down to opening Color Management > Advanced tab > changing the device profile to “System Default.”
That would fix it in a normal situation. However, chances are this won’t work for you, but it’s worth a try. Still, some unfamiliar situations require other troubleshooting tips that I’m going to show you in the rest of this article.
Gigabyte App Center Not Working: What Worked for Me
It happened that after the last Windows 11 update, my Gigabyte App Center stopped working anymore, as did the apps included with it like RGB Fusion.
As you probably have attempted, I considered uninstalling them, but the process didn’t go as usual since some icons disappeared from the programs. In some instances of installation, I even get the message “Error 1920 service failed to start. Verify that you have sufficient privileges to start system services“
My first move was to try and reset back to a restore point from before these updates. And if none were available, I’d try uninstalling these specific Windows Updates.
But the same issue remained afterward. So at that point, it seemed the only option was to manually uninstall all related Gigabyte software and then reinstall everything related. But I didn’t want to go down that road, as it could lead to a mandatory fresh OS install using the latest MS 11 install package.
So after giving it a hard look, I figured that the problem behind the Gigabyte app not working after the Windows update was that net framework 3.5 was disabled with the last update. So I had to reactivate it following the proper procedure, and all programs that stopped working started working fine after a restart.
So if this sounds similar to your problem, you should give this solution a shot.
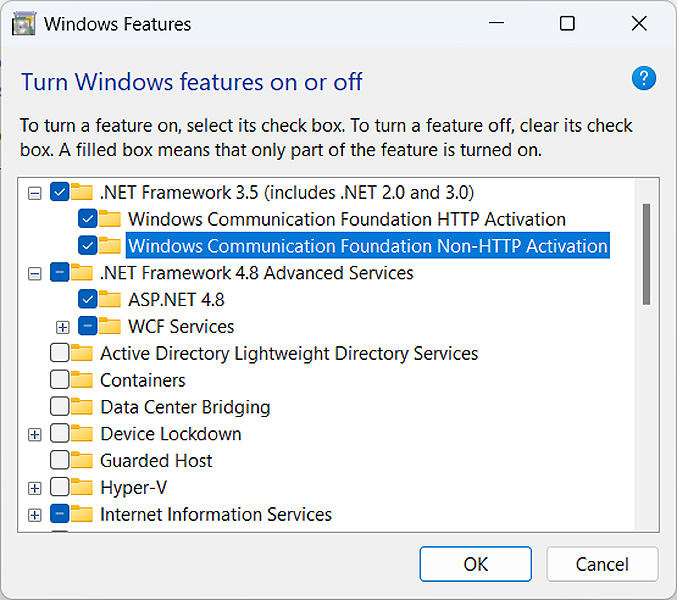
Navigate to Control Panel > Programs > Turn Windows features on or off and make sure.NET Framework 3.5 (which includes.NET 2.0 and 3.0) and Net Framework 4.8 Advanced Services are checked to be ON.
By now, the problem of the Gigabyte App Center not working should be a thing of the past. But if there are still no dice, then there are other things you can try. The above solution was what worked for me. But it doesn’t apply to all cases where Gigabyte App Center refuses to work.
For instance, it could be that you ran into “the driver can’t release due to failure” after Windows 10 updates or when using a certain Gigabyte utility, especially Gigabyte Cloud Station and EasyTune.
Most common troubleshooting tips:
Gigabyte App Center “The Driver Can’t Release Due to Failure”—Fixes
1. Home Cloud, Gigabyte Remote, and Remote OC at startup settings
If you are a Gigabyte user, you may have experienced issues with Gigabyte software such as Cloud Station Server and Gigabyte EasyTune failing to release when you reboot Windows 10.
This can be attributed to the Always run on the next reboot option, which is enabled by default for Gigabyte HomeCloud, Home OC, and Gigabyte Remote.
To address this issue, you can disable the “Always run on next reboot” option for these three Gigabyte items by following these steps:
Step 1: Open the Gigabyte App Center.
Step 2: Locate the Gigabyte Cloud Station server in the App Center.
Step 3: Under Gigabyte Cloud Station Server, find HomeCloud, Gigabyte Remote, and Remote OC.
Step 4: Turn off the “Always run on next reboot” option for all three items.
Step 5: Reboot your computer to apply the changes.
After following these steps, you should no longer encounter the “driver can’t release due to failure” error at startup, and the Gigabyte App Center should open without issue on Windows 10.
If otherwise, then consider the next solution.
2. Try uninstalling the Gigabyte App Center Utility.
The “Gigabyte drivers can’t release due to failure” error may be caused by issues with the Gigabyte App Center.
To resolve this issue, you can try uninstalling and reinstalling the problematic software on your PC using the following steps:
Step 1: Navigate to the Control Panel on your Windows 10 PC.
Step 2: In the Control Panel, select “View by Category” and then click on “Uninstall a program” under the “Programs” category.
Step 3: Scroll down to locate the Gigabyte App Center in the Programs and Features window and right-click on it to select “Uninstall.”
Step 4: Restart your Windows 10 PC.
After reinstalling the Gigabyte App Center, check to see if the “Gigabyte drivers can’t release due to failure” error has been resolved for your Gigabyte motherboard.
If that doesn’t work, then it means you have to uninstall and reinstall the gigabyte service.
3. Turn Off the Gigabyte Service and Enable It Again.
To address the “driver can’t release due to failure” error related to Gigabyte services, it may be necessary to uninstall and reinstall the Gigabyte service using Command Prompt.
In some cases, the Gigabyte services themselves may be the root cause of the issue.
To do this, follow these steps:
Step 1: Search for Command Prompt in the Windows search box and right-click to select “Run as administrator.”
Step 2: In the Command Prompt, enter “sc delete gdrv” and press Enter to uninstall the Gigabyte service.
Step 3: Then, enter the required command to reinstall the Gigabyte services for Windows 10:
Step 4: Restart your computer.
4. Any Windows update?
If you are experiencing the “driver can’t release due to failure” error or App Center not working after a Windows 10 update, it is worth checking for new updates that may help resolve the issue.
To do this:
Step 1: Click on “Start,” go to “Settings,” and select “Update & Security.”
Step 2: Under Windows Update, click on “Check for updates.”
Once the updates are installed, the Gigabyte utilities may become more compatible with the drivers on your PC.
Conclusion
A few cases of the Gigabyte App Center not working that I have combed through on forums recounted issues connected to how computers immediately turn off each time the users go into the System Information Viewer section of the Gigabyte App Center and then click on one of the tabs relating to the fan control.
No matter what the actual issue is that’s making your Gigabyte App Center not work properly, it all boils down to solving it using any of the solutions shared in the above article.
I’ve spent years using Gigabyte, and if you ask me, I’d say the App Center is far from satisfactory. I find them personally to be unreliable and sometimes unbearably buggy.
My two cents? Uninstall it and set fan settings straight in BIOS; it works perfectly for me whenever this issue surfaces and I need to do fan control configurations.
P.S. You’ll now have to familiarize yourself with BIOS use if you are overclocking or changing fan speeds.
GIGABYTE «Драйвер не может быть выпущен до отказа»
В этом руководстве описаны различные обходные пути, которые вы можете попробовать, если утилита центра приложений GIGABYTE выдает ошибку Этот драйвер не может быть выпущен до отказа . Если на вашем ПК с ОС Windows установлены материнские платы GIGABYTE, вы должны хотя бы раз столкнуться с упомянутой ошибкой. Хуже всего в этом сообщении об ошибке то, что в нем не указывается, какой драйвер является основным виновником проблемы. Но, как сообщают пользователи, ошибка в основном возникает в системе с материнскими платами GIGABYTE, которые не поддерживают возможности беспроводной связи. Итак, если вы также столкнулись с тем же сообщением об ошибке, продолжайте использовать это руководство по устранению неполадок, чтобы избавиться от проблемы.
Что вызывает сообщение об ошибке GIGABYTE?
Как уже упоминалось, проблема в основном возникает в системе с материнскими платами GIGABYTE без возможностей беспроводной связи. Как оказалось, утилите GIGABYTE App Center требуется доступ к встроенному Wi-Fi. Но если он не находит его установленным в системе, компонент дает сбой и выдает указанную ошибку. Под «компонентами» мы подразумеваем станцию облачной службы, удаленный OC и удаленный GIGABYTE.
Итак, теперь у вас есть предварительные знания о том, что вызывает ошибку «Этот драйвер не может быть выпущен с ошибкой», давайте рассмотрим другой обходной путь, который вы можете попробовать, чтобы избавиться от проблемы.
Исправить Драйвер не может Ошибка GIGABYTE при отказе от выпуска
Вот различные решения, чтобы избавиться от ошибки GIGABYTE.
Отключить станцию облачного обслуживания, Remote OC и GIGABYTE RemoteЗагрузить последнюю версию GIGABYTE. Обновление Центра приложенийПереустановите GIGABYTE с помощью командной строкиУдалите приложение GIGABYTE
Теперь давайте подробно рассмотрим все эти решения.
1] Отключите станцию облачного обслуживания, Remote OC и GIGABYTE Remote
Вот как отключить статус облачной службы on, Remote OC и Gigabyte Remote в утилите GIGABYTE App Center.
Запустите утилиту GIGABYTE App Center в вашей системе. Нажмите на станцию облачного обслуживания в нижней части экрана. В следующем окне выключите параметр Всегда запускать при следующей перезагрузке . Вернитесь снова в главное окно и таким же образом выключите Remote OC и GIGABYTE Remote.
Вот и все. Теперь вы запускаете свой компьютер и проверяете, устранена ли проблема.
Читать: чипсеты и материнские платы, поддерживающие операционную систему Windows 11
2] Загрузите последнее обновление GIGABYTE App Center
Если вы давно не загружали последнее обновление GIGABYTE App Center, вы также можете столкнуться с указанным кодом ошибки. Как оказалось, многие пользователи сообщают, что GIGABYTE App Center несовместим с последним обновлением патча для Windows 10. Таким образом, обновите служебное приложение, посетив официальную страницу загрузки GIGABYTE. чтобы избавиться от проблемы.
Загрузив последнее обновление приложения, установите его в своей системе. Проверьте, устранена ли проблема.
3] Переустановите GIGABYTE с помощью командной строки
Если вы все еще сталкиваетесь с проблемой даже после загрузки последнего обновления, следующее, что вы можете попробовать заключается в переустановке сервисов GIGABYTE через командную строку или Windows PowerShell. Для этого выполните следующие действия.
Для начала нажмите клавишу Windows, чтобы открыть меню «Пуск».
В строке поиска введите «Командная строка» и в результатах выберите , параметр «Запуск от имени администратора».
Теперь скопируйте и вставьте указанные ниже команды одну за другой и нажмите Enter.
sc delete gdrvsc create gdrv binPath=”C:Windowsgdrv.sys”type=”kernel”DisplayName=”gdrv”
Первая командная строка удалит службы GIGABYTE с вашего ПК с Windows. Вторая строка кода автоматически переустановит службы заново.
После того, как командная строка выполнит код, перезагрузите систему и проверьте, устранена ли проблема. Если нет, используйте следующий обходной путь.
4] Удалите приложение GIGABYTE
Серверы Cloud Station приложения GIGABYTE работают в фоновом режиме под именем ubssrv. Это программное обеспечение предлагает расширенные функции в приложении GIGABYTE, но в то же время оно также может вызывать указанную проблему. Таким образом, удаление приложения — это ставка, на которую вы можете пойти. Для этого выполните следующие действия.
Нажмите сочетание клавиш Windows + I, чтобы открыть меню «Настройки». Нажмите «Приложения» на левой панели экрана. Выберите «Приложения и функции» в следующем окне. Здесь вы найдете все установленные приложения в вашей системе. Найдите приложение GIGABYTE и нажмите на три точки рядом с именем. Выберите Удалить в контекстном меню. На странице удаления GIGABYTE отметьте только галочкой вариант Cloud Station Server . Нажмите”Удалить”, чтобы начать процесс удаления.
Это все. Теперь перезагрузите систему и проверьте, устранена ли проблема.
Читать: как загрузить и установить драйверы материнской платы MSI для Windows 11/10
Что такое приложение GIGABYTE?
Центр приложений GIGABYTE – это единый ресурс для длинного списка приложений GIGABYTE. Эти приложения приближают вас к богатству установленной материнской платы GIGABYTE. В приложении также можно проверить наличие последних обновлений драйверов и BIOS.
Как проверить драйверы материнской платы?
Удалить Центр приложений с компьютера очень просто. Просто зайдите в панель управления и перейдите в «Программа» > «Удалить программу». В списке всех установленных приложений щелкните правой кнопкой мыши центр приложений и выберите параметр «Удалить». Следуйте инструкциям на экране, чтобы завершить процесс удаления.
Читать далее: Что такое настройка Windows WHQL в BIOS?

[SOLVED] Impossible to install Gigabyte App Center ?
-
Thread starter7medd
-
Start dateMay 23, 2022
You should upgrade or use an alternative browser.
- Status
- Not open for further replies.
![]()
-
- Nov 14, 2020
-
- 116
-
- 24
-
- 2,245
-
#1
My pc components are in signature. So after last windows 11 update (KB5013943 , KB5010474, KB5013628) my Gigabyte App Center doesn’t work anymore, neither do the apps included with it like RGB Fusion. I tried to uninstall them , the process didn’t go as usual but icons disappeared from programmes.
Now I try to install App Center again but I get this error message: «Error 1920 service failed to start. Verify that you have sufficient privileges to start system services «
Any idea how tofix this please?
Thank you
![]()
-
- Jan 14, 2016
-
- 6,978
-
- 1,078
-
- 49,190
-
#2
after last windows 11 update (KB5013943 , KB5010474, KB5013628) my app center (gigabyte software) doesnt work anymore neither the apps included
i’ve run into many similar issues with users on Windows 11.
my first move would be to try and reset back to a Restore Point from before these updates.
if none available try uninstalling these specific Windows Updates.
if you face the same issue afterwards;
try manually uninstalling all related Gigabyte software.
it’s possible that Gigabyte offers a special uninstall tool for completely removing their control software.
then reinstall everything related.
if still no good;
try a fresh OS install using the latest MS 11 install package.
![]()
-
- Nov 14, 2020
-
- 116
-
- 24
-
- 2,245
-
#3
if still no good;
try a fresh OS install using the latest MS 11 install package.
Thank you bro,
I tried all the methods before this . I’m not gonna do a fresh install only for that software. I’m gonna wait for a fix within future updates probably
![]()
-
- Jun 12, 2015
-
- 62,270
-
- 5,464
-
- 168,090
-
#4
What else do you use App store for? I don’t like how it defaults to downloading everything installed every time. So I only ever installed it once to install RGB Fusion.
I assume they add your motherboard to this at some stage, may not need to use Fusion — https://www.signalrgb.com/
![]()
-
- Nov 14, 2020
-
- 116
-
- 24
-
- 2,245
-
#5
i can see other people having issues with RGB Fusion not working at the moment, so it may not just be you.What else do you use App store for? I don’t like how it defaults to downloading everything installed every time. So I only ever installed it once to install RGB Fusion.
I assume they add your motherboard to this at some stage, may not need to use Fusion — https://www.signalrgb.com/
Yes I do use it to install fusion and disable RGB
Now i’m stuck with RGB on which I dont like.
I tried to install signalRGB but I got an error .. openRGB worked though . I have RGB off. I will wait for an update from Windows or gigabyte
Last edited: May 24, 2022
![]()
-
- Nov 14, 2020
-
- 116
-
- 24
-
- 2,245
-
#6
the problem seems to be netframework 3.5 was disabled with the last update
you have to reactivate it following this procedure , and all programs that stopped working should work fine after restart
Control Panel > Programs > Turn Windows features on or off and make sure .NET Framework 3.5 (includes .NET 2.0 and 3.0) and Net Framework 4.8 Advanced Services are checked
![]()
-
- Jun 12, 2015
-
- 62,270
-
- 5,464
-
- 168,090
-
#7
![]()
-
- Nov 14, 2020
-
- 116
-
- 24
-
- 2,245
-
#8
That is a strange service to be turned off. It should be on by default.
Indeed. and it looks like it causes a huge variety of problems with software so you cant troubleshoot that easily. I have a lenovo laptop and vantage software wouldnt work too and I have a windows startup error message. everything is solved with this solution.
windows had to revert that update already
![]()
-
- Jun 12, 2015
-
- 62,270
-
- 5,464
-
- 168,090
-
#9
- Status
- Not open for further replies.
Similar threads
- Advertising
- Cookies Policies
- Privacy
- Term & Conditions