Operating System: Windows 10 Pro 64-bit (10.0, Build 16299) (16299.rs3_release_svc_escrow.180502-1908)
Language: English (Regional Setting: English)
System Manufacturer: ASUS
System Model: All Series
BIOS: 1601
Processor: Intel(R) Core(TM) i7-6800K CPU @ 3.40GHz (12 CPUs), ~3.4GHz
Memory: 32768MB RAM
Available OS Memory: 32676MB RAM
Page File: 7131MB used, 30408MB available
Windows Dir: C:WINDOWS
DirectX Version: DirectX 12
DX Setup Parameters: Not found
User DPI Setting: 96 DPI (100 percent)
System DPI Setting: 96 DPI (100 percent)
DWM DPI Scaling: Disabled
Miracast: Available, with HDCP
Microsoft Graphics Hybrid: Not Supported
Card name: NVIDIA Quadro M4000
Manufacturer: NVIDIA
Chip type: Quadro M4000
DAC type: Integrated RAMDAC
Anything else?
Hi Guys, Today I am Going to Show You How to Fix “A low-level exception occurred in ImporterMPEG” Error in Adobe Premiere Pro?
If You’re Looking for the Commonly Searched Term “How to Fix Low-Level exception importer MPEG in Abo Premiere Pro?” (or) “A low-level exception occurred in ImporterMPEG”.You are at the Right Place to Get Your Answers & Solve the Issue/Error.
Adobe Premiere Pro is a top-selling and most often used Video Editing Program in the world. Adobe Premiere is a Non-Linear Video Editing Program launched in 2003 and was developed by Adobe Inc.Adobe Premiere Pro is used for editing videos along with audio editing ability. It can be used for many film projects, Professionals works, and much more. Adobe Premiere Pro is very useful for Individuals who are very much interested in creating and Editing video content. Adobe Premiere Pro can also be used alongside After Effects and Photoshop on many projects. Premiere Pro can be used on any platform like Mac OS or Windows computers. Adobe Premiere Pro has a very good attractive, flexible interface which makes everyone a fan of it.
If You’re a Normal Video Editor or Video Editing Professional, then You must have faced the low-level exception that occurred in ImporterMPEG Error. When You’re Working on Video Projects for a Long time, then This Error Often Appears at some point of time while editing a video. This Errors Can Come and Go Without any Indication. This low-level exception that occurred in ImporterMPEG Error can also be caused on some of the following occasions Like If you’re Using Older Versions without Updating, Accelerated Intel H.264 decoding is Enabled and sometimes it happens when you Didn’t Delete the Media Cache for a long period of time. Usually, a Simple PC Restarting (or) Reinstallation of the Program Can Fix the Issue in Some Cases. But This can’t Work for All Users.You Don’t Need to Worry About the Error, We are Here to Help you to Solve this Issue Easily. We Provide You the Help Guides Below, Just Follow the Below Given Methods One by One Correctly.
Check Out This: How to Transfer a Domain Easily from One Registrar to Another (In 3 Steps)? | Step-By-Step Domain Transfer Tutorial
Steps For How to Fix “A low-level exception occurred in ImporterMPEG” Error in Adobe Premiere Pro?
Method 1: Update Your Adobe Premiere to Latest Version
Whenever You Face any Issues or any Bugs with it, Try to Update Your Software to the Latest Version ( Not Only Adobe Premiere Pro, Whatever the Software it is).
Method 2: Disabling Hardware Accelerated Decoding Option
Step 1: First of all Run Adobe Premiere Pro and Navigate to the Edit Tab and Select Preferences Option
Step 2: Under the Preferences Tab, Select the Media Option.
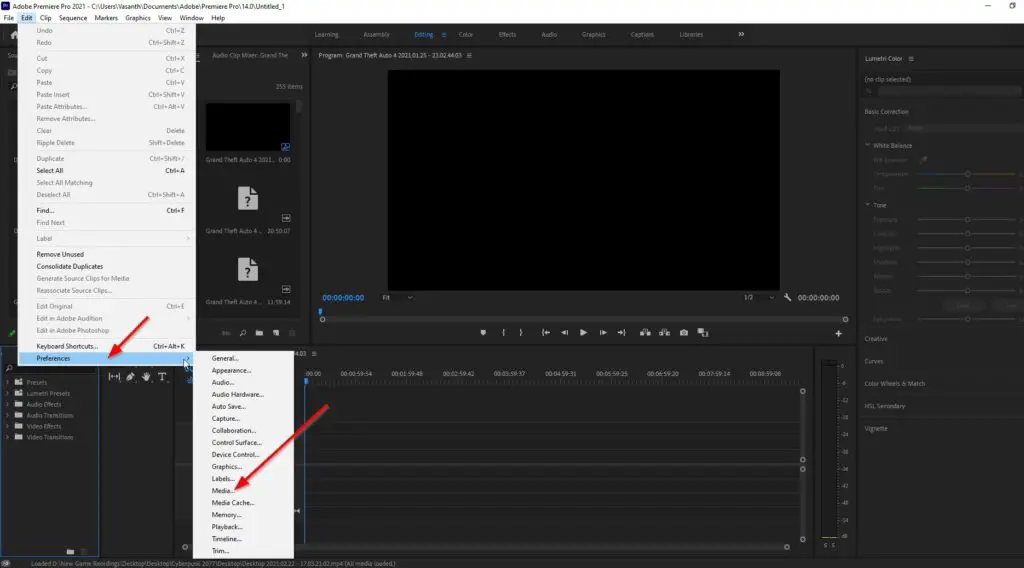
Step 3: Uncheck the Enable Hardware accelerated decoding Option.

Step 4: Restart Adobe Premiere Pro.
Method 3: Switching the Mercury Playback Engine GPU Acceleration CUDA to Software Only
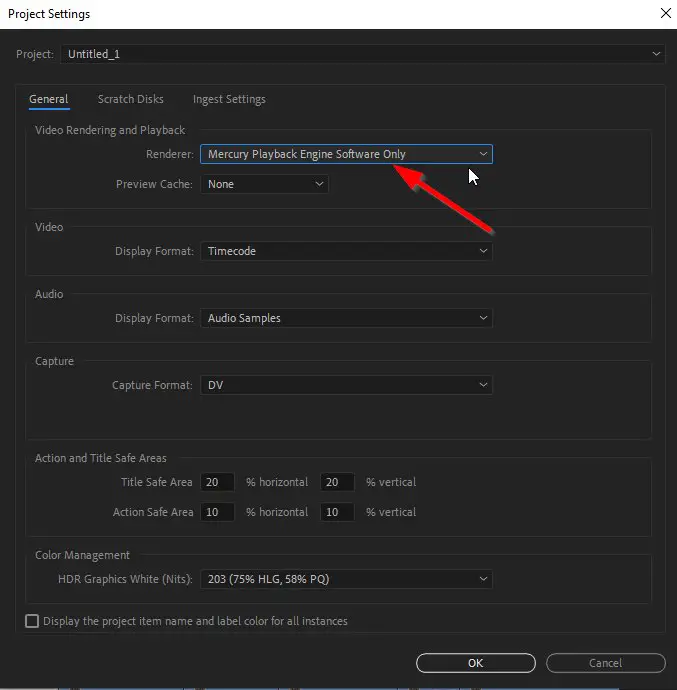
Step 1: First of all Run Adobe Premiere Pro and Navigate to File Tab and Select Project Settings Option
Step 2: In Project Settings, Select the General Option.
Step 3: Under Video Rendering and Playback, Change the Mercury Playback Engine GPU Acceleration CUDA to Mercury Playback Engine Software Only.
Step 4: Click Ok to Save and Restart Adobe Premiere Pro.
Method 4: Deleting the Media Caches
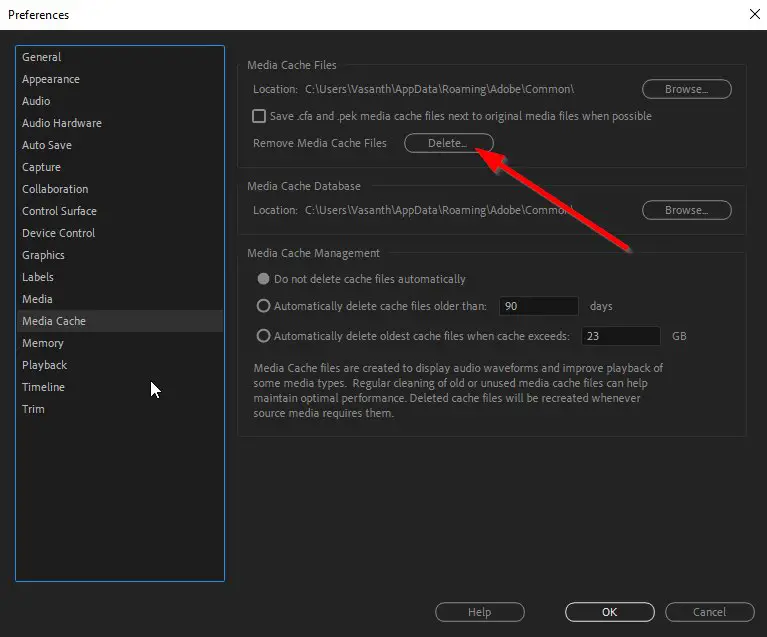
Step 1: First of all Run Adobe Premiere Pro and Navigate to Edit Tab and Select Preferences Option
Step 2: Under Preference Tab, Select the Media Cache Option.
Step 3: Click Delete Button to Remove the Media Cache Files.
Step 4: Restart Adobe Premiere Pro.
That’s It! You’re Done Man!
That’s All About this Post. Give Your Reviews / Reactions about this Post and Leave Comments, Ask Your Doubts, We are here to Help You!

Basically an Instrumentation Engineer But Very much Interested in Blogging. I’m a Passionate Blogger and an Expert in Search Engine Optimization And Always Looking Forward to Learn New Things. I Would Fix & Provide Solution to the Most Common Issues Related to PC,Laptops,Mobiles,OS, Hardwares and Softwares.
Been having these problems for years : media cache gets corrupt when importing too much MP4 files…
Workarounds :
— Go to C:Users*username*AppDataRoamingAdobeCommonMedia Cache Files
and delete the cache files associated to the media file (search with the media file’s name)
Open Premiere and it will recreate that cache and see the media file once again.
— It sounds ridiculous but : in order not to let Premiere saturate the memory and corrupt cache files, click on the Premiere window then on the desktop window, navigate between the two : the memory will somehow dump itself and saturate less…
— Buy more RAM… Had 32 GB, got 32 more…
Hi Guys, Today I am Going to Show You How to Fix “A low-level exception occurred in ImporterMPEG” Error in Adobe Premiere Pro?
If You’re Looking for the Commonly Searched Term “How to Fix Low-Level exception importer MPEG in Abo Premiere Pro?” (or) “A low-level exception occurred in ImporterMPEG”.You are at the Right Place to Get Your Answers & Solve the Issue/Error.
Adobe Premiere Pro is a top-selling and most often used Video Editing Program in the world. Adobe Premiere is a Non-Linear Video Editing Program launched in 2003 and was developed by Adobe Inc.Adobe Premiere Pro is used for editing videos along with audio editing ability. It can be used for many film projects, Professionals works, and much more. Adobe Premiere Pro is very useful for Individuals who are very much interested in creating and Editing video content. Adobe Premiere Pro can also be used alongside After Effects and Photoshop on many projects. Premiere Pro can be used on any platform like Mac OS or Windows computers. Adobe Premiere Pro has a very good attractive, flexible interface which makes everyone a fan of it.
If You’re a Normal Video Editor or Video Editing Professional, then You must have faced the low-level exception that occurred in ImporterMPEG Error. When You’re Working on Video Projects for a Long time, then This Error Often Appears at some point of time while editing a video. This Errors Can Come and Go Without any Indication. This low-level exception that occurred in ImporterMPEG Error can also be caused on some of the following occasions Like If you’re Using Older Versions without Updating, Accelerated Intel H.264 decoding is Enabled and sometimes it happens when you Didn’t Delete the Media Cache for a long period of time. Usually, a Simple PC Restarting (or) Reinstallation of the Program Can Fix the Issue in Some Cases. But This can’t Work for All Users.You Don’t Need to Worry About the Error, We are Here to Help you to Solve this Issue Easily. We Provide You the Help Guides Below, Just Follow the Below Given Methods One by One Correctly.
Check Out This: How to Transfer a Domain Easily from One Registrar to Another (In 3 Steps)? | Step-By-Step Domain Transfer Tutorial
Steps For How to Fix “A low-level exception occurred in ImporterMPEG” Error in Adobe Premiere Pro?
Method 1: Update Your Adobe Premiere to Latest Version
Whenever You Face any Issues or any Bugs with it, Try to Update Your Software to the Latest Version ( Not Only Adobe Premiere Pro, Whatever the Software it is).
Method 2: Disabling Intel H.264 Decoding Option
Step 1: First of all Run Adobe Premiere Pro and Navigate to Edit Tab and Select Preferences Option
Step 2: Under Preference Tab, Select the Media Option.
Step 3: Uncheck the Enable accelerated Intel H.264 decoding Option.
Step 4: Restart Adobe Premiere Pro.
Method 3: Switching the Mercury Playback Engine GPU Acceleration CUDA to Software Only
Step 1: First of all Run Adobe Premiere Pro and Navigate to File Tab and Select Project Settings Option
Step 2: In Project Settings, Select the General Option.
Step 3: Under Video Rendering and Playback, Change the Mercury Playback Engine GPU Acceleration CUDA to Mercury Playback Engine Software Only.
Step 4: Click Ok to Save and Restart Adobe Premiere Pro.
Method 4: Deleting the Media Caches
Step 1: First of all Run Adobe Premiere Pro and Navigate to Edit Tab and Select Preferences Option
Step 2: Under Preference Tab, Select the Media Cache Option.
Step 3: Click Delete Button to Remove the Media Cache Files.
Step 4: Restart Adobe Premiere Pro.
That’s It! You’re Done Man!
That’s All About this Post. Give Your Reviews / Reactions about this Post and Leave Comments, Ask Your Doubts, We are here to Help You!
Okay, first some system specs:
Macbook Pro
2.2 GHz Intel Core i7
8 GB RAM
Radeon HD 6750
OSX Lion 10.7.5
Premiere Pro CS6 (updated to lastest available version)
—I remember installing updates a few days ago (maybe last week), but don’t remember if any of them were for Premiere and could possibly be the problem.
The trouble I’m having is with one .MTS clip. I have a timeline about 20 minutes in length. I edited the whole thing and had no problems the whole time, with any clip. All clips originally imported correctly, played back fine, etc.
I exported a copy for client review (from Media Encoder CS6) the other day. One clip (the .MTS clip in question) showed as «Media Offline». It is not offline, I did not move the clip, etc. I unlinked the clip in the project, relinked it, and it did show up in the project and was able to be played back.
Exported another copy, found the same error occured with just this one clip. Now I’m noticing that when I open the project, I receive the error in the topic title (A low level exception occured in: Importer MPEG (Importer). The clip will not play back and shows up as «Media Pending», as if it’s not coming in correctly. Unlinking and relinking doesn’t fix the issue.
I have many other .MTS clips in my timeline. All of them work correctly, play back correctly, and export correctly. There doesn’t seem to be any inherent problem with the clip itself; it plays back smoothly in VLC, and I’ve transcoded it to a .mov to try and just bring that in and get around this stupid issue. This didn’t work either; I unlink the clip, then relink to the transcoded .mov — it actually will play back in the preview monitor, but will not display when trying to view it on my timeline. I have also created a copy of the project, tried this inside of the copy, as well as created a new sequence and pasted over the information; none of that worked either. There are also other sequences this clip is on, and it will not play back in any of them either, but as I mentioned, plays back in the preview.
I did find one other topic with a similar issue; they recommend deactivating Premiere, restarting the computer, and activating it again. I did do a restart initially to try and diagnose the problem, but to no avail. I tried deactivating the program, but the Adobe Application Manager doesn’t load; it has almost never loaded for me whenever I try to use it, which is frustrating in and of itself.
I tried creating an entirely new project and importing the other project. When I did this Premiere just froze; I’m assuming it can’t handle all the pieces (it’s a fairly complex project with hundreds of clips) and they are also coming off an external drive through a USB 3.0 cable.
I’ve temporarily «fixed» this by bringing in the transcoded clip, resyncing it to to the spot I need it in, and cutting it as necessary. I typed this post as I went and tried various things, and while I’ve found my way around the problem, it doesn’t really solve it. I opened another old project that was very similar to this one and also encountered the same error message. I didn’t stick around to find out if there was just one clip causing the issue; the fact that it was there was enough for me.
So, what do I need to be doing here? I’m guessing the stock answer is to uninstall Premiere and reinstall it, which I don’t want to do unless I have to since it’s a pain in the ass. I’m kind of through the problem for this project, but want to be able to deal with it for the future. Hoping someone with knowledge can chime in and tell me whether it’s the update from the other day causing this.
If the answer is to uninstall and reinstall Premiere, do I need to run some cleaner tool? I vaguely remember hearing about that before in regards to uninstalling and reinstalling.
On opening the project all media loading normaly and after that program crashes without any error, just gone…
Sometimes it shows this error before closing itself.
I have worked with this project quit a while, all media clips have been imported and edited already without issues, so it can not depend on some demaged videos.
After last Premiere CC 13.1.2 this problem occurs.
But not always, sometimes the project loads normaly, but I would say 90% it crashes..
When the project is laoded and did not crash there is no problem after that with any clip, issues occurs just on loading the project media…!?
And yes I have tried all of this :
— enough space on disk, used different disks
— enough RAM (Windows 10 / i5)
— deleted all media cache, tried different new cache locations
— user preferences deleted
— reboots
— reinstall premiere
— used different devices (ssd, hdd)
— made a new admin user in windows and complete install of premiere
Please help or fix!
I can not work at all at this project!
Thx
Автор:
Roger Morrison
Дата создания:
17 Сентябрь 2021
Дата обновления:
19 Январь 2023

Содержание
- Что вызывает сообщение об ошибке «Импортер сообщил об общей ошибке» в Adobe Premiere?
Adobe Premiere — одно из ведущих программ для редактирования видео. Adobe Premiere Pro является преемником Adobe Premiere. Программа была впервые представлена в 2003 году и вскоре получила известность благодаря удобному интерфейсу, функциям и эффективности. Как и любое другое приложение, оно время от времени вызывает у пользователей несколько ошибок. Один из них — «Импортер сообщил об общей ошибке‘ сообщение об ошибке. Это появляется, когда вы пытаетесь импортировать видео на временную шкалу с помощью импортера. Это может быть связано с множеством причин, например, неподдерживаемым кодеком или форматом видеофайла.

В этой статье мы рассмотрим сообщение об ошибке, обсудив его причины, а затем упомянем решения, которые вы можете применить, чтобы избавиться от сообщения об ошибке; тщательно. Итак, начнем с причин.
Как мы упоминали ранее, сообщение об ошибке появляется, когда вы используете импортер для импорта видеофайлов. Это может быть связано со следующими причинами:
- Неподдерживаемый кодек: Все устройства видеозаписи используют разные кодеки. Если кодек не поддерживается программным обеспечением Adobe Premiere Pro, вы не сможете импортировать его на шкалу времени. В таком случае вам придется изменить кодек видеофайлов.
- Неподдерживаемый формат видеофайлов: Adobe Premiere довольно щедро предлагает формат видеофайлов, однако он не поддерживает все форматы видеофайлов по очевидным причинам. Поэтому, если видео, которое вы пытаетесь импортировать, не поддерживается приложением, вы, в конечном итоге, наткнетесь на сообщение об ошибке.
- Проблемы с активацией: По словам Adobe, проблемы с активацией иногда могут нарушить некоторые функции импортера. Поэтому убедитесь, что программное обеспечение активировано и вы вошли в свою учетную запись Creative Cloud.
- Имя видео файла: В некоторых случаях проблема также может быть вызвана названием видеофайла. В имени файла могут быть символы, которые вызывают всплывающее окно.
С учетом сказанного, давайте перейдем к реальной части и поможем вам пройти через это испытание. Пожалуйста, следуйте всем предложенным решениям, если одно или два из них не работают для вас.
Решение 1. Проверьте формат видеофайла и кодек
Первое, что вам следует сделать, когда вы столкнетесь с сообщением об ошибке, — это убедиться, что формат видео и кодек поддерживается Adobe. Некоторые кодеки не поддерживаются Adobe Premiere, например, Adobe отказалась от поддержки кодека QuickTime. В таком случае вам придется перекодировать отснятый материал в более новый / современный кодек.
Точно так же, если формат видеофайла не поддерживается Adobe, вы не сможете импортировать файл. Точно так же вам придется изменить формат видеофайла, что довольно просто. Пожалуйста, обратитесь к этому ссылка на сайт список поддерживаемых форматов видеофайлов.
Решение 2. Очистка кеша файлов мультимедиа
Еще вы можете попытаться удалить кэш медиафайлов, а затем попытаться импортировать файлы. Когда вы импортируете видео или аудио файлы в Adobe Premiere, он сохраняет версии этих файлов, к которым он может быстро получить доступ снова для повышения производительности. Эти сохраненные версии называются файлами кэша мультимедиа. Вот как удалить файлы:
- близко Adobe Premiere Pro а затем перейдите к Users AppData Roaming Adobe Common каталог. Обратите внимание, что Данные приложения По умолчанию папка скрыта, поэтому убедитесь, что вы ее открыли.
- Если вы используете Mac, пожалуйста, перейдите к / Пользователи // Библиотека / Поддержка приложений / Adobe / Common каталог.
- Удалите файлы а затем запустите Adobe Premiere Pro.
- Если у вас возникли трудности с поиском указанного выше пути, вы также можете просто перейти на Предпочтения а затем перейдите к Медиа-кеш таб.

Решение 3. Переместите файлы в другое место или переименуйте их
В некоторых случаях проблема может быть связана с указанным путем к видео- или аудиофайлам. В таком случае вам придется изменить путь к файлам, то есть переместить их на другой диск или просто в другую папку. Об этом сообщили многие пользователи, и это помогло им решить проблему.
Вы также можете попробовать просто переименовать файлы в том же каталоге, а затем попробовать импортировать файлы. Если не работает, просто переместите их в другое место.
Решение 4. Переустановите Premiere Pro
Если все вышеупомянутые решения не работают для вас, возможно, возникла проблема с установкой программного обеспечения, и вам придется переустановить его. Вот как это сделать:
- Открыть Creative Cloud.
- Удалить Adobe Premiere Pro при сохранении настроек (опция при удалении).

- После этого установите его снова и посмотрите, решит ли он проблему.

Обновлено 2023 января: остановите эти сообщения об ошибках и устраните распространенные проблемы с помощью этого инструмента. Получить сейчас в эту ссылку
- Скачайте и установите программного обеспечения.
- Он просканирует ваш компьютер на наличие проблем.
- Затем инструмент исправить проблемы которые были найдены.
Adobe Premiere Pro, несомненно, является одним из самых популярных и широко используемых программ для редактирования видео. Это программное обеспечение имеет множество расширенных функций, которые позволяют пользователю создавать потрясающие фильмы и высококачественный контент.
Хотя Adobe Premiere Pro очень популярен и широко используется, он иногда характеризуется нестабильностью и необычным поведением из-за постоянных обновлений и новых функций.
Итак, в этой статье мы рассмотрим две наиболее распространенные проблемы с Premiere Pro, а именно сообщение Premiere Pro Importer о распространенной ошибке.
В большинстве случаев проблем с видео нет, это проблема, связанная с тем, что программное обеспечение не может его обработать и обнаружить.
Регулярное развитие и гибкость могут быть важными факторами в этом отношении. Вот почему бета-версии и недоработанные программы так распространены в современном цифровом мире. Это приводит к следующей проблеме: Importer сообщает об общей ошибке, Importer Premiere Pro сообщает об общей ошибке.

Кодек не поддерживается:
Все устройства видеозахвата используют разные кодеки. Если кодек не поддерживается в Adobe Premiere Pro, вы не сможете импортировать его на временную шкалу. В этом случае необходимо изменить кодек видеофайла.
Неподдерживаемый формат видеофайла:
Adobe Premiere довольно щедр на форматы видеофайлов, но по понятным причинам поддерживает не все форматы видеофайлов. Таким образом, если видео, которое вы пытаетесь импортировать, не поддерживается приложением, вы получите сообщение об ошибке.
Проблемы с активацией:
По словам Adobe, проблемы с активацией иногда могут мешать работе некоторых функций импортера. Поэтому убедитесь, что программа активирована и вы вошли в свою учетную запись Creative Cloud.
Имя видеофайла:
В некоторых случаях имя видеофайла также может вызвать проблему. Некоторые символы в имени файла могут быть причиной проблемы.
Как исправить ошибку?
Обновлено: январь 2023 г.
Этот инструмент настоятельно рекомендуется, чтобы помочь вам исправить вашу ошибку. Кроме того, этот инструмент обеспечивает защиту от потери файлов, вредоносных программ и аппаратных сбоев, а также оптимизирует работу вашего устройства для достижения максимальной производительности. Если у вас уже есть проблема с компьютером, это программное обеспечение может помочь вам решить ее и предотвратить повторение других проблем:
- Шаг 1: Установите инструмент восстановления и оптимизации ПК. (Виндовс 10, 8, 7, ХР, Виста).
- Шаг 2: Нажмите Начать сканирование чтобы определить, какие проблемы вы испытываете с вашим компьютером.
- Шаг 3: Нажмите Починить всечтобы решить все проблемы.

Решение 1. Проверьте формат и кодек видеофайла.
Первое, что нужно сделать, когда вы видите сообщение об ошибке, — это проверить, поддерживаются ли формат видео и кодек Adobe. Некоторые кодеки не поддерживаются Adobe Premiere, например, поддержка кодека QuickTime была удалена Adobe. В этом случае вам необходимо перекодировать фильм на более новый/современный кодек.
Кроме того, если формат видеофайла не поддерживается Adobe, вы не сможете импортировать файл. Точно так же вам нужно изменить формат видеофайла, что довольно просто. По этой ссылке приведен список поддерживаемых форматов видеофайлов.
Решение 2. Очистите кеш медиафайлов
Другой вариант — очистить кэш мультимедиа, а затем попытаться импортировать файлы. Когда вы импортируете видео- или аудиофайлы в Adobe Premiere, программа сохраняет версии этих файлов, к которым вы можете быстро получить доступ снова для повышения производительности. Эти сохраненные версии называются файлами кэша мультимедиа. Вот как удалить файлы:
1.) Закройте Adobe Premiere Pro и перейдите в Пользователи AppDataРоумингAdobeОбщие каталог. Обратите внимание, что папка AppData по умолчанию скрыта, поэтому убедитесь, что она не видна.
2.) Если вы используете Mac, перейдите к /Пользователи//Библиотека/Поддержка приложений/Adobe/Общие.
3.) Удалите файлы, а затем запустите Adobe Premiere Pro.
4.) Если у вас возникли проблемы с поиском указанного выше пути, вы также можете просто перейти в «Настройки», а затем в Вкладка «Медиа-кэш».

Решение 3. Переместите файлы в другое место или переименуйте их
В некоторых случаях проблема может быть связана с указанным путем к видео- или аудиофайлам.
В этом случае нужно изменить путь к файлам, т.е. переместить их на другой диск или просто в другую папку.
Многие пользователи сообщили об этом, и это помогло им решить проблему.
Вы также можете попробовать просто переименовать файлы в том же каталоге, а затем попытаться импортировать файлы. Если это не сработает, просто переместите их в другое место.
Решение 4. Переустановите Premiere Pro
Если все вышеперечисленные решения не работают для вас, возможно, возникла проблема с установкой программного обеспечения, и вам может потребоваться его переустановка. Вот как это сделать:
1.) Откройте Creative Cloud.
2.) Удалите Adobe Premiere Pro, сохранив настройки по умолчанию (параметр удаления).

3.) Затем переустановите его и посмотрите, решит ли это проблему.
ОДОБРЕННЫЙ: Чтобы исправить ошибки Windows, нажмите здесь.
Часто задаваемые вопросы
1) Закрыть Premiere Pro и открыть снова. Затем создайте новый проект и попробуйте импортировать MP4 в Premiere Pro.
2) Сохраните другие запущенные проекты и перезагрузите компьютер.
3) Отключите и снова включите аппаратное ускорение.
Если вы видите «Файл имеет неподдерживаемый тип сжатия«, проверьте кэш мультимедиа и базу данных кэша мультимедиа в Premiere Pro. Выберите «Правка» > «Установки» > «База данных кэша мультимедиа» в Windows или Premiere Pro > «Установки» > «База данных кэша мультимедиа» в Mac OS. Запишите это расположение.
Один из них «Импортер сообщил о распространенной ошибке» сообщение об ошибке. Оно появляется при попытке импортировать видео на временную шкалу с помощью средства импорта. Это может быть вызвано многими причинами, например неподдерживаемым кодеком или форматом видеофайла.
Единственный реальный способ открыть файлы, которые не поддерживаются используемым вами программным обеспечением, — преобразовать тип файла в поддерживаемый файл. Преобразование гарантирует, что файл останется целым, и вы всегда сможете открыть его нужной вам программой. Вы можете сделать это с помощью онлайн-конверсионных сайтов.
Сообщение Просмотров: 124
Hi Guys, Today I am Going to Show You How to Fix “A low-level exception occurred in ImporterMPEG” Error in Adobe Premiere Pro?
If You’re Looking for the Commonly Searched Term “How to Fix Low-Level exception importer MPEG in Abo Premiere Pro?” (or) “A low-level exception occurred in ImporterMPEG”.You are at the Right Place to Get Your Answers & Solve the Issue/Error.
Adobe Premiere Pro is a top-selling and most often used Video Editing Program in the world. Adobe Premiere is a Non-Linear Video Editing Program launched in 2003 and was developed by Adobe Inc.Adobe Premiere Pro is used for editing videos along with audio editing ability. It can be used for many film projects, Professionals works, and much more. Adobe Premiere Pro is very useful for Individuals who are very much interested in creating and Editing video content. Adobe Premiere Pro can also be used alongside After Effects and Photoshop on many projects. Premiere Pro can be used on any platform like Mac OS or Windows computers. Adobe Premiere Pro has a very good attractive, flexible interface which makes everyone a fan of it.
If You’re a Normal Video Editor or Video Editing Professional, then You must have faced the low-level exception that occurred in ImporterMPEG Error. When You’re Working on Video Projects for a Long time, then This Error Often Appears at some point of time while editing a video. This Errors Can Come and Go Without any Indication. This low-level exception that occurred in ImporterMPEG Error can also be caused on some of the following occasions Like If you’re Using Older Versions without Updating, Accelerated Intel H.264 decoding is Enabled and sometimes it happens when you Didn’t Delete the Media Cache for a long period of time. Usually, a Simple PC Restarting (or) Reinstallation of the Program Can Fix the Issue in Some Cases. But This can’t Work for All Users.You Don’t Need to Worry About the Error, We are Here to Help you to Solve this Issue Easily. We Provide You the Help Guides Below, Just Follow the Below Given Methods One by One Correctly.
Check Out This: How to Transfer a Domain Easily from One Registrar to Another (In 3 Steps)? | Step-By-Step Domain Transfer Tutorial
Steps For How to Fix “A low-level exception occurred in ImporterMPEG” Error in Adobe Premiere Pro?
Method 1: Update Your Adobe Premiere to Latest Version
Whenever You Face any Issues or any Bugs with it, Try to Update Your Software to the Latest Version ( Not Only Adobe Premiere Pro, Whatever the Software it is).
Method 2: Disabling Intel H.264 Decoding Option
Step 1: First of all Run Adobe Premiere Pro and Navigate to Edit Tab and Select Preferences Option
Step 2: Under Preference Tab, Select the Media Option.
Step 3: Uncheck the Enable accelerated Intel H.264 decoding Option.
Step 4: Restart Adobe Premiere Pro.
Method 3: Switching the Mercury Playback Engine GPU Acceleration CUDA to Software Only
Step 1: First of all Run Adobe Premiere Pro and Navigate to File Tab and Select Project Settings Option
Step 2: In Project Settings, Select the General Option.
Step 3: Under Video Rendering and Playback, Change the Mercury Playback Engine GPU Acceleration CUDA to Mercury Playback Engine Software Only.
Step 4: Click Ok to Save and Restart Adobe Premiere Pro.
Method 4: Deleting the Media Caches
Step 1: First of all Run Adobe Premiere Pro and Navigate to Edit Tab and Select Preferences Option
Step 2: Under Preference Tab, Select the Media Cache Option.
Step 3: Click Delete Button to Remove the Media Cache Files.
Step 4: Restart Adobe Premiere Pro.
That’s It! You’re Done Man!
That’s All About this Post. Give Your Reviews / Reactions about this Post and Leave Comments, Ask Your Doubts, We are here to Help You!
Basically an Instrumentation Engineer But Very much Interested in Blogging. I’m a Passionate Blogger and an Expert in Search Engine Optimization And Always Looking Forward to Learn New Things. I Would Fix & Provide Solution to the Most Common Issues Related to PC,Laptops,Mobiles,OS, Hardwares and Softwares.
![]()
A low level exception occured in ImporterMPEG(Importer:37). What is the root cause of this issue? Because sometimes randomly this doesn’t happen and I get to run the software smoothly, but when this happen’s I can’t specifically find how to solve importer:37 issue. Seeking help. I reinstalled, updated, went back to the previous version, but the error still persisted. And randomly it decides to work again. I have delayed my project for over 3 weeks now and finally it was back up yesterday. Today I am having the error again. Any help or any knowledge regarding this issue will be appreciated.
-
Главная
-
Vale V
-
How to fix low-Level Exception — Importer MPEG Importer:8 Premiere Pro CC
Просмотров: 3 574

Если вам понравилось бесплатно смотреть видео how to fix low-level exception — importer mpeg importer:8 premiere pro cc онлайн которое загрузил Vale V 25 мая 2020 длительностью 00 ч 03 мин 59 сек в хорошем качестве, то расскажите об этом видео своим друзьям, ведь его посмотрели 3 574 раза.

Kris
2 дня назад
MANNN YOU SAVED MY LIFEEE BROOO THANKYOUUU!!!

BRANDIKRATER
1 неделя назад
THANK YOU SO MUCH, YOU SAVED MY LIFE!!!! YOU ARE A GENIOUS!!! 🙏🙏

DL Photography
1 неделя назад
THANK YOU SOO MUCH
for giving me my project back

A.O. Hamer — The Artist
1 месяц назад
F**CKIN’ LIFESAVER!!!!!! THANK YOU 👏🏾👏🏾👏🏾👏🏾 I was going INSANE!!

Lahiru Kariyawasam
1 месяц назад
Absolutely work 🙏🙏🙏❤

Vinaphuong Studio
1 месяц назад
It’s work, thank bro!

Subash Editor
1 месяц назад
Thank you 🎉❤

ARSHAD
3 месяца назад
Thank you soo much man

Aircraft
3 месяца назад
IT WORKED!!! I LOVE YOU

Александр Ретин
5 месяцев назад
Doesn’t working!

Barri
5 месяцев назад
Thanks a lot my friend!

Balasubramanyam M
5 месяцев назад
Thanks a lot brother! my problem got solved.

edit
8 месяцев назад
شكرا شكرا شكرررررا شكرا شكرررا من قلللبي❤️❤️❤️❤️❤️❤️❤️

GMC files
9 месяцев назад
u saved my life ❤❤❤❤❤❤ uwu

Baby Pinhead
9 месяцев назад
* PSA ! *…Nothing technical worked for me. I got “error : 81” while trying to import an mp4. All I had to do was crop it in a different video software and it worked. To be specific, what I did was import to IMOVIE instead, crop it, export it, then importing it to Premiere worked 😂 So I guess the error can also come from buggy dimensions 💀

Ivanov Marius
10 месяцев назад
Not working for me…

Irving José Baldirio Rivas
1 год назад
Have tried 3 possible solutions, but any didn»t work. This one from you Vale Adventure fixed my «low level exception» problem!!

КАТИМ С НАМИ
1 год назад
didn’t help me

Trx_channel
1 год назад
Trimakasih banyak atas tutorialnya dan ahirnya sanya menemukan solusinya thanks sir

TUBE GROW
1 год назад
Thanks Dude For Saving My $350
A lower-level exception occurred in ImporterFastMPEG (import)
I recently bought and installed 14 elements Photoshop and Photoshop elements 14 first.
Having problem adding media files from a hard drive to 14 first of Photoshop elements for editing.
Successfully, I had changed a MPEG-2 TS video file and exported as a .mp4 file.
Now any further video file does not open.
I’m getting «a low-level exception occurred in ImporterFastMPEG (import)» constantly.
What does this error message mean? And what are the probable causes?
When the mouse is placed over the strip of video editing at the bottom of the application window, the name of displayed file is correct, but no pictures are visible.
Get this same error on the same original file which has been successfully changed earlier.
Have restarted first elements 14. No change.
Restarted the PC and restart first elements 14. Always make the same mistake when any video file is opened.
First Elements14 is up to date.
Is a re-installation required?
Running Windows 7 Pro 64 bit with 16 GB of memory.
Rant, good news! The converter is probably done the same thing that would have made brake hand.
Please mark this question as answered.
error — operation of menu not valid and a lower-level exception occurred in ImportMPEG (importer) how can I fix this?
When I export a file in Adobe Premiere Pro, I get the error: operation of menu invalid and a lower-level exception occurred in ImportMPEG (importer) how can I fix this?
I am running Windows 8.1 Pro, Intel Core i7 — 5930K @ 3.50 GHz CPU
RAM — 16 GB
Adobe Premiere Pro CC 2015
Premiere Pro CS6 — a low level exception occurred in ImporterMPEG
Hi Adobe community.
I am having a bit of a problem with the ImporterMPEG.prm for Premiere CS6 Pro plugin that is causing playback and export issues.
Specifications of the computer: Win7 PC, NVIDIA GeForce 6150SE nForce 430 graphics card
Description: After video for a while, first finally start playing repeatedly have reported «a low-level exception occurred in ImporterMPEG. The preview player will be frozen, and I won’t be able to export. Export fails with a generic message «unexpected error».
This issue has only started a week ago. So far, I was able to use Premiere Pro CS6 without any problem. If possible, I would avoid the upgrade to 2014 CC, because the CS6 version was working fine before.
So far, I’ve tried a few things:
• Deactivation and reactivation (which, moreover, apparently is not help users subscription like me, by my recent chat with Adobe support on this issue)
• Uninstall and reinstall (I didn’t know the CC cleaning tool at the time, so I didn’t try a clean uninstall yet)
• Change the preview File Format in the settings of the sequence (from i-Frame only MPEG who had worked since I installed the software for more than a year to Microsoft AVI)
• Crying silently to myself (it did not help, the computer is cold and cruel)
• Compensation to the media cache (that I had never done it before and let it get up to ~ 75GB without noticing me)
• Move the plugin from its location in Program Files, in the hope that maybe Premiere Pro would notice was missing and try to find a new cool (it did not)
So far, only the preview File Format change appeared to bring relief, but bad behavior came back after about a week.
I think that maybe the ImporterMPEG.prm plugin has been corrupted somehow? The only notable thing, I remember with the computer in the course of the last few weeks has been a power event that suddenly stop my computer. I think that was my first Pro open at the time.
If it is relevant, I work mostly with. AVI. MP4, and. TS files my FPS and projects, all the different resolutions. I’m usually working with about 1 GB of files in a project, very rarely more than 2 GB.
Does anyone else have this problem? Or, better yet, someone else has solved this problem?
Thank you!
But really, the real solution for me was don’t update Premiere Pro CS6 after a reinstallation. The latest updates do not like my computer, I guess.
Thought I’d post the solution here in case anyone in the future has this problem. (relevant: xkcd: the wisdom of the elders)
-Sam
First Pro CC encoding failed because of a low level exception occurred in: color of Lumetri (AEVideoFilter)
Trying to export the video to DVD (MPEG2-DVD) format… He began to make video ‘normally’ up to 10-50 minutes… Tried several times, the modified video quality and output training has changed, always stop with the same error code.
Is there something to do… ?
-Encoding Time: 02:22:33
26/06/2015 21:40:48: encoding failed
————————————————————
A lower-level exception occurred in: color of Lumetri (AEVideoFilter)
Export error
Movie compilation error.
Unknown error.
Hello
If you have a solution that you have found, please return to the thread and let us know. We can only assume that you have solved your problem. In general, you will get these types of errors when you exhaust the system resources such as VRAM, RAM memory, or both.
The solution or workaround is to use software mode only for the Mercury playback engine. You can also buy additional equipment that can help the work.
Thank you
Kevin
A lower-level exception occurred in: (GPUVideoFilter::DisposeInstance)
I am unable to get my video to play audio only. Some of my linked files, After Effects does not show either. All this occurred after the last update CC.
Yes, I have a third-party plugin that should probably be updated. But when I got that out I still didn’t play back video. I found the thread on the forums where some suggested a disabling mercury pass and allowed me to have a video playback again. Now I can finally resume production. It be nice to have this problem however, I wouldn’t have a product worse experience with a new update. The experience should improve. Your customers aren’t your test subjects, please fix as soon as POSSIBLE.
How to fix a ‘low level exception occurred in adobe player?
Timeline now not reading images and prevent me from working.
IM using an iMac, OSX Version 10.8.5. 3.2 GHz Intel core i5 processor. 32 GB OF RAM.
All updates for first pro have been made and still the problem.
Any help would be greatly appreciated.
Thank you.
Hi DavidRanson01,
Welcome to the forums.
Please try to clean the cache files of media manually from the location below. Reboot the machine and then re-launch your project to verify whether or not it solves the problem.
/ Users/username/Library/application support/adobe/common
Kind regards
Vinay
A lower-level exception has occurred
Hello
Has left my company CS6 to CC2015. Since install on machines (6), get us frequent crashes, freeze ups, to force them to leave.
Initially, FX Factory was the culprit, as they had not yet updated to CC2015. They fixed this issue.
I know there are 1 million of factors that go into an accident, but this is ridiculous. Editing on a MacPro trash with 32GBs of RAM and double video cards
should not produce these results. Mixed footage, 1080 p and 4 k, warp stabilizering on the nested sequences and color Lumetri. I keep getting a red box in the lower right hand
corner of tell something about an MPEG overview do not… Then playback in the window of the program hangs and I have to force quit.
I’m reading mercury to the software only and see if it works. Someone at — it met similar problems?
Thank you
Dan
Edit: title changed to better reflect your current number. Thanks, KM
Kevin,
If you’re still on the wire, I understood the question.
In the studio, we do an edition lite on an iMac i7 with 16 GB of RAM.
Adobe asked today and went through the NVIDIA Cuda driver update.
Changed the first adjustment to optimize CUDA and bang, problem solved.
On the Mac Pro, there are two graphics cards AMD over-pants D700 with 32 GB of RAM.
I started to update the drivers and realized that they are not CUDA. Looked on the forums
and I’m not alone. It seems that there was and is always unplug a huge on Adobe products
using the parameters of high-end of the Mac for graphics cards. Apple says that Adobe, Adobe, Apple said. Am I wrong?
New Mac Pro, more recent Adobe CC… can they be optimized without crashing?
Thank you
Dan
Why do I get «low level exception» and «out of memory» problems/failures?
My system should be able to handle EVERYTHING, but it’s not:
Model name: Mac Pro
Model identifier: MacPro6, 1
Processor name: Intel 8-Core Xeon E5
Processor speed: 3 GHz
Number of processors: 1
Total number of cores: 8
(By heart) L2 Cache: 256 KB
L3 Cache: 25 MB
Memory: 64 GB
Boot ROM version: MP61.0116.B16
Version of the SCM (System): 2.20f18
Version of lighting: 1.4a6
Dual AMD over-pants D700
I keep getting warnings and accidents when using various «up-to-date» filters Noise industries. Occurs usually when there are multiple filters on a clip, but it also happens with only one filter.
Hi AD,.
I suspect the FX Factory plug-ins for the memory leak problem that you are experiencing. You can try some alternatives or some native effects instead, then see if you experience the same problem?
Thank you
Kevin
low-level genarts and Sapphire exception error
Hi guys,.
for about one or two weeks, I get «exception of low level error» messages whenever I try to use a sapphire or transition effect.
Had no problem before, so I’m really curious.
Tempted to go Cuda cl only, open software
deleted manytimes caches
and even uninstalled first and reinstalled.
Still having this issue.
My system is a Macbook Pro retina 15 » running Mavericks and first Pro CC 9.2.0
The Sapphire is v9.02
I hope someone can help me!
Got a solution of GenArts support!
If anyone happens to have the same questions,
Here is the info:
Open the file/Library/Application Support/GenArts/SapphireAE/s_config.text with a text editor.
Find the line that says «use_gpu: Yes» and to take «use_gpu: no» and save the file.
Then restart the first and see if that fixes it.
The only thing I find my s_config.text file in this folder: Applications/GenArtsSapphireAE/config
Low-level Poster.png just a white box on IE8
Hello world
I’ve created a banner of edge animate very simple of an image background and two text layers that fade, it shows perfectly in everything except for IE8 (understandable) and I suppose IE7, all I see is a white box.
I inserted the movie via Dreamweaver using Insert/Media/Edge animate Composition, he went into a «mainbanner» with CSS div:
{#mainbanner}
Clear: both;
Width: 1000px;
margin: 0 auto;
border: 0;
padding: 10px;
}
These lines of code were inserted into the < head > section of the following Dreamweaver template and page index.php:
< meta http-equiv = «X-UA-Compatible» content = «IE = Edge» / >
< meta http-equiv = «Content-Type» content = text/html»; Charset = UTF-8 «/ >»
This code has been applied to the div «mainbanner» of Dreamweaver after doing Insert/Media/Edge animate Composition:
<! — views of tag following a Composition to animate dashboard — >
«< object id =»EdgeID»name =»EdgeID»type =» text/html»width =»1020″height =»437″data =».. «/ edgeanimate_assets/jb_mainbanner/Assets/jb_mainbanner.html» >
< / object > < / div >
Don’t know why, a width 1000px animation has a width of 1020px shown in the code when importing again shows correctly as 1000px in the browser but good!
I checked that the low-level (Poster.png) poster, I created has been linked to the animation. has been uploaded to the web server. shows the static version of the animation, but after an entire night trying everything I can think whatever I still get on IE8 is a white box!
Can someone give me please help with this, thanks in advance.
Chris
Sort by the white box!
I had to rename the div to be #Stage in my CSS file instead of #mainbanner.
Only problem now is that IE8 now does not want to recognize the #Stage div and place the foot bar of page behind the top of the Poster.png displayed correctly. Argh!
Close this post and open a new re: above question.
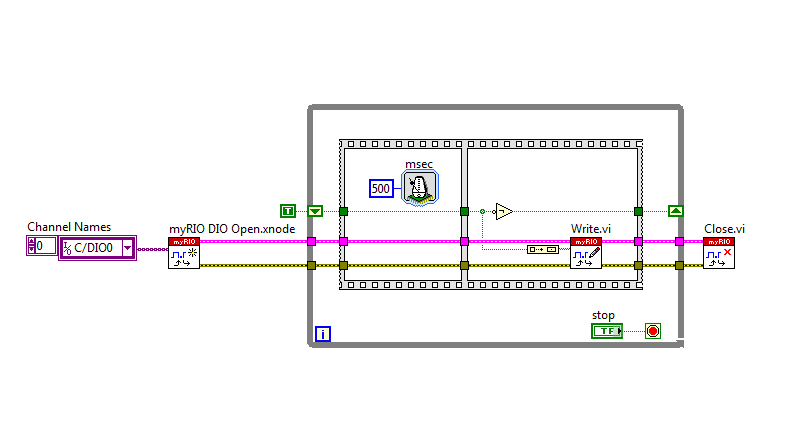
myRIO low level screw
Good afternoon
I try to use the low level with a myRIO screw. Here is the block diagram with all deleted except blocks of low digital output (the calendar has also been changed to create a pulse every two seconds):
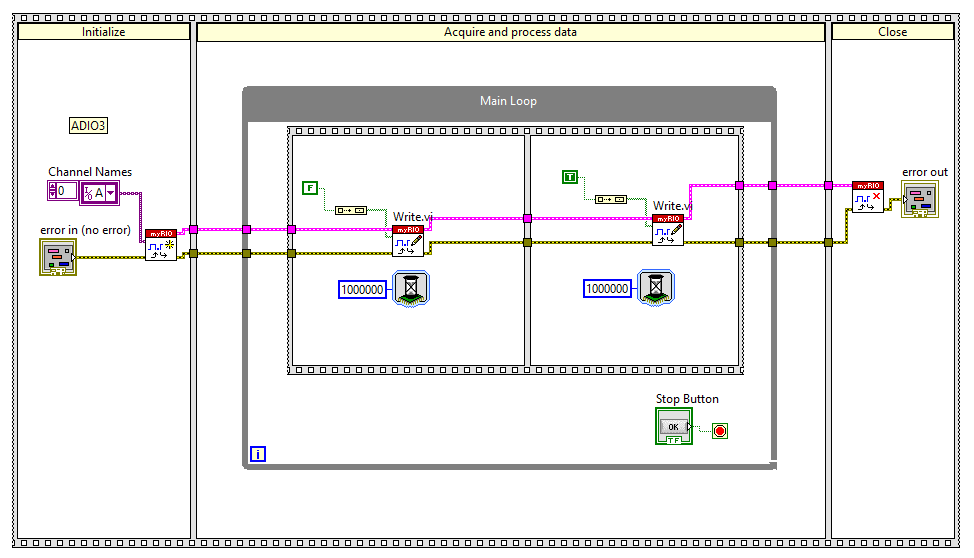
I know that there are easier ways to do it, but I’m learning how to use low screw when I run the code, everything seems to work properly (the debugger is normally done without errors), but the result is just 3.9 volts.
Can someone tell me what I am doing wrong? The project is attached (zipped).
Thank you
John
John,
I don’t know what could be going on here. I tried all three pieces of code you have posted and all of them worked for me. The only thing I changed was I used DIO ports on connector C. I know it’s kind of a stupid question, but are you sure that you are using the correct pins on your connector? Are you sure that you have defined the correct lines of DIO in the program? Maybe try the connector B or C to see if those who work.
You’re right in that low screw run more quickly than the screw Express.
In addition, for the first bit of the code, here would be a better way to structure, using the RT wait next multiple VI to control loop rate:
Get information from the low level of the Subvi ni5660
A quick explanation of the problem: I need to create several VI just to return a value of the PXI-5660 (ex: Center frequency, Span, etc.) while the entries are only a «VISA» and one «error in.»
Detailed explanation of problem: I need to create multiple VI that the properties ‘Set’ or ‘Get’ of the PXI-5660 module (ex: the Central frequency value, get frequency, etc…). Each VI must have a VISA in/out and in/out Error, but the only other present in/out should be the property of game/called. Global variables are not allowed.
One of the biggest problems for me is that ni5660 drivers do not contain a property node. I managed to (apparently) set some of the properties by feeding only a single entry in the icon ‘configure ni5660 for spectrum’, but the only tool that seems to be able to output all information is the icon «MT get Attributes» The release of ‘MT get Attributes’ does not contain many of the properties that I need good output.
I tried to use the icon ‘MT get Attributes’ linked to «ungroup by name» which has the value «handle receiver.handles.niScope» which feeds on the reference to a property niScope node, hoping that I would be able to obtain information through the niScope 5660 (it seems that ni5660 software uses the niScope on a lower level software «, correct me if I’m wrong). This VI finished, when put online with the ‘ni5660 Initialize.vi’ and ‘ ni5660 Close.vi, ‘ returned the error (-1074135028) with the explanation ‘ID attribute not recognized.’ «» (The error occurred on the property node in the Subvi «Get the Central frequency»)
The goal is to make the action of PXI chassis similar to a HP8563E Spectrum Analyzer. With this in mind, the list of attributes that I will need in the end to set and get (the separate VI) are the following: Center frequency, Span, window, number of Points, resolution bandwidth, level of reference, mitigation and time sweep.
I apologize for my (very probably) simple question, but endless (I only started programming in LabVIEW there about 2 weeks). If someone would be able to point me in how to make apparently PXI-5660 current property settings from thin air, I would be very grateful. If more information or details are needed, feel free to ask.
Thank you
zdunn wrote:
….
but unfortunately, I’m still at a loss, how to create a VI that «calls» that same property back and the fate, while using only ‘VISA In’ and ‘In Error’ as inputs.
Located on how silly that statement. You want to create a function where (for example) you want to set the resolution bandwidth and do not want to pass as a parameter the name of the instrument. You have created the programming language that is able to read minds?
You can use a function where you can pass a parameter in (or use a function that retrieves a parameter) or do nothing at all with the instrument. It is more complicated than that.
There are tutorials available that can help yu with LabVIEW to learn, but I think that there are certain fundamentals means.
Edit: Sorry, I may have misunderstood. to query does not require an entry but I don’t understand what you want to query. The parameters of the instrument are all under control stripped — a program you or any other writing. Unlike a GPIB instrument, there is no one ‘?’ command to read a rear frame. It is assumed that you know how the instrument has been configured in the first place.
Question/problem of low-level Stadium
Hello
As I understand it, the image of low level scene should display when an Edge animation is displayed in a browser with Javascript disabled.
If that is correct, then it does not work for me, either in the preview in the edge browser animate, or when he published and used a site built with Muse.
Tested with IE 9, 16.01 FF, Opera 12.02 w / JS disabled. In all cases, neither animation nor the poster is displayed.
Yes, I read the answers to the message of Vancouver Joel re: «low level does not work» to
http://forums.Adobe.com/message/4730549#4730549
but here, anything.
My animation film is very simple; It just uses native ellipses, text using arial fonts, nothing special.
The image of the poster I selected is present when I inspect the stage of low level.
Same problem occurs with a more complex animation.
Any ideas?
Thank you!
Hey wbaafs, the phase at a lower level will not appear with JS disabled because it requires searching for information on the preloader.js file. However, you can manually mak your own rescue using the noscript tag:
Exception occurred during the event dispatching: java.lang.NoSuchMethodError
Hello
We have upgraded to the latest Oracle Application Server version 10.1.2.3.0 and webutil version 1.0.6.
But we are facing the following error while accessing the web link. Message captured from the Java Console.
Please suggest if you have a solution/idea about this error. Thank you!
Oracle JInitiator: Version 1.3.1.22
Using JRE version 1.3.1.22— internal Java hotspot Client VM
Maximum size: 50 MB
Compression level: 0 -.
c: clear console window
f: finalize objects on the finalization queue
g: garbage collection
h: display this help message
l: dump classloader list
m: print memory usage
q: Hide console
S: dump system properties
t: dump thread list
x: delete the cache of class loaders
0-5: set the level of trace to < n >
—————————————————-
Download http://si02938.in.irt.com:7778/forms/java/frmall_jinit.jar to JAR cacheDownloading http://si02938.in.irt.com:7778/forms/java/frmwebutil.jar to JAR cacheDownloading http://si02938.in.irt.com:7778/forms/java/jacob.jar to JAR cacheDownloading http://si02938.in.irt.com:7778/forms/java/FileInformation.jar to JAR cacheDownloading cacheproxyHost = nullproxyPort = 0connectMode = HTTP, native.
Version forms cmdlet is: 10.1.2.3
Exception occurred during the event dispatching: java.lang.NoSuchMethodError at oracle.forms.webutil.common.VBeanCommon.init(VBeanCommon.java:281) at oracle.forms.handler.UICommon.instantiate (Unknown Source) at oracle.forms.handler.UICommon.onCreate (Unknown Source) at oracle.forms.handler.JavaContainer.onCreate (Unknown Source) at oracle.forms.engine.Runform.onCreateHandler (Unknown Source) at oracle.forms.engine.Runform.processMessage(Unknown Source) at oracle.forms.engine.Runform.processSet(Unknown Source) at oracle.forms.engine.Runform.onMessageReal(Unknown Source) at oracle.forms.engine.Runform.onMessage(Unknown Source) at oracle.forms.engine.Runform.processEventEnd(Unknown Source) at oracle.ewt.lwAWT.LWComponent.redispatchEvent(Unknown Source) at oracle.ewt.lwAWT.LWComponent.processEvent(Unknown Source) at java.awt.Component.dispatchEventImpl (unknown Source) at java.awt.Container.dispatchEventImpl (unknown Source) at java.awt.Component.dispatchEvent (unknown Source) at the java.awt.EventQueue.dispatchEvent (Unknown Source) at java.awt.EventDispatchThread.pumpOneEventForHierarchy (unknown Source) at the java.awt.EventDispatchThread.pumpEventsForHierarchy (Unknown Source) at java.awt.EventDispatchThread.pumpEvents (unknown Source) at java.awt.EventDispatchThread.run (Unknown Source)
Published by: user12233243 on November 16, 2009 22:28
Published by: user12233243 on November 16, 2009 22:29
Hello
Your welcome, but you need to mark it as correct or relatively useful because other users will be able to solve their problems.
Sarah
Автор:
Roger Morrison
Дата создания:
17 Сентябрь 2021
Дата обновления:
1 Апрель 2023
Содержание
- Что вызывает сообщение об ошибке «Импортер сообщил об общей ошибке» в Adobe Premiere?
Adobe Premiere — одно из ведущих программ для редактирования видео. Adobe Premiere Pro является преемником Adobe Premiere. Программа была впервые представлена в 2003 году и вскоре получила известность благодаря удобному интерфейсу, функциям и эффективности. Как и любое другое приложение, оно время от времени вызывает у пользователей несколько ошибок. Один из них — «Импортер сообщил об общей ошибке‘ сообщение об ошибке. Это появляется, когда вы пытаетесь импортировать видео на временную шкалу с помощью импортера. Это может быть связано с множеством причин, например, неподдерживаемым кодеком или форматом видеофайла.
В этой статье мы рассмотрим сообщение об ошибке, обсудив его причины, а затем упомянем решения, которые вы можете применить, чтобы избавиться от сообщения об ошибке; тщательно. Итак, начнем с причин.
Как мы упоминали ранее, сообщение об ошибке появляется, когда вы используете импортер для импорта видеофайлов. Это может быть связано со следующими причинами:
- Неподдерживаемый кодек: Все устройства видеозаписи используют разные кодеки. Если кодек не поддерживается программным обеспечением Adobe Premiere Pro, вы не сможете импортировать его на шкалу времени. В таком случае вам придется изменить кодек видеофайлов.
- Неподдерживаемый формат видеофайлов: Adobe Premiere довольно щедро предлагает формат видеофайлов, однако он не поддерживает все форматы видеофайлов по очевидным причинам. Поэтому, если видео, которое вы пытаетесь импортировать, не поддерживается приложением, вы, в конечном итоге, наткнетесь на сообщение об ошибке.
- Проблемы с активацией: По словам Adobe, проблемы с активацией иногда могут нарушить некоторые функции импортера. Поэтому убедитесь, что программное обеспечение активировано и вы вошли в свою учетную запись Creative Cloud.
- Имя видео файла: В некоторых случаях проблема также может быть вызвана названием видеофайла. В имени файла могут быть символы, которые вызывают всплывающее окно.
С учетом сказанного, давайте перейдем к реальной части и поможем вам пройти через это испытание. Пожалуйста, следуйте всем предложенным решениям, если одно или два из них не работают для вас.
Решение 1. Проверьте формат видеофайла и кодек
Первое, что вам следует сделать, когда вы столкнетесь с сообщением об ошибке, — это убедиться, что формат видео и кодек поддерживается Adobe. Некоторые кодеки не поддерживаются Adobe Premiere, например, Adobe отказалась от поддержки кодека QuickTime. В таком случае вам придется перекодировать отснятый материал в более новый / современный кодек.
Точно так же, если формат видеофайла не поддерживается Adobe, вы не сможете импортировать файл. Точно так же вам придется изменить формат видеофайла, что довольно просто. Пожалуйста, обратитесь к этому ссылка на сайт список поддерживаемых форматов видеофайлов.
Решение 2. Очистка кеша файлов мультимедиа
Еще вы можете попытаться удалить кэш медиафайлов, а затем попытаться импортировать файлы. Когда вы импортируете видео или аудио файлы в Adobe Premiere, он сохраняет версии этих файлов, к которым он может быстро получить доступ снова для повышения производительности. Эти сохраненные версии называются файлами кэша мультимедиа. Вот как удалить файлы:
- близко Adobe Premiere Pro а затем перейдите к Users AppData Roaming Adobe Common каталог. Обратите внимание, что Данные приложения По умолчанию папка скрыта, поэтому убедитесь, что вы ее открыли.
- Если вы используете Mac, пожалуйста, перейдите к / Пользователи // Библиотека / Поддержка приложений / Adobe / Common каталог.
- Удалите файлы а затем запустите Adobe Premiere Pro.
- Если у вас возникли трудности с поиском указанного выше пути, вы также можете просто перейти на Предпочтения а затем перейдите к Медиа-кеш таб.
Решение 3. Переместите файлы в другое место или переименуйте их
В некоторых случаях проблема может быть связана с указанным путем к видео- или аудиофайлам. В таком случае вам придется изменить путь к файлам, то есть переместить их на другой диск или просто в другую папку. Об этом сообщили многие пользователи, и это помогло им решить проблему.
Вы также можете попробовать просто переименовать файлы в том же каталоге, а затем попробовать импортировать файлы. Если не работает, просто переместите их в другое место.
Решение 4. Переустановите Premiere Pro
Если все вышеупомянутые решения не работают для вас, возможно, возникла проблема с установкой программного обеспечения, и вам придется переустановить его. Вот как это сделать:
- Открыть Creative Cloud.
- Удалить Adobe Premiere Pro при сохранении настроек (опция при удалении).
- После этого установите его снова и посмотрите, решит ли он проблему.
When importing media to Premiere Pro, are you seeing “The Importer Reported a Generic Error”?
If so, read on! This article will look at what causes the error and how to fix it.
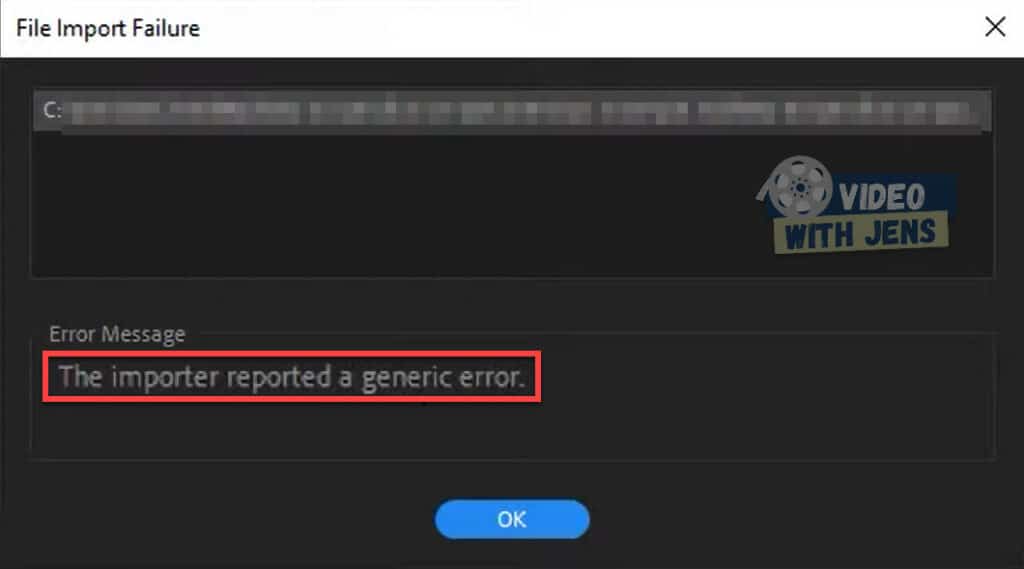
If you are getting “The Importer Reported a Generic Error,” Premiere Pro cannot read the file you are trying to import. The error usually occurs due to an unsupported codec or a file location not accessible to Premiere Pro.
Here’s a video of how to fix the error:
1. Make Sure Your Video Codec is Supported
The most common reason people are getting the “The Importer Reported a Generic Error” is that their video is encoded by an codec which Premiere Pro does not support.
Look for your video’s format and codec in this list from Adobe; if you can’t find it, this is likely triggering the error.
Here’s how to check what codec your video is using:
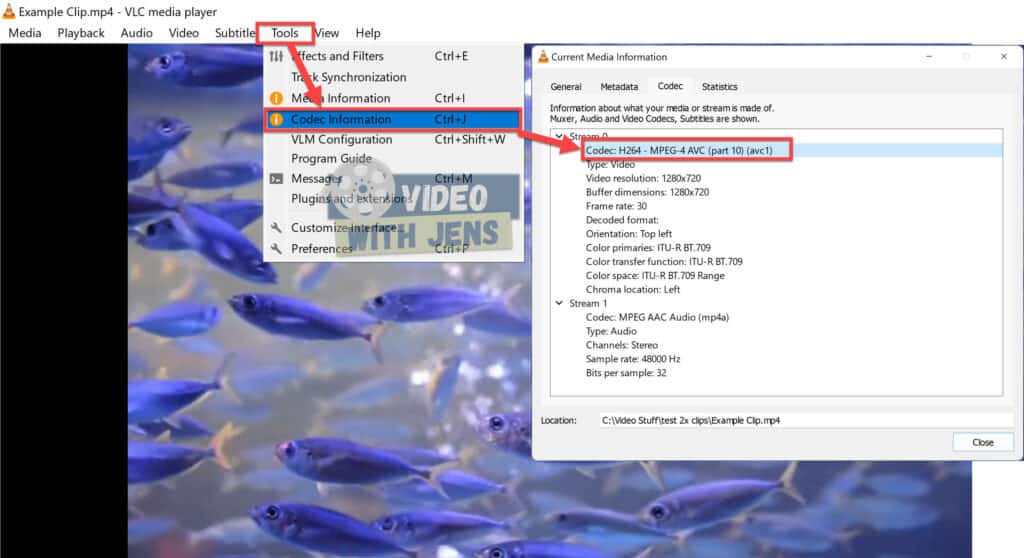
I recommend using VLC media player to check this (free, super popular software); here’s a link to where you can download it.
Once you’ve downloaded and installed VLC, open your video using the software.
- On Windows: Right-click the file > Open with > VLC media player.
Inside VLC, click on Tools > Codec Information.
In the image below, you can see that next to Codec it says H.264, which is my codec. Since I can find the codec in the list at Adobe, this is not what’s causing the error for me.
1.1 How to Transcode
If your video has an unsupported codec, you can transcode the video using VLC as well! Here’s an article explaining how to do that.
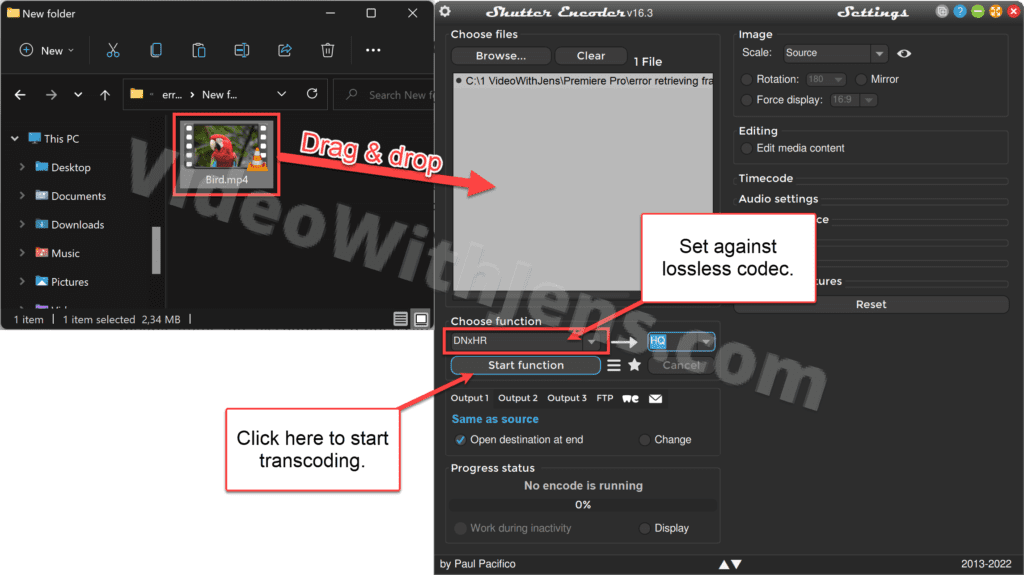
However, I recommend downloading another free software called Shutter Encoder (open in a new tab), which is known to encode videos in high quality and offers better codecs.
Here’s how to transcode the file using Shutter Encoder:
- Drag and drop the video on top of the white box inside Shutter Encoder.
- Under Choose function, select a lossless codec to prevent quality loss.
- I recommend DNxHR (4K) or DNxHD (1080p).
- Click on Start function to transcode.
- You’ll, by default, find the file in the same folder as the original video clip(s) once it’s finished.
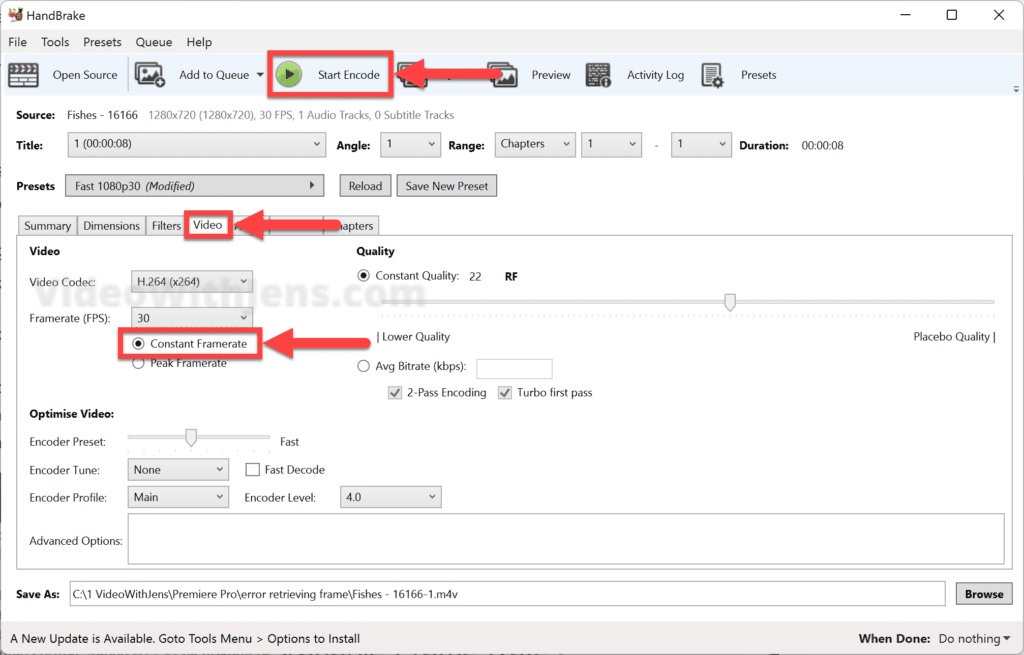
1.2 Convert Varible Frame Rate (VFR) to Constant Frame Rate (CFR)
Sometimes videos of variable frame rates have been found to trigger errors in Premiere Pro. Although supported, most NLE software has difficulties dealing with such frame rates.
This is primarily relevant if you have been screen-recording games using software like OBS, Fraps, etc.
A quick fix to this problem is using HandBrake (open in a new tab), yet another free, excellent software.
- Drag and drop the video on top of the software to import.
- Open the Video tab.
- Under Framerate (FPS), tick off the Constant Framerate option.
- Click on Browse (at the bottom) to set an export location.
- Click on Start Encode to convert the file.
2. Make Sure the File Format is Supported
Another reason that might be triggering “The Importer Reported a Generic Error” is that it’s an unsupported format. Contrary to solution 1, this solution is also relevant to images.
- The format is not the same as the codec.
To ensure this is not causing the import error, check if your format is included in the list of supported file formats on adobe’s website. If you can’t find it, this is likely causing the error.
To check your video’s format:
- Right-click the file and select Properties.
- Next to Type of file you should be able to see the format:
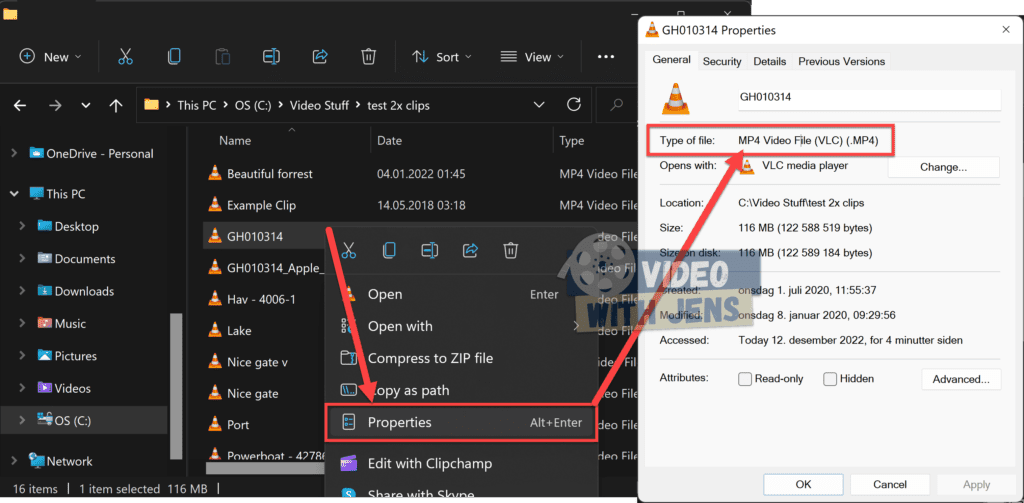
To fix this, follow the steps explained above on how to transcode a file.
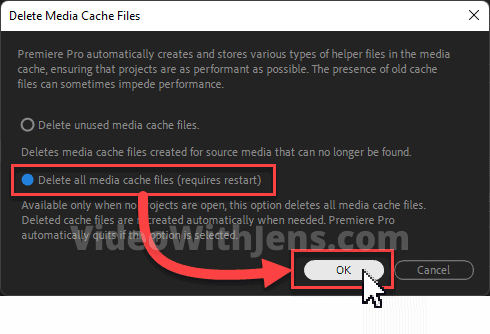
Sometimes the media cache files that are supposed to help you become corrupt and cause problems.
The media cache files are automatically generated when you import a new file to Premiere Pro. The cache file may have been created when you used it for another project, or it may have been right before you got the import error.
To delete the media cache files:
- Click on File > Close Project (remember to save).
- Only relevant if you have a project open.
- Click on Edit > Preferences > Media Cache.
- Under Media Cache Files, click on Delete.
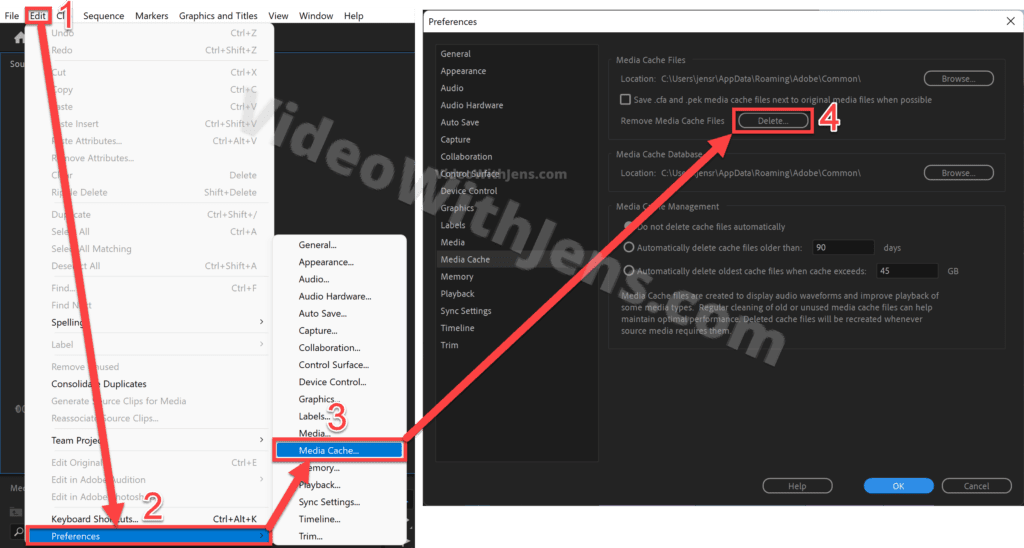
- Select Delete unused media cache files, and click OK.
- If that doesn’t solve the error, try the second option to Delete all media cache files (requires restart).
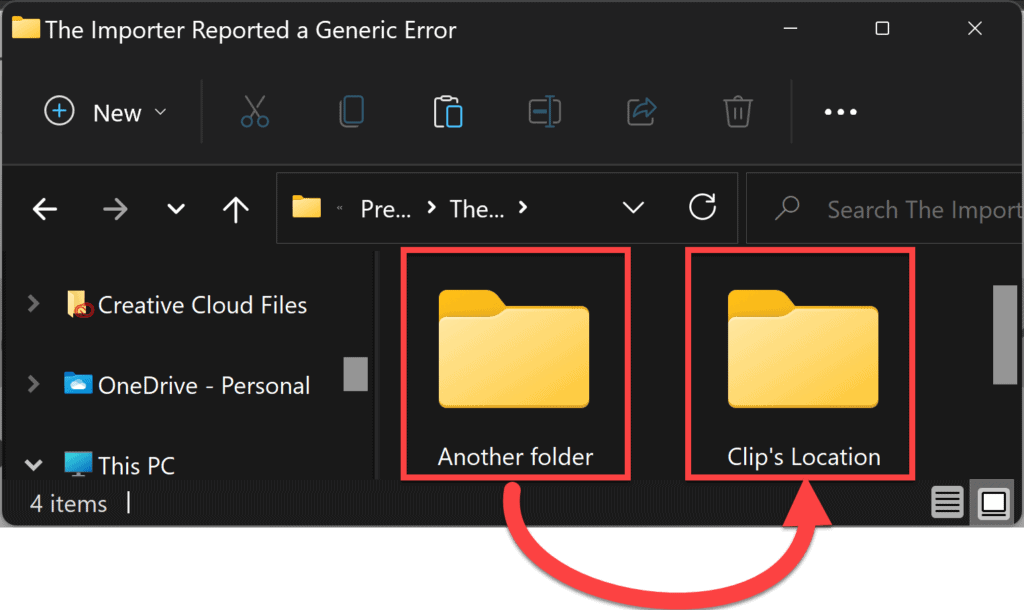
4. Move Files to a Different Location
Many users have successfully solved “The Importer Reported a Generic Error” by changing the location where their files are saved in their system.
One guy simply selected all his media, dragged it onto the desktop, and then dragged the files into Premiere Pro.
If you have multiple drives on your computer or are using an external storage device, try changing the location to another drive (preferably a dedicated fast drive).
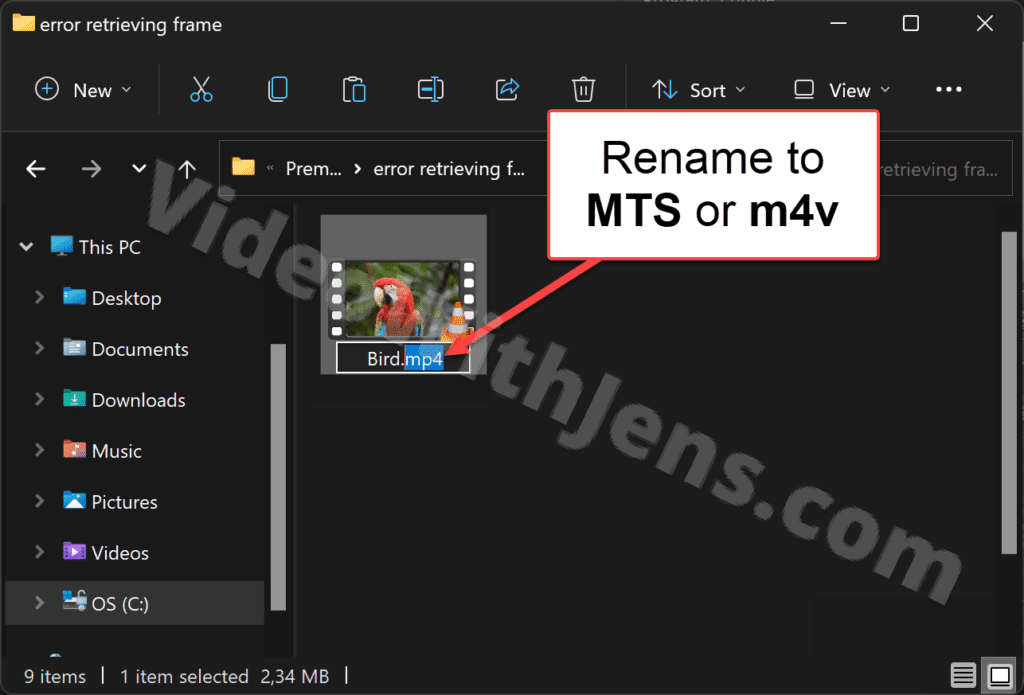
5. Change the File Extension Name
Another easy way to solve the import error is changing the file extension name.
I’ll show you how to do this on Windows if you use macOS; check out this article on how to show file extensions.
- Open the folder where your media is located.
- Click on View > Show > File name extensions.
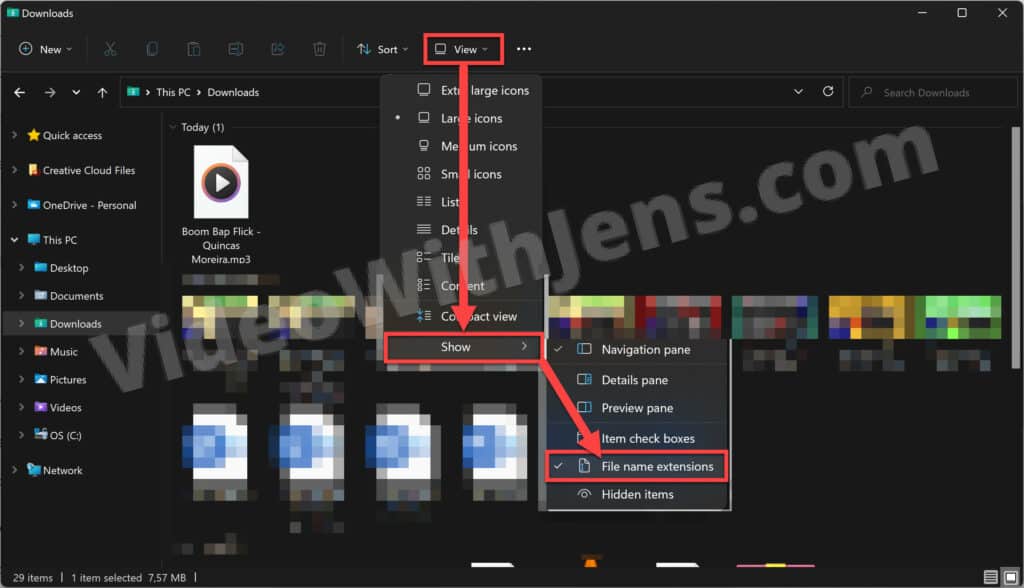
- Right-click the file causing the error > Show more options > Rename.
- Change the file name extension to “.MTS” and confirm the action.
- If you are having problems with an image, try changing it to “.PNG”.
- If you have problems with an audio file, try “.wav”.
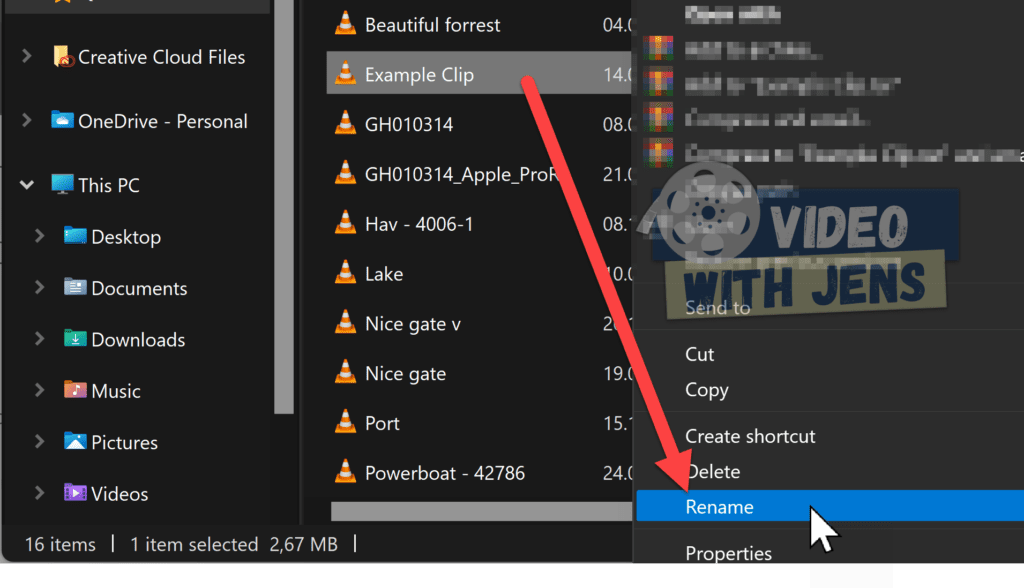
6. Change File Name
If your filename contains any special symbols or characters, try renaming the file using only characters from the English alphabet and standard numbers from 0-9.
To do this, right-click the file > Rename, and type in a new name.
7. Re-install Premiere Pro
Lastly, if none of the solutions above solved “The Importer Reported a Generic Error,” try re-installing Premiere Pro to ensure there are no software bugs causing the error.
You can do this in the Adobe Creative Cloud application on your computer.
- Go to Apps > All apps.
- Click on the three dots next to Premiere Pro, and select Uninstall.
- Once uninstalled, you should find Premiere Pro under Available in your plan on the same page.
Here’s a neat list of the most common errors in Premiere Pro and how to fix them; consider saving it for later!